Sorry guys, the video is in Portuguese, but it’s only follow the tutorial and you will create your test case on the software All Pairs. You have to jump to the 13:07ms because before this the guy was explaining about his company, who he is and theoretical things about Pairwise.
Category: Test Automation
Selendroid Mobile Gestures
Mobile Gestures
Selendroid is implementing the Advanced User Interactions API. This is a new, more comprehensive API for describing actions a user can perform on an app. This includes actions such as drag and drop or clicking multiple elements while holding down the Control key.
Supported Interactions
-
doubleTap(WebElement onElement)
-
down(int x, int y)
-
flick(int xSpeed, int ySpeed)
-
flick(WebElement onElement, int xOffset, int yOffset, int speed)
-
longPress(WebElement onElement)
-
move(int x, int y)
-
singleTap(WebElement onElement)
-
up(int x, int y)
Example
How to swipe from right to left
Java:
#Please import: org.openqa.selenium.interactions.touch.TouchActions
WebElement pages = driver.findElement(By.id("vp_pages"));
TouchActions flick = new TouchActions(driver).flick(pages, -100, 0, 0);
flick.perform();
My app doesn’t start when I run the command cucumber
Hello guys !
I hope you are fine. I am searching here for a problem that I had for the second time when I tried to run cucumber and calabash in a PC.
First, I got the installation of cucumber framework on the app, but when I run the command: cucumber. The splash screen appears a lot of times, but the app doesn’t start. It seems that the cucumber are trying to open the app and something is blocking.
After you have all configured, this problem won’t happen again. I am trying to reproduce the problem in my PC and since this already is configured the problem didn’t happen again. For this reason I think that it is some permission or update type of problem.
- Look on the launch.rb file inside the folder features/support if the line APP_BUNDLE_PATH is commented with # in front of. (Because this just have to be used as the last case if the app doesn’t start). There should generally be no need to set ANY environment variables for default project setups. APP_BUNDLE_PATH should only be set if Calabash is not able to detect it correctly. SDK_VERSION should only be set if you don’t want to run in the latest iOS simulator version. OS should never need to need to be set.
- Check if the cucumber is installed in the app:
calabash-ios check PATH_TO_IPA_OR_APP
- Disable your firewall: https://groups.google.com/forum/#!msg/calabash-ios/AXrXhGB2_mc/wIzR16Sm2IEJ
- Try running with sudo.
- Verify if your permission is of admin and what is the user that you is trying to run cucumber (must be the same)
- Verify if you have permission to access the page of the project and the .app with the user that you are using to run cucumber
- Have you built the -cal target from XCode?
- Are you using Xcode5? Have you run sudo xcode-select -switch PATH_TO_XCODE/Content/Developer.When using the final version of Xcode5 you should havexcode-select -print-path
/Applications/Xcode.app/Contents/Developer➜ ~ instruments
instruments, version 5.0 (51166)Xcode5 must be installed in the default /Applications/Xcode.app location - Please stop the simulator. Do not start it from Xcode, instead let Calabash launch the simulator.
- Make sure you use the iPhone Retina or the iPad simulator. There is a well-known bug with instruments and its ability to launch the iPhone (non-retina simulator).
- Try the following – it is the easiest way to test if it is working:In your project folder (typically the folder just above your ‘features’ folder), run:
DEBUG=1 calabash-ios console
start_test_server_in_background(:timeout => 30)
run_loop.out
What is the contents of this file? run
cat /var/folders/…/run_loop.out
- The password prompt seems to be bogus, as hit cancel still allows calabash to do what it needs to do, and everything works.To resolve the issue, I edited /etc/authorization:
           <string>user</string>

           <string>rule</string>
           <key>rule</key>
           <array>
               <string>is-developer</string>
           </array>
This changes system.privilege.taskport, which was using the implicit user rule to ensure the current user was a member of _developer to an explicit rule to do the same. The end security constraints should be identical, and now a password prompt is never shown for calabash. SSH runs work just fine.
security authorizationdb write system.privilege.taskport is-developer
- Try use this command to debug the session and discover what is happening:
DEBUG=1 calabash-ios console
- Start the installation again:
- Comment out the APP_BUNDLE_PATH definition on YourProject/features/support/01_launch.rb like
#APP_BUNDLE_PATH = "~/..../../myApp-cal.app"so The calabash gem can locate the app automatically. - Open a console go to the project folder from it. Then enter
gem install calabash-cucumberthis will install the calabash gem its ok to run again even if you installed it previously there’s no harm. - Now open the project file in xcode editor (You can see the calabash.framework added to your project’s framework group successfully.) select the yourApp-cal target and the simulator you want clean, build and run the your App-cal target on your simulator.
- Then stop it and come back to that console enter
calabash-ios consoleconsole will start a ruby console that you can work with the app. now (while simulator is on your screen but your app is backbround on that simulator) typestart_test_server_in_backgroundyour app must come to foreground. If that works the calabash can find and run your app on simulator. - Remember only if you create an app build on a separate folder using a xcodebuild command or script or something, thats the time to set the APP_BUNDLE_PATH variable.
- Comment out the APP_BUNDLE_PATH definition on YourProject/features/support/01_launch.rb like
- Look what is the result of these commands:
# xcode installation location
$ xcode-select --print-path
# xcode version
$ xcodebuild -version
# calabash version
$ calabash-ios version
# calabash.framework version
# start your app manually in the simulator or from Xcode
# and then launch a console
$ calabash-ios console
 server_version
- Look if it is enable, running this command:
DevToolsSecurity -status
- Try these steps:
- Update gem packages: sudo gem update
- Cleanup old gem packages: sudo gem cleanup
- Execute “Clean build folder…” in Xcode
- Close Xcode and simulator
- Delete all folders from /Developer/Xcode/DerivedData
- Reboot your computer
- Rebuild your project and run the tests
-
Try reset Simulators:
killall 'iPhone Simulator'
rm -rf ~/Library/Application\ Support/iPhone\ Simulator/
- You can turn on additional calabash debugging running:
DEBUG=1 CALABASH_FULL_CONSOLE_OUTPUT=1 calabash-ios console
-
Connect to calabash-ios console and use query when executing command:
DEVICE=ipad DEVICE_ENDPOINT=http://xx.xx.xxx.xx:37265 BUNDLE_ID=build/LPSimpleExample-cal DEVICE_TARGET=device calabash-ios console
- Follow these steps:
- Reboot the device
- Make sure you can see the device from XCode “devices” (Cmd-2) and that it is “green”
- Make sure the app is installed on the device
- Make sure you can run “profile” with automation from xcode
- Make sure the device doesn’t have a “autolock passlock code”
- Reboot your mac.
-
Use OS key for OS version, name key for device, key-value options list should be comma separated.For example:
xcodebuild -project ABC.xcodeproj -scheme ABC-cal -destination OS=6.1,name=iPad
- Clear the instruments:
- Run this command:
killall -9 instruments
- And restart the device sometimes works.
- Run this command:
- After trying all these things, restart your pc and try again:
$ SDK_VERSION=6.0 DEVICE_TARGET=simulator DEVICE=iphone cucumber
(This is the last hope… lol)
Thank you again !
Fonts:
https://groups.google.com/forum/#!msg/calabash-ios/AXrXhGB2_mc/wIzR16Sm2IEJ
https://github.com/calabash/calabash-ios/issues/203
https://github.com/calabash/calabash-ios#important-notice
http://www.gerardcondon.com/blog/2012/10/22/setting-up-calabash-on-ios/
https://groups.google.com/forum/#!topic/calabash-ios/b1f1sVtU0ys
https://github.com/calabash/calabash-ios/wiki/A0-UIAutomation—instruments-problems
https://github.com/calabash/calabash-ios/wiki/01-Getting-started-guide
http://stackoverflow.com/questions/24022823/ios-simulator-doesnt-launch-with-calabash
https://groups.google.com/forum/#!msg/calabash-ios/B3OUOYf7lFY/u8uBYGCOyosJ
https://groups.google.com/forum/#!topic/calabash-ios/ntpNi91DeCE
https://groups.google.com/forum/#!msg/calabash-ios/jfx9CvVoliw/EARXTGYdaFkJ
http://www.marshut.com/vutwq/for-people-with-launch-and-ios7-questions.html#imqxmw
What is headless browser ?
Every browser must to do 3 things:
- With an address, to access any site
- Render the content in DOM, run scripts inside of tag script and turns it able on the page
- Render the DOM in a visual content
A browser that do only the first item is called of “text-based”. A browser that surround the 3 itens is the browsers that we know nowadays. A headless browser surround both firsts itens.
So, headless browser is a browser that don’t have graphical interface, means: We don’t see the content of the page in our screen, but the browser runs any action on the URL.
What is its function?
Two things: As crawler and as a browser that do faster tests. The rising use of headless browsers is the capacity of run tests a faster way than a browser with graphical interface.
It turns more faster to don’t need load a lot of visual contents, as css styles on elements and load of images.
Think in a Continuous integration, each behaviour(commit, time, version…) a system of CI has to process (compile, unit tests with/or not integration, deploy, acceptance tests). In this process run the tests daily in a environment of CI will spend a lot of time to give us a feedback that we need.
What the people used to do is separate in few parts the most important scripts (smoke, sanity) with known tools (Selenium, Watir, Robot Framework), but these tests still spend a precious time on the execution because of the visual contents that they need.
Other people create scripts or just update them to execute on headless browser. This give to us a huge gain on execution and give to us a more faster feedback.
What are the headless browsers that we can use?
There are a lot of headless browsers on the market and the most part of them (and the best) are open source. They are developed on WebKit and Javascript. The most popular headless browsers:
- PhantomJS
- CasperJS
- SlimerJS (Gecko)
- HtmlUnit
- ZombieJS
And Selenium/WebDriver can run tests in the most popular headless browsers:
- HtmlUnit through of HtmlUnitDriver
- PhantomJS through of GhostDriver
If you have any doubt or suggestion, just write below !
Thank you again guys 🙂
Implementing cross-browser with Selenium
Hi guys !!
I wrote a simple example of how we can implementing cross browser code.
import java.io.File;
import java.io.IOException;
import java.util.Arrays;
import java.util.concurrent.TimeUnit;
import org.openqa.selenium.Proxy;
import org.openqa.selenium.WebDriver;
import org.openqa.selenium.chrome.ChromeDriver;
import org.openqa.selenium.firefox.FirefoxDriver;
import org.openqa.selenium.firefox.FirefoxProfile;
import org.openqa.selenium.ie.InternetExplorerDriver;
import org.openqa.selenium.remote.CapabilityType;
import org.openqa.selenium.remote.DesiredCapabilities;

public class CrossBrowsers {

    public WebDriver Select(WebDriver driver) throws IOException, Exception {
        try {
            //Switch browsers
            switch (driver.getBrowser()) {
                case "firefox": {
                    FirefoxProfile profile = new FirefoxProfile();
                    profile.setPreference("network.proxy.type", 0);
                    driver.setDriver(new FirefoxDriver(profile));
                    driver.getEnvironment();
                    break;
                }
                case "ie": {
                    DesiredCapabilities cap = DesiredCapabilities.internetExplorer();
                    Proxy proxy = new Proxy();
                    proxy.setNoProxy(environment);
                    cap.setCapability(CapabilityType.PROXY, proxy);
                    cap.setCapability(
                            InternetExplorerDriver.INTRODUCE_FLAKINESS_BY_IGNORING_SECURITY_DOMAINS, true);
                    cap.setCapability("ignoreZoomSetting", true);
                    cap.setCapability("ignoreProtectedModeSettings" , true);
                    cap.setCapability("initialBrowserUrl", driver.getEnvironment());
                    File file = new File("drivers//IEDriverServer.exe");
                    System.setProperty("webdriver.ie.driver", file.getCanonicalPath());
                    driver.setDriver(new InternetExplorerDriver(cap));
                    driver.get(environment);
                    break;
                }
                case "chrome": {
                    DesiredCapabilities cap = DesiredCapabilities.chrome();
                    Proxy proxy = new Proxy();
                    proxy.setNoProxy(driver.getEnvironment());
                    cap.setCapability(CapabilityType.PROXY, proxy);
                    cap.setCapability("chrome.switches", Arrays.asList("--disable-web-security"));
                    cap.setCapability("chrome.switches", Arrays.asList("--safebrowsing-disable-download-protection"));
                    cap.setCapability("chrome.switches", Arrays.asList("--ignore-certificate-errors"));
                    File file = new File("drivers//chromedriver.exe");
                    System.setProperty("webdriver.chrome.driver", file.getCanonicalPath());
                    driver.setDriver(new ChromeDriver(cap));
                    driver.getEnvironment();
                    break;
                }
            }
        } catch (IOException ex) {
            System.print.out(ex);
        }
        return driver;
    }
}
If you have any question or suggestion, please just write below on the comments.
Have a nice week everyone, Bye !!
JMeter Distributed Testing Step-by-step
Hi guys, I found this tutorial about Jmeter distributing testing in different PCS. This short tutorial explains how to use multiple systems to perform stress testing. Before we start, there are a couple of things to check.
- the firewalls on the systems are turned off.
- all the clients are on the same subnet.
- the server is in the same subnet, if 192.x.x.x or 10.x.x.x ip addresses are used. If the server doesn’t use 192 or 10 ip address, there shouldn’t be any problems.
- Make sure JMeter can access the server.
- Make sure you use the same version of JMeter on all the systems. Mixing versions may not work correctly.
Once you’ve made sure the systems are ready, it’s time to setup remote testing. The tutorial assumes you already have JMeter installed on all the systems. The way JMeter works is 1 master controller initiates the test on multiple slave systems.

Terminology
Before we dive into the step-by-step instructions, it’s a good idea to define the terms and make sure the definition is clear.
Master – the system running Jmeter GUI, which controls the test
Slave – the system running jmeter-server, which takes commands from the GUI and send requests to the target system(s)
Target – the webserver we plan to stress test
Slave – the system running jmeter-server, which takes commands from the GUI and send requests to the target system(s)
Target – the webserver we plan to stress test

Step-by-Step
- On the slave systems, go to jmeter/bin directory and execute jmeter-server.bat (jmeter-server on unix). On windows, you should see a dos window appear with “jre\[version]\bin\rmiregistry.exe”. If this doesn’t happen, it means either the environment settings are not right, or there are multiple JRE installed on the system. Note: [version] would be the jre version installed on the system.
- Open jmeter-server.bat in a text editor
- go to line 44 and find “:setCP”
- edit “START rmiregistry” to the full path. Example: “START C:\<JAVA_HOME>\jre\bin\rmiregistry”
- On master system acting as the console, open windows explorer and go to jmeter/bin directory
- open jmeter.properties in a text editor
- edit the line “remote_hosts=127.0.0.1”
- add the IP address. For example, if I have jmeter server running on 192.168.0.10, 11, 12, 13, and 14, the entry would like like this: remote_hosts=192.168.0.10,192.168.0.11,192.168.0.12,192.168.0.13,192.168.0.14
- Start jmeter.
- Open the test plan you want to use

Starting the Test
At this point, you are ready to start load testing. If you want to double check the slave systems are working, open jmeter.log in notepad. You should see the following in the log.
Jmeter.engine.Remote
Jmeter.engine.Remote
JMeterEngineImpl:
Starting backing engine
If you do not see this message, it means jmeter-server did not start correctly. For tips on debugging the issue, go to the tips section. There are two ways to initiate the test: a single system and all systems.
If you do not see this message, it means jmeter-server did not start correctly. For tips on debugging the issue, go to the tips section. There are two ways to initiate the test: a single system and all systems.
Start a single clients

- click Run at the top
- select Remote start
- select the IP address
Start all clients

- click Run at the top
- select Remote start all or use CRTL-Z
Limitations
There are some basic limitations for distributed testing. Here’s the list of the known items in no specific order.
- RMI cannot communicate across subnets without a proxy; therefore neither can jmeter without a proxy.
- Since JMeter sends all the test results to the controlling console, it is easy to saturate the network IO. It is a good idea to use the simple data writer to save the results and view the file later with one of the graph listeners.
- Unless the server is a large multi processor system, in most cases
Tips
In some cases, the firewall may still be blocking RMI traffic. Symantec Anti Virus and Firewall. In some cases, Symantec firewall needs to be stopped from windows services.
- open control panel
- open administrative tools
- double click services
- Go to down to symantec anti virus, right click and select stop
Windows firewall
- open network connections
- select the network connection
- right click and select properties
- select advanced tab
- uncheck internet connection firewall
Linux
On Suse linux, ipchains is turned on by default. For instructions, please refer to the “remote testing” in the user manual.
On RedHat (or derivatives), iptables (netfilter) is turned on by default. Execute “service iptables stop” to stop the Linux netfilter firewall.
Fonts: http://wiki.apache.org/jmeter/JMeterFAQ#How_to_do_remote_testing_the_.27proper_way.27.3F
http://jmeter.apache.org/usermanual/remote-test.html
http://jmeter.apache.org/usermanual/jmeter_distributed_testing_step_by_step.pdf
Interview’s Logic Tests
Yes Guys !
I will write a post about this, because recently I made some logic tests that are VERY VERY easy, but because of my nervous I made some mistakes ![]() Really, I have to stop to stay anxious about something… So, let’s go:
Really, I have to stop to stay anxious about something… So, let’s go:
Tests Fibonnaci – JAVA:
package Tests;
public class Main {
static long fibo(int n) {
if (n < 2) {
return n;
} else {
return fibo(n – 1) + fibo(n – 2);
}
}
if (n < 2) {
return n;
} else {
return fibo(n – 1) + fibo(n – 2);
}
}
public static void main(String[] args) { // test
for (int i = 0; i < 15; i++) {
System.out.print(Main.fibo(i) + “\t”);
}
}
}
System.out.print(Main.fibo(i) + “\t”);
}
}
}
Tests Reverse String – JAVA:
package Tests;


public class Main {

    static String converse() {
        String a = "This is a string...";
        String b = "";

        for (int i = a.length() - 1; i >= 0; i--) {
            b = b + a.charAt(i);
        }
        return b;
    }

    public static void main(String[] args) { // test
      System.out.println(Main.converse());

    }
}
JMeter Setup on Mac
In summary, this initial setup will create a way for you to record all of the requests that get made when using your web-application. From here, you can save certain thread sets and run tests where multiple instances of these thread-sets are sent to your web app.
My plan is to use this to record what Selenium does, and then use that for load testing. If I use Selenium IDE to make the aforementioned Selenium routines, the redundancy is hilarious. But in all seriousness, I am really excited to pair the two of them together. I am a bit worried though about whether JMeter can keep up with Selenium…
What I am wondering is ‘What benefit is there to using JMeter over Fiddler?’… probably has to do with being able to integrate JUnit tests etc more easily… but I don’t know. Any comments?
First: Installation
- Download JMeter. You may download the source code and build it yourself, or you may download the binaries. I just downloaded the binaries.
- While on the JMeter Download page, follow the instructions provided to verify the md5 (Mac OSX Snow Leopard Server does not come with pgp, gpg, or pgpk.)
- In Terminal.app
- md5 jakarta-jmeter-2.5.1.zip
- Click ‘md5’ next to the version of JMeter you downloaded. There will be a 20 character value shown, and it should match what you got in the the terminal. A quick way to check this is to just use ⌘+F in your browser and copy in your results from the terminal.
- In Terminal.app
- In your Finder, uncompress jakarta-jmeter-2.5.1, and drill down into the directory called ‘bin’.
- Open ApacheJMeter.jar
- If you prefer the Terminal, use the following:
- sh ./jakarta-jmeter-2.5.1/bin/jmeter.sh
Setup & Tuning-in to your web-browser
- Add (via right click) a Thread group to the Test Plan 1
- Add a Non Test Element > HTTP Proxy Server to the Workbench 2
- Open the HTTP Proxy Server Page and change the port if required 3
- Set the Target Controller to Test Plan > Thread Group on the same page 4
- Configure your browser to use the Proxy Server (it’s localhost) 5
- Zac Spitzer recommends Firefox. This is probably the case because you can set up proxying internally to Firefox without messing around with your system settings. If you try to go ‘Under the Hood’ in Chrome or into Safari’s ‘Change Settings…’ dialog, it will kick you right into your system preferences. Please note that if your workplace has a special proxy configuration already, or any other network settings that might interfere with setting this up, don’t fight it: submit a ticket to IT.
- ⌘+,
- In ‘Advanced’, go to your connection settings and set up your localhost as a proxy server. You can assign different ports to different protocols.
- Zac Spitzer recommends Firefox. This is probably the case because you can set up proxying internally to Firefox without messing around with your system settings. If you try to go ‘Under the Hood’ in Chrome or into Safari’s ‘Change Settings…’ dialog, it will kick you right into your system preferences. Please note that if your workplace has a special proxy configuration already, or any other network settings that might interfere with setting this up, don’t fight it: submit a ticket to IT.
- Press Start at the bottom of the page 6
Now, JMeter will record all the HTTP requests your browser makes, so make sure you have closed all the other tabs you have open. 7
Don’t forget to reset your browser proxy settings! 8
You can delete any requests you don’t want from the list at any time. 9
Remember to read the documentation and be careful! Make sure you know what servers will be affected by your testing, and don’t jump to simple conclusions, 3-tier web apps are complex beasts. 10
Fonts: Zac Spitzer, http://zacster.blogspot.com/2008/03/quick-howto-to-setup-jmeter.html
What is cross-browser ? Why I have to perform it ?
Nowadays, we have to test our application in a lot of browsers, but how ?
Cross-browser testing is chose to guarantee that a website or web application works on different browsers and it involves compatibility check and testing of both client-side apps.
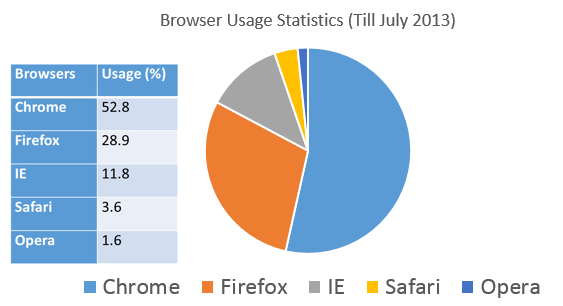
According to the statistics from W3Schools, Chrome is one of the most popular browsers these days with 54.1% market share followed by Firefox with 27.2% market share. On the other hand Internet explorer is at third place with 11.7% market share followed by Safari and Opera.
Maybe your website will look very different in all these browsers as each of the browsers will understand some code a little differently than the other one. For this reason, it is important to perform cross-browser testing to ensure your website runs on all the mainly browsers.
Reasons to test your website in other browser:
-Running browser specific tests will spend more time.
-Customers never like to use the same browser.
-Mobile is in demand. Pay attention in mobile browsers.
-New technology is not supported by all browsers.
-You have to worry with the Security too.
-No one likes to maintain separate tests for each and every browser. (Of course, it is boring)
Browser Compatibility?
Check whether the application works the way it should across all the browsers, you should take a look at the following ingredients of a web application or website:
-HTML:
– CSS Styles & CSS Validations:
– Sessions & Cookies:
-JavaScript:
– Text Alignments & Page Layouts:
There are several other important areas of web applications to be considered for achieving 100% cross-browser compatibility such as:
-Font Sizes
-Mouse Hover
-SSL Certificates
-Upload File
-Export File
-Scroll Bar Appearance
-Flash Work
-Page Zoom In/Out
-Pop Ups
-Space between various HTML components, etc.
Functional Testing?
> There are 5 actively used versions of Internet Explorer, 8 versions of Firefox, 7 versions of Chrome, 3 versions of Safari and 3 versions of Opera. That makes a total of 26 versions of browsers on which to test your application.
> Even if you cut down to the main versions of each of the main browsers, you will have to repeat your web application testing at least 9 times.
> You need to test your application on multiple browser versions every time your application has a new release.
> You need to test your application on multiple browser versions every time the browser has a new release. Firefox releases a new version almost every 2 weeks.
> Manual testing on each browser version is time consuming, monotonous and prone to human errors.
Create a simple Script on Jmeter
Hello guys, I noticed that there are a lot of people who want learn Jmeter. So, I found other video that helped me to create a Script that opens a page and after does the login and verifies if the my account appears.
This video is a little fast, but I followed with pauses and I did the same example here.
I hope that this video help you too.
Bye 🙂
