Hey guys, today I will post a webinar that I joined last week about Mobile CI.
It is very interesting, so you will see briefly when you need to use, why, how it works, etc. It lasts 43 minutes so, make sure that you have time to watch. Jump to 00:27:35 to watch the demo of Sauce Labs.
To download or watch you need follow the instructions in the link below:
https://saucelabsreview.webex.com/saucelabsreview/lsr.php?RCID=06e87f252b274b37b4500335b35ef868
What is CI for mobile ?

Automatically – every commit
How does it works?
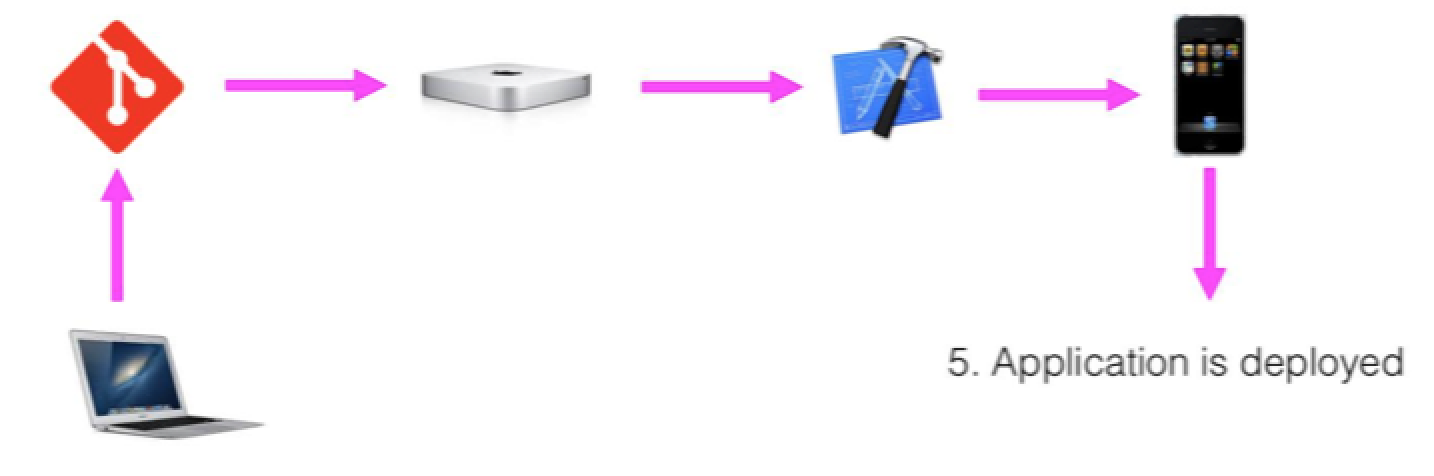
Why ?
– Reduce the need for human-based testing (Save money and time)
– Faster Feedback
– Automate Everything (Very optimistic point of view)
– No touch configuration
– Automated OTA Distribution
– Code Validation: Automated Builds and Tests
How choose the right process ?

Depend the size of the
company.
Mobile is harder
– Infrastructure (If you are building in iOS – You will need XCode, a MacMini, etc.)
– Compilation/Code Signing (You have to configure your build machine, so you will need your key store file, mobile provisioning…)
– Testing (What is the right time to use, challenge to choose what is the better for the project- real devices, simulators…)
– Deployment
Simulators x Emulators x Devices
Simulators
– Used by iOS, included w/ XCode
– Execute i386 instruction set, not ARM
– Upside: Very fast compared to Emulators
– Downside : You don’t have access hardware functions (GPS,Bluetooth Radio, Accelerometers,etc)
Emulators
– Used by Android, included with Android sdks
– Execute ARM (or native device instruction set)
– Upside: You can find free tools
– Downside: Very slow compared to Simulators
– Do not have access to certain hardware functions (GPS, Bluetooth Radio, Accelerometers, etc)
Devices
– Upside: Reproduces the actual performance experienced by your users
– Upside: The only way to catch manufacturer/OEM bugs
– Downside: Very expensive to configure and maintain compared
– Upside: Full access to hardware functions (GPS, Bluetooth Radio, Accelerometers, etc)
When to use devices vs simulators/emulators ?
– Emulators and Simulators are an excellent solution for running automated tests during development. They are inexpensive and will reliably catch most problems.
– Physical Devices can be used on a lower frequency (i.e. pre-release, weekly, daily, etc.). They are the only way to catch performance problems, test certain hardware features and find OEM issues. In the least, devices should be used before every release.
Unit Testing
– 77% of developers said app quality is “very important or mission critical”
– 80% of mobile developers test their apps manually
– Only 13% of mobile developers use automated testing
Unit vs Functional
– Unit: Testing small pieces of code
– Functional: Testing button clicks and UI interaction
Benefits:
– Instant Gratification !
– Repeatable
– Can automatically test every commit
Challenges:
– Unit Tests are not users
– Lot of work to write and maintain them
Which framework to use ?
– You need to remember:
– What is the language/framework do your developers know
– Open Source/Community Support
– 3rd party framework requirements
CI Tools/Services for mobile
– Jenkins:
Open Source, Lots of plugins, iOS and Android
Self-Hosted, DYI solution (Setup all the environment, it isn’t easy this part)
– Travis CI:
Hosted Solution, OS X support, lots of plugins, iOS and Android
Tedious setup process
– Ship.io:
Hosted solution, Designed specifically for mobile, Easy setup, iOS and Android
Less flexible than other solutions
– Xcode CI:
Integrated w/ Xcode, Apple-Supported
Self-hosted, iOS Only
Thank you guys, thank you Sauce Labs ! Hope you like it !
