JMeter Setup on Mac

In summary, this initial setup will create a way for you to record all of the requests that get made when using your web-application. From here, you can save certain thread sets and run tests where multiple instances of these thread-sets are sent to your web app.

My plan is to use this to record what Selenium does, and then use that for load testing. If I use Selenium IDE to make the aforementioned Selenium routines, the redundancy is hilarious. But in all seriousness, I am really excited to pair the two of them together. I am a bit worried though about whether JMeter can keep up with Selenium…
What I am wondering is ‘What benefit is there to using JMeter over Fiddler?’… probably has to do with being able to integrate JUnit tests etc more easily… but I don’t know. Any comments?
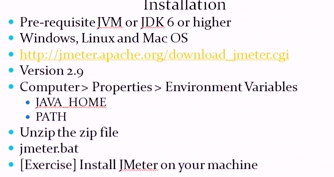
First: Installation

  1. Download JMeter. You may download the source code and build it yourself, or you may download the binaries. I just downloaded the binaries.
  2. While on the JMeter Download page, follow the instructions provided to verify the md5 (Mac OSX Snow Leopard Server does not come with pgp, gpg, or pgpk.)
    • In Terminal.app
      • md5 jakarta-jmeter-2.5.1.zip
    • Click ‘md5’ next to the version of JMeter you downloaded. There will be a 20 character value shown, and it should match what you got in the the terminal. A quick way to check this is to just use ⌘+F in your browser and copy in your results from the terminal. 
  3. In your Finder, uncompress jakarta-jmeter-2.5.1, and drill down into the directory called ‘bin’.
  4. Open ApacheJMeter.jar
    • If you prefer the Terminal, use the following:
    • sh ./jakarta-jmeter-2.5.1/bin/jmeter.sh
Setup & Tuning-in to your web-browser
  1. Add (via right click) a Thread group to the Test Plan 1
  2. Add a Non Test Element > HTTP Proxy Server to the Workbench 2
  3. Open the HTTP Proxy Server Page and change the port if required 3
  4. Set the Target Controller to Test Plan > Thread Group on the same page 4
  5. Configure your browser to use the Proxy Server (it’s localhost) 5
    1. Zac Spitzer recommends Firefox. This is probably the case because you can set up proxying internally to Firefox without messing around with your system settings. If you try to go ‘Under the Hood’ in Chrome or into Safari’s ‘Change Settings…’ dialog, it will kick you right into your system preferences. Please note that if your workplace has a special proxy configuration already, or any other network settings that might interfere with setting this up, don’t fight it: submit a ticket to IT. 
      1. ⌘+,
      2. In ‘Advanced’, go to your connection settings and set up your localhost as a proxy server. You can assign different ports to different protocols. 
  6. Press Start at the bottom of the page 6

Now, JMeter will record all the HTTP requests your browser makes, so make sure you have closed all the other tabs you have open. 7

Don’t forget to reset your browser proxy settings! 8

You can delete any requests you don’t want from the list at any time. 9

Remember to read the documentation and be careful! Make sure you know what servers will be affected by your testing, and don’t jump to simple conclusions, 3-tier web apps are complex beasts. 10

What is cross-browser ? Why I have to perform it ?

Nowadays, we have to test our application in a lot of browsers, but how ?

Cross-browser testing is chose to guarantee that a website or web application works on different browsers and it involves compatibility check and testing of both client-side apps.

According to the statistics from W3Schools, Chrome is one of the most popular browsers these days with 54.1% market share followed by Firefox with 27.2% market share. On the other hand Internet explorer is at third place with 11.7% market share followed by Safari and Opera.

10268702_801134233233224_3463662876642180326_n

Maybe your website will look very different in all these browsers as each of the browsers will understand some code a little differently than the other one. For this reason, it is important to perform cross-browser testing to ensure your website runs on all the mainly browsers.

Reasons to test your website in other browser:

-Running browser specific tests will spend more time.

-Customers never like to use the same browser.

-Mobile is in demand. Pay attention in mobile browsers.

-New technology is not supported by all browsers.

-You have to worry with the Security too.

-No one likes to maintain separate tests for each and every browser. (Of course, it is boring)


Browser Compatibility?

Check whether the application works the way it should across all the browsers, you should take a look at the following ingredients of a web application or website:

-HTML:

– CSS Styles & CSS Validations:

– Sessions & Cookies:

-JavaScript:

– Text Alignments & Page Layouts:

There are several other important areas of web applications to be considered for achieving 100% cross-browser compatibility such as:

-Font Sizes
-Mouse Hover
-SSL Certificates
-Upload File
-Export File
-Scroll Bar Appearance
-Flash Work
-Page Zoom In/Out
-Pop Ups
-Space between various HTML components, etc.

Functional Testing?

> There are 5 actively used versions of Internet Explorer, 8 versions of Firefox, 7 versions of Chrome, 3 versions of Safari and 3 versions of Opera. That makes a total of 26 versions of browsers on which to test your application.

> Even if you cut down to the main versions of each of the main browsers, you will have to repeat your web application testing at least 9 times.

> You need to test your application on multiple browser versions every time your application has a new release.

> You need to test your application on multiple browser versions every time the browser has a new release. Firefox releases a new version almost every 2 weeks.

> Manual testing on each browser version is time consuming, monotonous and prone to human errors.

When I know to stop a test?

Good morning/afternoon/evening for everyone !

Today I will talk about one thing that every tester must to know: How do you know when you should stop testing? 

Everyone want to test everything, but we know that it is impossible. So, what we can do ? This is some guidelines that you can follow:


Set Time Guidelines

Provide a block of time to perform the initial tests. Then review the test results to determine next testing steps based upon the requirements and what you learned by performing the initial tests. Continue this process until testing has been completed. By going through this process will help train you how to think through the requirements, testing results, risks, identifying new testing ideas, and determining when to stop testing.

Sometimes the initial testing assignments are small enough to be completed in one or two testing sessions. As the assignments become larger it is beneficial to test in a continual feedback mode with a more experience tester.


Experience and Time

It is important to ask questions about what you are testing because this will help you understand
how much time to spend testing. 

  • Based upon the requirements, I am planning on performing the following tests;
  • Based upon what I learned during testing, I am going to perform the following tests and I am not going to perform the following tests. 
  • As an overview of my testing I performed the following tests and I did not test the following functionality. 

Diminishing Returns and Use of time 

Spending more time performing additional tests does not necessarily equate to added test value. There becomes a point where sufficient information and value has been gathered through testing and spending additional time testing will not necessary produce more valuable information. Instead, spending this additional testing time on a different testing problem could be a better use of time. When thinking about what is the best use of my testing time, a tester needs to consider time constraints and what testing problems are still outstanding. For example you have to test problem A and B. You have already spent a lot of time testing problem A and have gathered a lot of valuable information. At this point, is it better to spend more time performing additional tests or should I move on to test problem B?


Risk Level of the Testing Issue

The higher the risk typically means you will spend more time testing. However, that needs to be balanced with the scope of the problem. For example, a high risk change that touches many areas of the product will require more testing time than a high risk change that touches a very small, isolated part of the product.


Bye guys ! 

Using Robotium to automate Test in Android

Hello guys !

Today I will write about the benefits of using Robotium to automate the tests in apps of Android Cellphones. I hope that this list help you to decide what is the better tool to you use.

Robotium is an Android test automation framework that has full support for native and hybrid applications. Robotium makes it easy to write powerful and robust automatic black-box UI tests for Android applications. With the support of Robotium, test case developers can write function, system and user acceptance test scenarios, spanning multiple Android activities.


  • Test Android apps, both native and hybrid.
  • Requires minimal knowledge of the application under test.
  • The framework handles multiple Android activities automatically.
  • Minimal time needed to write solid test cases.
  • Readability of test cases is greatly improved, compared to standard instrumentation tests.
  • Test cases are more robust due to the run-time binding to UI components.
  • Fast test case execution.
  • Integrates smoothly with Maven, Gradle or Ant to run tests as part of continuous integration.


Bye 🙂

Why use continuous integration

Integrate at least daily

Continuous Integration (CI) is a development practice that requires developers to integrate code into a shared repository several times a day. Each check-in is then verified by an automated build, allowing teams to detect problems early.

By integrating regularly, you can detect errors quickly, and locate them more easily.


Solve problems quickly

Because you’re integrating so frequently, there is significantly less back-tracking to discover where things went wrong, so you can spend more time building features.

Continuous Integration is cheap. Not continuously integrating is costly. If you don’t follow a continuous approach, you’ll have longer periods between integrations. This makes it exponentially more difficult to find and fix problems. Such integration problems can easily knock a project off-schedule, or cause it to fail altogether.

Continuous Integration brings multiple benefits to your organization:

  • Say goodbye to long and tense integrations
  • Increase visibility which enables greater communication
  • Catch issues fast and nip them in the bud
  • Spend less time debugging and more time adding features
  • Proceed in the confidence you’re building on a solid foundation
  • Stop waiting to find out if your code’s going to work
  • Reduce integration problems allowing you to deliver software more rapidly

More than a process

Continuous Integration is backed by several important principles and practices.

The Practices

  • Maintain a single source repository
  • Automate the build
  • Make your build self-testing
  • Every commit should build on an integration machine
  • Keep the build fast
  • Test in a clone of the production environment
  • Make it easy for anyone to get the latest executable
  • Everyone can see what’s happening
  • Automate deployment

How to do it

  • Developers check out code into their private workspaces.
  • When done, the commit changes to the repository.
  • The CI server monitors the repository and checks out changes when they occur.
  • The CI server builds the system and runs unit and integration tests.
  • The CI server releases deployable artefacts for testing.
  • The CI server assigns a build label to the version of the code it just built.
  • The CI server informs the team of the successful build.
  • If the build or tests fail, the CI server alerts the team.
  • The team fix the issue at the earliest opportunity.
  • Continue to continually integrate and test throughout the project.

Team Responsibilities

  • Check in frequently
  • Don’t check in broken code
  • Don’t check in untested code
  • Don’t check in when the build is broken
  • Don’t go home after checking in until the system builds

Many teams develop rituals around these policies, meaning the teams effectively manage themselves, removing the need to enforce policies from on high.

Continuous Deployment

Continuous Deployment is closely related to Continuous Integration and refers to the release into production of software that passes the automated tests.

Essentially, “it is the practice of releasing every good build to users,” explains Jez Humble, author of Continuous Delivery.

By adopting both Continuous Integration and Continuous Deployment, you not only reduce risks and catch bugs quickly, but also move rapidly to working software.

With low-risk releases, you can quickly adapt to business requirements and user needs. This allows for greater collaboration between ops and delivery, fuelling real change in your organisation, and turning your release process into a business advantage.


Font: http://www.thoughtworks.com/continuous-integration

Continuous integration

Nowadays we talk a lot about Continuous Delivery (CD), and there is a good reason for that. In the same way that developing code driven by tests was a defining change in the past few years, the practice of releasing new versions of a system continually is becoming the next big thing.

However, though there are a lot of tools to help you implement CD, it is no simple task. In this post I’ll walk you through how the team I’m on is implementing CD using automation as the first step to our goal.

The Problem

Initially, the deployment process on the project was basically manual. Although we had a document with the task details, almost every time the deployment failed, it was necessary to have some experienced person identify issues and solve them. Besides that, the document changed at each iteration, to accommodate modifications to scripts that had to be run to fix issues. This made the process even more chaotic.

Another big issue was that by being super fragile, the process was very time consuming and the deployment had to happen during a low system utilization period. Which meant that the team had to update the system with the new features at night. Final straw! The team decided to invest in improving this process. And when I say “the team” I really mean across all project roles, and not only the group of developers. We collectively researched what could be improved and how to implement the fixes. Working together with the project managers and the client was critical to providing senior management with visibility of the problem. It then stopped being a team issue and became a company-wide issue.

To give a little bit of context about the project, the codebase is about 6 or 7 years old and was started with one of the first versions of the Rails framework. Today we are using Ruby 1.8 and Rails 2.3. The production environment is located in a private data center and has more than 20 boxes dedicated to run the web server, database and so on. All configuration changes are made by Puppet, which is run at every deployment. The team has a 3-week iteration and we deploy at the end of each iteration.

Solution: Take 1

The first step of improvements was to try to automate the deployment process. Depending on a manual process that is constantly changing was the biggest problem. We set off making the deployment to be as simple as running a one-line script. The automation started right from getting the Git tag for the correct version to be deployed to triggering specific scripts that had to be run at every iteration transparently. At the end of the first improvement phase, the team had a deploy script that with a simple command line would do all the system state validations, update the code and database and verify that it was in a consistent state. However, even with an automated script, the process was still unreliable. We often had to complete the deployment manually due to failures in the run.

Solution: Take 2

Then we started the second phase of improvements – we changed the entire deploy script, splitting the process into steps, where every step was atomic. Thus, in case of a failure we didn’t have to restart the whole process, just from the failed step onwards. This change helped reduce the complexity and made it a lot faster. We also investigated the common deployment issues and fixed them for good.

Result?

The deployments that usually averaged 5 to 6 hours, with a maximum of 10 hours, were down to 2 hours at the end of the two improvement phases. The project and company management were thrilled and this further boosted the team’s morale.

The next steps on our Continuous Delivery journey, will be to split code, data and infrastructure changes, so it will be possible to release new versions with no system downtime. There are a lot of techniques to help with that, and right now we are investigating the context so that we can chose the solution that will be the best fit for us. Stay tuned for more…


Font: http://www.thoughtworks.com/insights/blog/automacao-como-pontape-inicial-para-entrega-continua

Singleton

What is: Singleton is a design pattern that restricts the instantiation of a class to one object. The concept is sometimes generalized to systems that operate more efficiently when only one object exists, or that restrict the instantiation to a certain number of objects. 

When to use: This is useful when exactly one object is needed to coordinate actions across the system.

Image


How to use in JAVA:

public class SingletonDemo {
    private static SingletonDemo instance = null;
    private SingletonDemo() { }
    public static synchronized SingletonDemo getInstance() {
        if (instance == null) {
            instance = new SingletonDemo();
        }
        return instance;
    }
}

Or (I prefer this last one, it is more simple and easy to understand):

public class Singleton {
    private static final Singleton INSTANCE = new Singleton();
 
    private Singleton() {}
 
    public static Singleton getInstance() {
        return INSTANCE;
    }
}

This method has a number of advantages:

  • The instance is not constructed until the class is used.
  • There is no need to synchronize the getInstance() method, meaning all threads will see the same instance and no (expensive) locking is required.
  • The final keyword means that the instance cannot be redefined, ensuring that one (and only one) instance ever exists.

This is a very simple explanation, but helped me a lot. If you have some question, just write in the comments.

See you in the next post !