Refactoring by the Book

Refactoring is one of the techniques that allows us to be agile and apply an evolutionary approach to our design.  A core XP practice and one of TDD’s pillars, constant refactoring keeps the evil design upfront at bay and maintain our codebases in a healthy state. One of the few things I think most developers agree on is that refactorings are helpful and should be done at some point in any project, preferably in a continuous manner. The problem is that, like every other developer term, the definition of refactoring has become muddled over time. Refactoring is now commonly conflated with it’s more dangerous cousin, the Rewriting. The term is used whenever we want to improve the design of some part of a codebase, either a single class or entire subsystems.

The original refactorings

Although they existed a long time before that, Refactorings were introduced to the large world by Martin Fowler’s book Refactoring: Improving the Design of Existing Code where he writes about coding practices from legendary SmallTalkers like Kent Beck and Ward Cunningham. A definition from the same book: “Refactoring is a disciplined technique for restructuring an existing body of code, altering its internal structure without changing its external behavior. Its heart is a series of small behavior preserving transformations. Each transformation (called a “refactoring”) does little, but a sequence of transformations can produce a significant restructuring. Since each refactoring is small, it’s less likely to go wrong. The system is kept fully working after each small refactoring, reducing the chances that a system can get seriously broken during the restructuring.” The original refactorings were presented using a pattern format. They have names, likeExtract Method or Replace Temp with Query, an explanation of when to use the refactor and a list of steps you have to follow in order to apply them. You can browse the refactorings catalog on refactoring.com. They are meant to be applied in a conscious manner, one after the other, until your design is good enough for you to move forward. Words like disciplined and small are present on the very definition of the term. When you wildly rewrite large parts of your system, you are not refactoring, even if you are just trying to achieve a better design. The system needs to be kept working the whole time. That means the tests need to stay green! The TDD flow  is supposed to be Red -> Green -> Refactor, and not Red -> Green -> Red -> Red -> Oh nooooo! -> Rollback.

Some ways to refactor on the green
Let’s see how we can refactor some code in a more disciplined manner, keeping the tests always on the green. Instead of working on some contrived User class we are going to use a real example, the class Request from the Pacto project. You don’t need to understand what the class does, just pay attention to the code structure and how we apply the refactorings iteratively.
marcosccm-refactoring-1
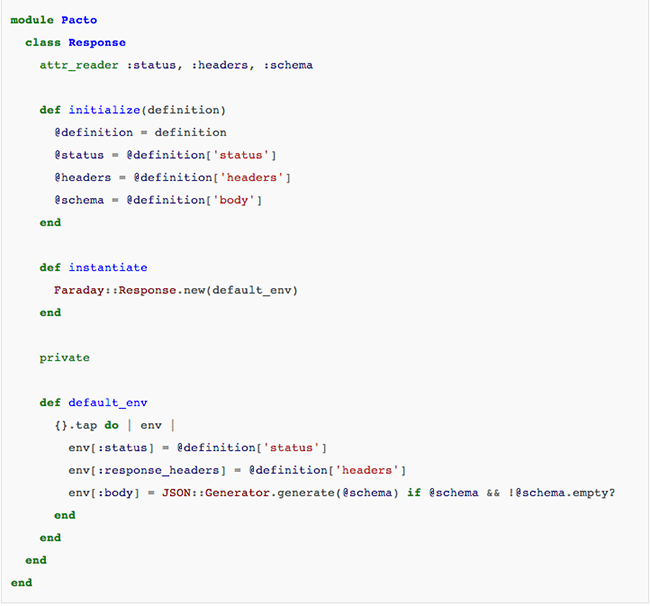
This class has many small issues, but the main thing I want to do is to remove theinstatiate method.  This method is forcing the Pacto codebase to deal with instances of a foreign class, Faraday::Response.  The thing is that Faraday::Response is a very simple class, and we can easily implement the interface we need on the Pacto::Response class itself, eliminating the dependency on external code. Step 0 – Check the current tests Before we start to refactor, a very important step is to check if the code in question is actually covered by tests. A quick way to do it is to just do  the refactoring, in our case simply remove the instantiate method and see if anything breaks. If you get zero red tests, that’s not a good thing! That means you have no way to be sure that your refactorings didn’t impacted the codebase, no safety net to catch your mistakes. There’s a famous phrase that says “refactorings without tests is just changing stuff”. If that happens, just rollback your change and start implementing the tests for the behavior you want to change. Luckily for us Pacto has test suite, so we get a precise red spec if we remove theinstantiate method.

Step 1 – Move Method
The failing spec tell us that we need a method body on whatever instantiate returns. We can see the body definition passed on the Faraday::Response initialization. Let’s apply a slightly altered Move Method refactoring to move it from the default_env definition to theResponse class.
marcosccm-refactoring-3
We run the tests to make sure we didn’t break anything. Since we only changed private methods and we kept the original structure, everything runs fine.

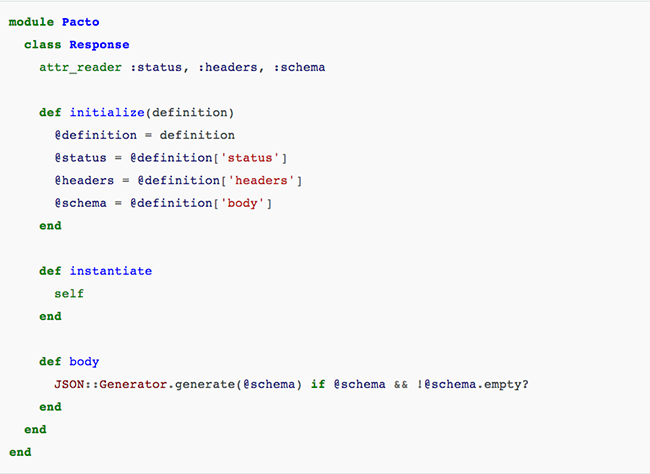
Step 2 – Change Faraday::Response to self
It turns out that step one is the only thing we need to do in order to be able to replaceFaraday::Response with self on the instantiate method, so we  change the method.
marcosccm-refactoring-4
That’s probably the most useless method ever, but remember, we want to keep the tests green. By allowing this travesty to live a little longer on the codebase we can be sure that nothing will break and move forward with a few other refactorings before paying attention to other parts of the Pacto codebase.

Step 3 – Remove the unused default_env method
So we have a private method that’s not used anymore. Safest refactoring you can have, we don’t even need to run the tests for this one, right? Well, remember that in Ruby private methods can be called with send (a very bad practice, by the way), so you are never totally sure that’s something is not important just by eyeballing a class. Always run your tests. Thankfully Pacto is not a metaprogramming happy codebase, so our tests still run green after removing the default_env. marcosccm-refactoring-5

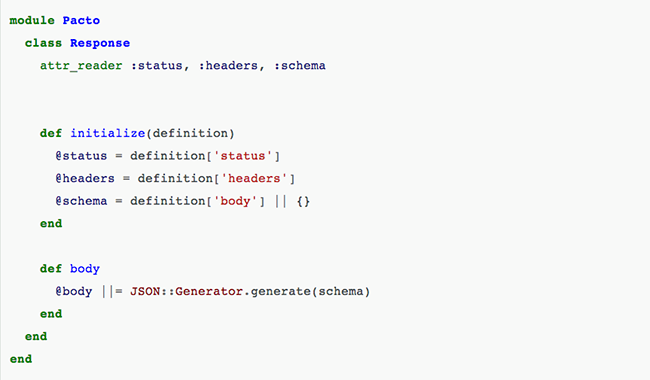
Step 4 – Remove unused @definition field
Another piece of private unused code, same rules as the previous step. marcosccm-refactoring-6

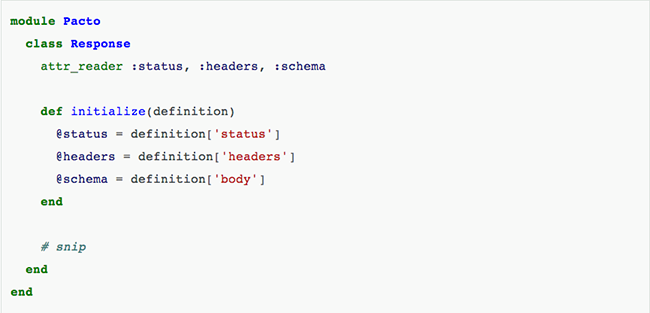
Step 5 – Remove excessive conditionals
On the Response#body method we have some conditionals that could be easily replaced by a default value for the schema attribute. Doing a “let’s see if something break” trick we discover that this conditionals are not under test, so first we add the relevant specs:   marcosccm-refactoring-7 Then we replace the conditionals with a default value for the schema field: marcosccm-refactoring-8

Step 6 – Remove instantiate method
Finally the class is looking good enough and we can go forward and remove theinstantiate method. Whoever is using that method can just use a Response instance instead. For this step we simply delete the method and fix all the broken specs. Thankfully in this case, the Response class was used only by another class, so it was a very straightforward process. For cases were you have many dependencies, you might let the offending method live for a little longer and replace each use separately on work on each case separately.
marcosccm-refactoring-9
There’s still some things we could do on this class, like turn it into a Struct, but it’s good enough. Knowing when to stop refactoring is as important as knowing how to do it, the world is full of yaks and rabbit holes.


I summarized some parts of the article, but you should read this at least one time in your life. If you don’t know how to do a good refactoring you and your team will be lost. 😦

I know, very extensive article today, but it is very important too! Bye 🙂


Resource: http://www.thoughtworks.com/insights/blog/refactoring-book?utm_campaign=technology&utm_medium=social&utm_source=linkedin

Testing Ajax application with Selenium

Ajax, an acronym for Asynchronous JavaScript and XML, is a web development technique for creating interactive and more responsive web applications. The Ajax application works more like a desktop application, meaning that user’s request will not cause an entire page to reload every time, the web browser makes an asynchronous call to the web server to obtain the required data and update only specific parts of the current web page. As result the user gets more interactive, speedy, and usable web pages, but testing AJAX with Selenium will be challenging.

Selenium’s ‘assert’ and ‘verify’ commands might occasionally fail thanks to the asynchronous nature of the Ajax. It may happened that the result doesn’t come back from the server immediately and while ‘assert’ and ‘verify’ commands already trying to verify a new value immediately.

Not experienced testers would recommend to add a ‘pause’ command for a few seconds before the verification. The ‘pause’ suggestion may work in certain cases, because Ajax call may be not completed after pausing for a specific time due to slow machines or network. If the tester set the long pause time it will make the test unacceptably slow and drastically increase testing time.

In this type of tests you should use waitForCondition function in Selenium for Ajax testing. The waitForCondition command evaluates a JavaScript snippet repeatedly, until the snippet returns true. As soon as Selenium detects that the condition returns true, it will stop waiting and Ajax testing will resume.

It is important to note that the selenium in selenium.waitForCondition is a Java object in your test code and the selenium in selenium.browserbot is a javascript object running in the web browser.

Examples:

selenium.waitForCondition("selenium.browserbot.getCurrentWindow().loading == false", "20000");

> Condition

> Timeout miliseconds

If you are using AJAX you might find there is an AJAX object on your application. In it will be a activeRequestCount. When the AJAX.activeRequestCount goes to zero, all the AJAX calls are done. So you can wait for an AJAX call to complete with:

selenium.waitForCondition("selenium.browserbot.getCurrentWindow().AJAX.activeRequestCount == 0", "30000");

Thank you 🙂


Fontshttp://www.seleniumguide.com/p/testing-ajax-with-selenium.html

http://darrellgrainger.blogspot.co.uk/2010/03/selenium-rc-java-waitforcondition.html

How take a property inside an element in calabash-ios and calabash-android

Hello mate !


I am writing about “How take a property inside an element in calabash-ios”, look the examples:
 

IOS

– This query is taking the property :TextContent for the element in a web page.


 query("WebView css:'#testid'")[1]["textContent"]

 
– This query is taking the property :TextContent for the element.


 query("Label index:1",:textContent)
 

– Look when you want a sub-property:


[

[0] {

     "id" => "login_button",

     "enabled" => true,

     "contentDescription" => nil,

     "class" => "android.widget.Button",

     "text" => "Login",

     "rect" => {

     "center_y" => 545.0,

     "center_x" => 639.5,

     "height" => 64,

     "y" => 513,

     "width" => 195,

     "x" => 542

               },

     }

]

– This query is taking the property inside the group of properties.


 query("Label").first["rect"]["y"]


Android

– This query is taking the property :TextContent for the element in a web page.

 query("WebView css:'#testid'",:textContent)
 
– This query is taking the property :TextContent for the element.


 query("Label index:1",:textContent)
 

– Look when you want a sub-property:


 [

[0] {

     "id" => "login_button",

     "enabled" => true,

     "contentDescription" => nil,

     "class" => "android.widget.Button",

     "text" => "Login",

     "rect" => {

     "center_y" => 545.0,

     "center_x" => 639.5,

     "height" => 64,

     "y" => 513,

     "width" => 195,

     "x" => 542

               },

     }

]


– This query is taking the property inside the group of properties.


 query("Label index:1",:rect,:y)
 

If you need help or have some comment to do, please write below 🙂
 
Thank you !


Javascript and CSS – Testing on hybrid apps

Hello everyone 🙂

I am testing a hybrid app these days and I am learning a lot…Ok, but what is a hybrid app ?
Like native apps, run on the device, and are written with web technologies (HTML5, CSS and JavaScript). Hybrid apps run inside a native container, and leverage the device’s browser engine (but not the browser) to render the HTML and process the JavaScript locally. A web-to-native abstraction layer enables access to device capabilities that are not accessible in Mobile Web applications, such as the accelerometer, camera and local storage.

Summarising…. You have to test native elements mixed with web elements… Cool, don’t you think ? HaHa Hard work !

This post have some examples of a query using CSS and an action (click) using Javascript(IOS and Android platform):

Using Javascript to click: (Example)

query("webView index:1", :stringByEvaluatingJavaScriptFromString 'document.getElementsByTagName("iframe")[0].contentWindow.document.getElementByTag("a").click()')

This example, you have to write first the WebView hat contains the HTML and after put that conversor from String to Javascript. Finally, put your code in Javascript 🙂
I don’t know many things about javascript, but you can use the console of the inspector of Chrome or Safari to identify web elements in mobiles (iphone,ipad,tablet).

Examples – CSS:

query("SlidePanelWebView index:2 css:'#articleContainer .currentPanel figure .video-play-button'")

query("SlidePanelWebView index:4 css:'#article_1 .data-copy p strong a'")

element_does_not_exist("WebView css:'.inner a'")

Below the explanation of each part to form a CSS query on Calabash:

query("WebView index:4 css:'#article_1 .data-copy p strong a [style=\'Font:Tahoma\']'")

First: Put the element and the index that contains the element that you want. How you discover this ? You can try each index according with the position where is your element. Like in the end of a page… more chances to be the last index of the element.

Second: Write css:

– Third: Inside each you will choose what properties, class, id or tag you want to use to find the element.

Fourth: When you know the id of the div or the element, you can write here. Put and then the id of the div… If the element that you want was not found until this point, you can use the id of the first div in the hierarchy. Like:

<div id:first>

<div id: second>

<element id: third></element>

</div>

</div>

In this example, you can use the id of the first div instead of the id’s element. And try writing the way to find the element with the tags or classes provided.

Fifth: Class, here you can use the class element. To identify that this is a class you need to put a . before the name of the class… And I used to write only the last name of the class when this has more then one class name. Example:

<div id:first>

<div class: class name second>

</div>

</div>

Sixth: The last thing that you should know it is about the tag name. Like <p>, <a href>, <strong>… When you want to find a tag you just write the tag names separated by space. Like:  div p a , following the example bellow.

<div class: first>

<p>

<a href: third></a>

</p>

</div>

Seventh: When you want to find a property in the middle of the css.You need to put [name of property=value of property] Like when you want to search a specific value for href: [href=https://azevedorafaela.wordpress.com], following the example bellow.

<a href: https://azevedorafaela.wordpress.com></a>


More examples of queries calabash with CSS:

query("WebView index:4 css:'#three .scrollable [data-component=buttonBlock] .sectionList li span'")

query("PanelWebView css:'#article .data-copy p strong a'")

query("View index:3 css:'.viewInactive'")


If you have any suggestion, questions or comments just write below please !

Bye !!

Summary of Calabash iOS Ruby API – Assertions

Hi guys ! I hope you are well ! Here there are many commands of calabash-ios that are very useful 🙂

Assertions


fail(msg="Error. Check log for details.")

check_element_exists(query)
check_element_does_not_exist(query)
check_view_with_mark_exists(expected_mark)

check_element_exists("view marked:'#{expected_mark}'")


Touch


touch(uiquery, options={})


irb(main):037:0> touch("view marked:'switch'")
irb(main):038:0> tap 'switch'
irb(main):040:0> touch("view marked:'First'", :offset => {:x => 50, :y => 0})
irb(main):041:0> touch(nil, :offset => {:x => 50, :y => 0})


Keyboard


keyboard_enter_char(chr)

irb(main):043:0> keyboard_enter_char "a"
irb(main):076:0> keyboard_enter_char "More"

keyboard_enter_text(text)

irb(main):044:0> keyboard_enter_text "The Quick Brown Fox"

done

Scroll

scroll(uiquery, direction)

irb(main):082:0> scroll "scrollView", :down


Tables


scroll_to_row(uiquery, number)

irb(main):081:0> scroll_to_row "tableView", 2

scroll_to_cell(options)

{:query => "tableView",
 :row => 0,
 :section => 0,
 :scroll_position => :top,
 :animate => true}
irb(main):003:0> scroll_to_cell(:row => 13, :section => 0)
=> ["; contentOffset: {0, 0}>. Delegate: LPThirdViewController, DataSource: LPThirdViewController"]

:row the row to scroll to
:section the section to scroll to
:scroll_position the position to scroll to :top, :bottom, :middle
:animate animate the scrolling or not

each_cell(options, &block)

{:query => "tableView", #the table view to act on
 :post_scroll => 0.3,  #a pause after each action taken
 :skip_if => nil, #an optional proc to skip some cells
 :animate => true #animate the scrolling?
}
irb(main):008:0> each_cell(:post_scroll=>0) do |row, sec|
irb(main):009:1* puts "Row #{row} in Section #{sec}"
irb(main):010:1> end
Row 0 in Section 0
Row 1 in Section 0
Row 2 in Section 0
Row 3 in Section 0
...
irb(main):001:0> table_labels = []
=> []

irb(main):002:0> each_cell(:animate => false, :post_scroll => 0.1) do |row, sec|
irb(main):003:1*  txt = query("tableViewCell indexPath:#{row},#{sec} label", :text).first
irb(main):004:1>  table_labels << txt irb(main):005:1> end
=> 1

irb(main):006:0> table_labels
=> ["Cell 0", "Cell 1", "Cell 2", "Cell 3", "Cell 4", "Cell 5", "Cell 6", "Cell 7", "Cell 8", "Cell 9", "Cell 10", "Cell 11", "Cell 12", "Cell 13", "Cell 14", "Cell 15", "Cell 16", "Cell 17", "Cell 18", "Cell 19", "Cell 20", "Cell 21", "Cell 22", "Cell 23", "Cell 24", "Cell 25", "Cell 26", "Cell 27", "Cell 28", "Cell 29"]


Rotation

rotate(dir)

irb(main):083:0> rotate :left


(Event) Playback

playback(recording, options={})

irb(main):103:0> playback "drag_switch_around", :query => "view marked:'switch'", :offset => {:x=>2, :y=>0}

record_begin and record_end

irb(main):104:0> record_begin
=> ""
irb(main):105:0> record_end "move_down"
=> "move_down_ios5_iphone.base64"


Location

set_location(options)

:place => "Tower of London"
:latitude => ..., :longitude => ...


Backdoor

backdoor(sel, arg)

- (NSString *) calabashBackdoor:(NSString *)aIgnorable;
irb(main):002:0> backdoor("calabashBackdoor:", "")
=> "YES"


Screenshot

screenshot(options={:prefix=>nil, :name=>nil})

screenshot({:prefix => "/Users/krukow/tmp", :name=>"my.png"})

screenshot_embed(options={:prefix=>nil, :name=>nil, :label => nil})

screenshot_embed({:prefix => "/Users/krukow/tmp", :name=>"my.png", :label => "Mine"})


Misc


server_version

irb(main):026:0> server_version
=> {"outcome"=>"SUCCESS", "app_name"=>"LPSimpleExample-cal", "simulator_device"=>"iPhone", "iOS_version"=>"5.1", "app_version"=>"1.0", "system"=>"x86_64", "app_id"=>"com.lesspainful.example.LPSimpleExample-cal", "version"=>"0.9.126", "simulator"=>"iPhone Simulator 358.4, iPhone OS 5.1 (iPhone/9B176)"}


client_version

irb(main):027:0> client_version
=> "0.9.127.pre1"


calabash_exit

irb(main):028:0> calabash_exit
=> []
irb(main):029:0> server_version
Errno::ECONNREFUSED: Connection refused - connect(2) (http://localhost:37265)


escape_quotes(str)

irb(main):007:0> quoted = escape_quotes("Karl's child")
=> "Karl\\'s child"
irb(main):008:0> query("view marked:'#{quoted}'")


macro(txt)

macro 'I touch "Second"'

lbl = ".......a long text......"
macro %Q[I use a step with "double" quotes and 'single' and #{lbl}]


flash(uiquery)

flash("TableView index:2")


Font: https://github.com/calabash/calabash-ios/wiki/03.5-Calabash-iOS-Ruby-API

Summary of Calabash iOS Ruby API – QUERY

Just a summary of useful commands !

Query

query(uiquery, *args)
irb(main):003:0> query("button index:0")
=> [{"class"=>"UIRoundedRectButton", "frame"=>{"y"=>287, "width"=>72, "x"=>100, "height"=>37}, "UIType"=>"UIControl", "description"=>">"}] 
irb(main):005:0> query("button index:0").first.keys
=> ["class", "frame", "UIType", "description"]

irb(main):006:0> query("button index:0").first["frame"]["width"]
=> 72

irb(main):031:0> query("tableView","numberOfSections")
=> [1]
irb(main):033:0> query("tableView","delegate","description")
=> [""]
irb(main):034:0> query("tableView",numberOfRowsInSection:0)
=> [30]
irb(main):035:0> query("tableView","numberOfRowsInSection"=>0)
=> [30]
irb(main):036:0> query("pickerView",:delegate, [{pickerView:nil},{titleForRow:1},{forComponent:0}])
=> ["1,0"]
[pickerView.delegate pickerView:nil titleForRow:1 forComponent:0]

classes(uiquery)

def classes(uiquery,*args)
  query_map(uiquery,:class,*args)
end
irb(main):001:0> classes("view")
=> ["UILayoutContainerView", "UITransitionView", "UIViewControllerWrapperView", "UIView", "UITextField", "UITextFieldRoundedRectBackgroundView", "UIImageView", "UIImageView", "UIImageView", "UITextFieldLabel", "UILabel", "UIRoundedRectButton", "UIButtonLabel", "UISwitch", "_UISwitchInternalView", "UIImageView", "UIView", "UIImageView", "UIImageView", "UIImageView", "UIRoundedRectButton", "UIButtonLabel", "UITabBar", "UITabBarButton", "UITabBarSelectionIndicatorView", "UITabBarSwappableImageView", "UITabBarButtonLabel", "UITabBarButton", "UITabBarSwappableImageView", "UITabBarButtonLabel", "UITabBarButton", "UITabBarSwappableImageView", "UITabBarButtonLabel", "UITabBarButton", "UITabBarSwappableImageView", "UITabBarButtonLabel"]

label(uiquery)

 def label(uiquery)
  query(uiquery, :accessibilityLabel)
end
irb(main):001:0> label("view")
[nil, nil, nil, nil, nil, nil, nil, nil, nil, nil, "Empty list", nil, nil, nil, "Mon", "Dec 17", nil, nil, nil, "Tue", "Dec 18", nil, nil, nil, nil, "Today", nil, nil, nil, "Thu", "Dec 20", nil, nil, nil, nil, nil, "Empty list", nil, nil, "12", "12", nil, nil, "1", "1", nil, nil, "2", "2", nil, nil, "3", "3", nil, nil, nil, nil, nil, "Empty list", nil, nil, "56", "56", nil, nil, "57", "57", nil, nil, "58", "58", nil, nil, nil, nil, nil, "Empty list", nil, nil, "AM", "AM", nil, nil, "PM", "PM", nil, nil, nil, nil, nil, nil, nil, nil, nil, nil, "Name", "First View", "First", "First", nil, "Second", "Second", nil, "other", "switch", nil, nil, nil, nil, nil, nil, "login", "Login", nil, "First", nil, nil, "First", "Second", nil, "Second", "Third", nil, "Third", "Fourth", nil, "Fourth"]

element_does_not_exist(uiquery)

element_exists(uiquery)

view_with_mark_exists(expected_mark)

element_exists("view marked:'#{expected_mark}'")

Waiting

wait_for(options, &block)
{:timeout => 10, #maximum number of seconds to wait
 :retry_frequency => 0.2, #wait this long before retrying the block
 :post_timeout => 0.1, #wait this long after the block returns true
 :timeout_message => "Timed out waiting...", #error message in case options[:timeout] is exceeded
 :screenshot_on_error => true # take a screenshot in case of error
}
irb(main):030:0> wait_for(:timeout => 5) { not query("label text:'Cell 11'").empty? }
irb(main):031:0> wait_for(:timeout => 5) { element_exists("label text:'Cell 20'") }
wait_for(:timeout => 30) do
    res = query("button marked:'Player play icon'", :isSelected)
    res.first == "1"        
end

wait_for_elements_exist(elements_arr, options={})

irb(main):008:0> wait_for_elements_exist( ["label text:'Cell 11'", "tabBarButton marked:'Third'"], :timeout => 2)
wait_for_elements_do_not_exist(elements_arr, options={})
wait_for_none_animating(options={})
wait_poll(opts, &block)
{:until => nil #a predicate which should return true when the condition is satisfied
 :until_exists => nil #a uiquery to function as predicate (i.e. element_exists(opts[:until_exists]))
 :timeout => 10, #maximum number of seconds to wait
 :retry_frequency => 0.2, #wait this long before retrying the block
 :post_timeout => 0.1, #wait this long after the block returns true
 :timeout_message => "Timed out waiting...", #error message in case options[:timeout] is exceeded
 :screenshot_on_error => true # take a screenshot in case of error
}
irb(main):023:0> wait_poll(:until_exists => "label text:'Cell 22'", :timeout => 20) do
irb(main):024:1* scroll("tableView", :down)
irb(main):025:1> end


Bye Guys 😀

Font: https://github.com/calabash/calabash-ios/wiki/03.5-Calabash-iOS-Ruby-API

Abstract Methods and Classes

Hello guys,

I will continue with more technical posts today… 🙂

What is ? 

An abstract class is a class that is declared abstract—it may or may not include abstract methods. Abstract classes cannot be instantiated, but they can be subclassed.

An abstract method is a method that is declared without an implementation (without braces, and followed by a semicolon), like this:

abstract void moveTo(double deltaX, double deltaY);

If a class includes abstract methods, then the class itself must be declared abstract, as in:

public abstract class GraphicObject {
   // declare fields
   // declare nonabstract methods
   abstract void draw();
}

When an abstract class is subclassed, the subclass usually provides implementations for all of the abstract methods in its parent class. However, if it does not, then the subclass must also be declared abstract.

An Abstract Class Example

In an object-oriented drawing application, you can draw circles, rectangles, lines, Bezier curves, and many other graphic objects. These objects all have certain states (for example: position, orientation, line color, fill color) and behaviors (for example: moveTo, rotate, resize, draw) in common. Some of these states and behaviors are the same for all graphic objects (for example: position, fill color, and moveTo). Others require different implementations (for example, resize or draw). All GraphicObjects must be able to draw or resize themselves; they just differ in how they do it. This is a perfect situation for an abstract superclass. You can take advantage of the similarities and declare all the graphic objects to inherit from the same abstract parent object (for example, GraphicObject) as shown in the following figure.

Classes Rectangle, Line, Bezier, and Circle Inherit from GraphicObject  

Classes Rectangle, Line, Bezier, and Circle Inherit from GraphicObject

First, you declare an abstract class, GraphicObject, to provide member variables and methods that are wholly shared by all subclasses, such as the current position and the moveTo method. GraphicObject also declares abstract methods for methods, such as draw or resize, that need to be implemented by all subclasses but must be implemented in different ways. The GraphicObject class can look something like this:

abstract class GraphicObject {
    int x, y;
    ...
    void moveTo(int newX, int newY) {
        ...
    }
    abstract void draw();
    abstract void resize();
}

Each nonabstract subclass of GraphicObject, such as Circle and Rectangle, must provide implementations for the draw and resize methods:

class Circle extends GraphicObject {
    void draw() {
        ...
    }
    void resize() {
        ...
    }
}
class Rectangle extends GraphicObject {
    void draw() {
        ...
    }
    void resize() {
        ...
    }
}

Class Members

An abstract class may have static fields and static methods. You can use these static members with a class reference (for example,AbstractClass.staticMethod()) as you would with any other class.

When ?

Abstract Classes is to create templates for future classes and offer the added benefit of letting you define functionality that your child classes can utilize later. You can’t provide an implementation for an Interface.

Why ?

Abstract Classes are a good fit if you want to provide implementation details to your children but don’t want to allow an instance of your class to be directly instantiated (which allows you to partially define a class). If you want to simply define a contract for Objects to follow, then use an Interface.

 
Abstract methods are useful ?

Abstract methods are useful in the same way that defining methods in an Interface is useful. It’s a way for the designer of the Abstract class to say “any child of mine MUST implement this method”.


Any question or comment, just write below ! Thank you again ! 

Bye 🙂


Font: http://docs.oracle.com/javase/tutorial/java/IandI/abstract.html

http://stackoverflow.com/questions/3344816/when-and-why-to-use-abstract-classes-methods