Good evening everyone, today I am just sharing a cool video with you guys about penetration tests, but to be honest is far more complete than just this 🙂
Good evening everyone, today I am just sharing a cool video with you guys about penetration tests, but to be honest is far more complete than just this 🙂
As a tester you have a different way to think about the scenarios. You know that you need to think beyond the scenarios. So, how do you know when it will be enough ? When will you have 100% of tests coverage ?
You probably already found a bug out of the requirements, and in a specific sequence of steps. I normally find these kind of bugs with exploratory tests, when I have time to free my creative side and start to do different ways to test the same thing. Developers follow the requirements, they don’t do exploratory tests, usually they think even the user has the possibility to do the same step in a different way, they shouldn’t (Because it’s not the right way).
In my humble opinion, if your software allow to do the same function in 1000 different ways, you should be prepare to test every single “invalid” way, because this will increase the trust in your software. If I find a single stupid bug in an application, like an error when I send invalid characters, I start to think what type of software was delivered, like neither the basic simple stupid scenario of invalid characters was tested, imagine the more complex ones… This could be low priority, but if you ignore this, you need to face there are many people like me (critical detail vision), that see these kind of things and lose the confidence on the software and to be honest, the respect too.

Imagine you have all the requirements:

And you have the system software in this another circle:

But in the real world, we don’t have every requirement covered by the system, we have something like this:
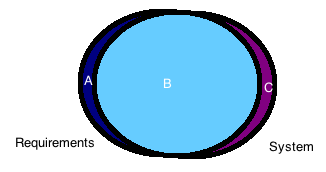
Which means you will have some parts in your system not covered by your requirements and you have some parts in your requirements not covered by your system. It is exactly in this part that we, testers should start to think about. We need knowledge of both of the parts, and this takes time.
So, you don’t need to worry cover 100% of your tests in the beginning, you need to worry if you know everything about what you are testing, some scenarios you just figure out when you are testing, because you are pretending you are an user. You need a good background, someone to sit next to you, or some good documentation about what you will test, spend some time exploring the app before you start the scenarios. This will create your first impression of the software and you will be more into it and the user experience.
Finally, my advice to know if you have a good test coverage is:
See you next week !
Hi guys,
Today I will post about Spoon which is a framework that I’ve been learning. I hope this helps someone too, because spoon is quite new and doesn’t have too much support if you want to run with Cucumber.
Spoon is a framework to run android reports and Cucumber is a BDD framework.
 classpath('com.stanfy.spoon:spoon-gradle-plugin:1.0.3') {
  exclude module: 'guava'
  }
plugin 'spoon' dependencies{ androidTestCompile 'com.squareup.spoon:spoon-client:1.2.0'androidTestCompile 'info.cukes:cucumber-android:1.2.4'androidTestCompile 'info.cukes:cucumber-picocontainer:1.2.4'}
spoon {
 debug = true
 if (project.hasProperty('spoonFailNoConnectedDevice')) {
    failIfNoDeviceConnected = true
 }

 if (project.hasProperty('cucumberOptions')) {
    instrumentationArgs = ["cucumberOptions=" + "'${project.cucumberOptions}'"]
 }

}public class Instrumentation extends CucumberInstrumentation {
@Override
public void onStart() {
runOnMainSync(new Runnable() {
@Override
public void run() {
Application app = (Application) getTargetContext().
getApplicationContext();
String simpleName = Instrumentation.class.getSimpleName();
// Unlock the device so that the tests can input keystrokes.
((KeyguardManager) app.getSystemService(KEYGUARD_SERVICE)) //
.newKeyguardLock(simpleName) //
.disableKeyguard();
// Wake up the screen.
((PowerManager) app.getSystemService(POWER_SERVICE)) //
.newWakeLock(FULL_WAKE_LOCK | ACQUIRE_CAUSES_WAKEUP
| ON_AFTER_RELEASE, simpleName) //
.acquire();
}
});
super.onStart();
}
}gradle spoon -PspoonFailNoConnectedDevice -PcucumberOptions='--tags @smoke'adb shell am instrument -w -e cucumberOptions "'--tags @smoke'" com.rsouza.test/com.rsouza.test.Instrumentation
| am instrument argument | Description |
|---|---|
| -e count true | Count the number of tests (scenarios) |
| -e debug true | Wait for a debugger to attach before starting to execute the tests. |
| -e log true | Enable Cucumber dry-run (same as –e dryRun true) |
| -e coverage true | Enable EMMA code coverage |
| -e coverageFile “/path/coverage.ec“ | Set the file name and path of the EMMA coverage report |
https://cucumber.io/docs/reference/jvm#third-party-runners
adb shell am instrument -w -e log true -e cucumberOptions "'--tags @debug'"
 com.rsouza.test/com.rsouza.test.Instrumentation
Thank you guys ! See you next week 🙂
Today I will post more about my experiences in developing the automation project from scratch. I developed 2 test mobile automation from scratch until now: one was with Calabash and Cucumber and the other one was with Robotium and Cucumber.
I hope this helps someone as well. If you have any suggestions/questions, please fell free to comment below. See you next week 🙂
You can download a sample project that is already configured and try first: https://github.com/cucumber/cucumber-jvm/tree/master/examples/android/android-studio/Cukeulator
On Android View:
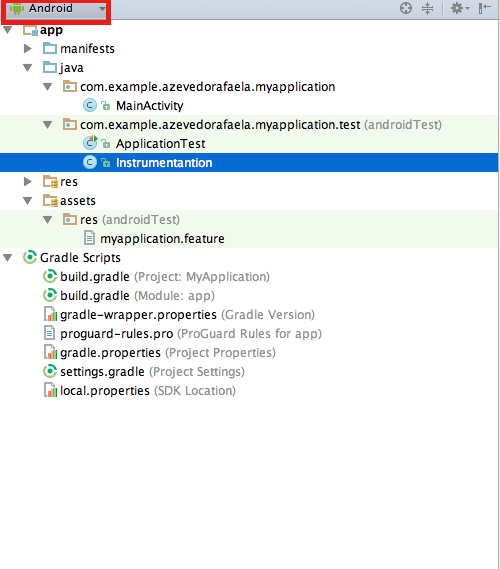
On Project View:
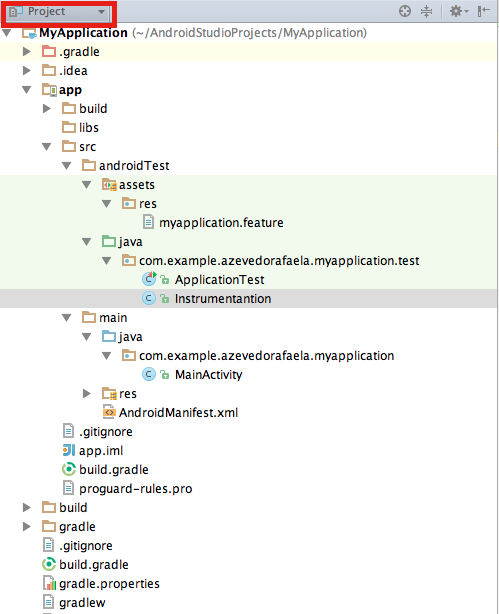
dependencies {
 androidTestCompile 'com.android.support.test.espresso:espresso-core:2.2'
 androidTestCompile 'com.android.support.test:testing-support-lib:0.1'
 androidTestCompile 'info.cukes:cucumber-android:1.2.4'
 androidTestCompile 'info.cukes:cucumber-picocontainer:1.2.4'
}
android {
 defaultConfig {
 testApplicationId "com.example.azevedorafaela.myapplication"
 testInstrumentationRunner "com.example.azevedorafaela.myapplication.test.
Instrumentation"
 }
   sourceSets {
     androidTest {
        assets.srcDirs = ['src/androidTest/assets']
     }
   }
}
Feature: Test

Scenario: Espresso with cucumber test
Given I have my app configured
When something happens
Then I should see xx on the display
package com.example.azevedorafaela.myapplication.test;
import android.os.Bundle;
import android.support.test.runner.MonitoringInstrumentation;
import cucumber.api.android.CucumberInstrumentationCore;
public class Instrumentation extends MonitoringInstrumentation {
private final CucumberInstrumentationCore instrumentationCore = new
CucumberInstrumentationCore(this);
@Override
 public void onCreate(final Bundle bundle) {
 super.onCreate(bundle);
 instrumentationCore.create(bundle);
 start();
 }
@Override
 public void onStart() {
 waitForIdleSync();
 instrumentationCore.start();
 }
}
package com.example.azevedorafaela.myapplication.test;

import android.test.ActivityInstrumentationTestCase2;

import com.example.azevedorafaela.myapplication.MainActivity;

import cucumber.api.CucumberOptions;
import cucumber.api.java.en.Given;
import cucumber.api.java.en.Then;
import cucumber.api.java.en.When;
import com.example.azevedorafaela.myapplication.R;
import static android.support.test.espresso.Espresso.onView;
import static android.support.test.espresso.action.ViewActions.click;
import static android.support.test.espresso.assertion.ViewAssertions.
matches;
import static android.support.test.espresso.matcher.ViewMatchers.withId;
import static android.support.test.espresso.matcher.ViewMatchers.withText;

@CucumberOptions(features = "features")
public class MainActivitySteps extends ActivityInstrumentationTestCase2
<MainActivity> {

    public MainActivitySteps(){
        super(MainActivity.class);
        assertNotNull(getActivity());
    }

    @Given("^I have my app configured$")
    public void I_have_my_app_configured() {
    }

    @When("^something happens$")
    public void something_happens(final char op) {

    }

    @Then("^I should see xx on the display$")
    public void I_should_see_xx_on_the_display(final String s) {
    }
}
Now you can start write your espresso code inside of each step. To run your test you need to:
gradle --parallel :app:assembleDebugTest
adb install -r app/build/outputs/apk/app-debug.apk
adb shell pm list instrumentation
gradle connectedCheckadb shell am instrument -w com.example.azevedorafaela.myapp lication/com.example.azevedorafaela.myapplication.test.Instrum entation
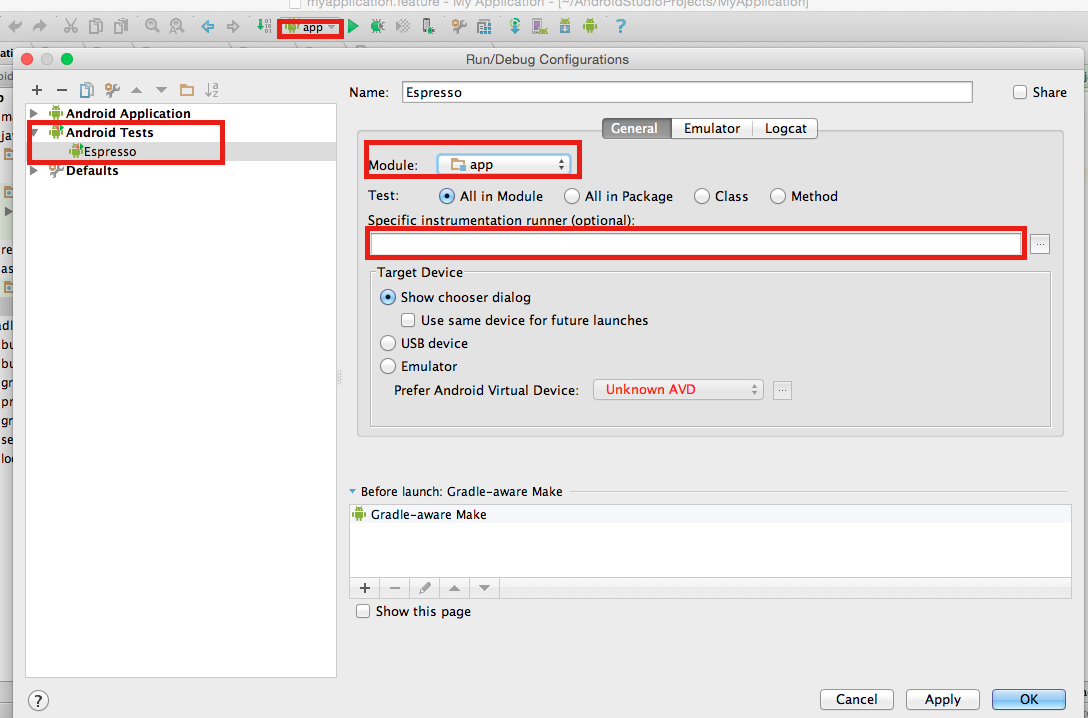
Now you can run your cucumber with espresso tests. I hope this “tutorial” helps you as helped me to install everything on my project.
Thank you guys ! See you next week 🙂
Hello guys, today I will post about some steps that you can follow to create the QA area from the scratch.
1 – Make questions like:
2 – Understand what will be first priority and until where you will reach (Like performance tests, integration ui tests, etc…), so you can have a big picture of the project
3 – Remember that if you are using BDD, it is just 3 layers (Don’t expose your code)
4 – Decide what are the scenarios that must be in the regression (Priority). What are the most repetitive tests ?
5 – Use tags for all the type of scenarios, like smoke, regression, iOS, android, manual. Even manual tests should be in the features inside the automation project
6 – Don’t use too many complex steps in your scenarios
7 – Try to re-use steps so you don’t need waste time
8 – Use examples
9 – Regression tests – Automated tests
10 – Form a team of automation and equality the level of knowledge. Make some meetings to prepare people in your team to use the tool with wisdom.
I think it’s pretty much this. Sorry guys if I forgot something… If I remember anything else I will update here. Thank you ! Feel free for comments and your opinion always ! See you next week !
What is ?
It’s used for small number of inputs, but with exhaustive number of possibilities. It’s a black box testing with systematic and statistics techniques so, you don’t need to have the knowledge of the implementation of the system. The main aim is maximize the coverage by comparatively lesser number of test cases
Orthogonal arrays can be applied in user interface testing, system testing, regression testing, configuration testing and performance testing.
What are the benefits ?
Remember Pairwise? So, the benefits are the same, you will have a precisely test. 100% of Orthogonal Tests implies 100% of Pairwise.
Why don’t use it ?
Well, as any other technique we can find some negative points:
So, you need to choose wisely because not all the applications will suit in this technique, this depends of the behaviour of your application. You need to measure the priority points of the project as well, like if you want to cover 100% of the tests of cover a good part of the tests and save a lot of time…
How to use it ?
Examples:
If we have 3 parameters, each can have 3 values then the possible Number
of tests using conventional method is 3^3 = 27
While the same using OAT, it boils down to 9 test cases.

The array is orthogonal, because all possible pair-wise combinations
between parameters occurs only once.
The given L9 Orthogonal Array assess result of test cases as follows:

Single Mode Faults - Single mode faults occur only due to one parameter.
For example, in above Orthogonal array if test cases 7, 8 and 9 show error
, we can expect that value 3 of parameter 1 is causing the error.
Likewise we can detect as well as isolate the error.

Double Mode Fault - Double mode fault is caused by the two specific
parameters values interacting together. Such an interaction is a
harmful interaction between interacting parameters.

Multimode Faults - If more than two interacting components produce the
consistent erroneous output, then it is a multimode fault.
Orthogonal array detects the multimode faults.
As always, if you have any suggestion or question please feel free to comment below.
Thank you ! See you next week 🙂
References:
http://www.tutorialspoint.com/software_testing_dictionary/orthogonal_array_testing.htm
http://www.softwaretestinghelp.com/combinational-test-technique/
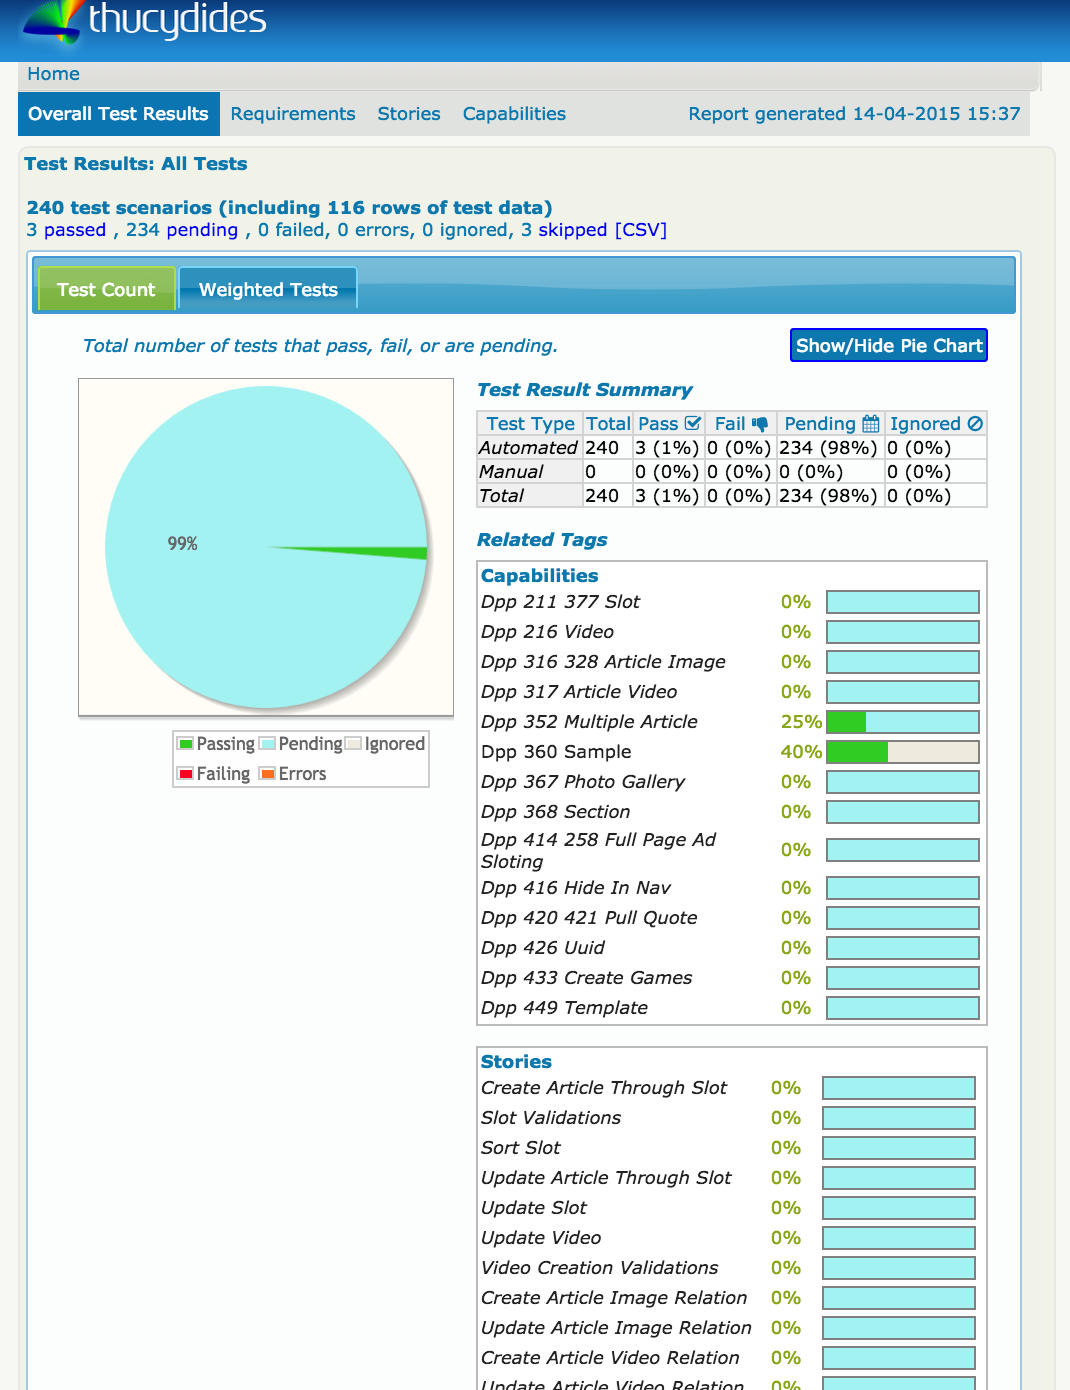
What is ?
Basically, this report of your scenarios/features:
Project Structure
+ src
   + main
      + java
         + com.mycompany.pages
            - HomePage.java

   + test
      + java
         + com.mycompany.pages
            + requirements
               - Application.java
            + steps
               - EndUserSteps.java
            - SearchByKeywordStoryTest.java

      + stories
         + com.wakaleo.webtests.wikipedia
            - SearchingForCats.story
Starting
If you have maven installed, go to the terminal or IDE and:
– Create a new project:
mvn archetype:generate -Dfilter=thucydides– Open your settings.xml and write:
<?xml version="1.0" encoding="UTF-8"?>
<settings>
   <pluginGroups>
       <pluginGroup>net.thucydides.maven.plugins</pluginGroup>
  </pluginGroups>
</settings>
– In the pom.xml file, update the default JUnit dependency to at least 4.11
– Add a dependency to hamcrest-all and thucydides-junit. Thucydides uses SLF4J for its logging, so add an SLF4J implementation (e.g. slf4j-simple) as well.
– If you are not using Maven 3, make sure you configure the Maven compiler plugin to use Java 5.
– Finally, add the thucydides-maven-plugin, which provides the Thucydides reporting services. The resulting pom.xml file should look something like this:
  <groupId>com.wakaleo.webtests.wikipedia</groupId>
  <artifactId>wikipediawebtests</artifactId>
  <version>1.0-SNAPSHOT</version>
  <packaging>jar</packaging>

  <name>wikipediawebtests</name>
  <url>http://maven.apache.org</url>

    <properties>
        <project.build.sourceEncoding>UTF-8</project.build.sourceEncoding>
        <thucydides.version>0.9.228</thucydides.version>
    </properties>

    <dependencies>
        <dependency>
            <groupId>junit</groupId>
            <artifactId>junit</artifactId>
            <version>4.11</version>
        </dependency>
        <dependency>
            <groupId>org.hamcrest</groupId>
            <artifactId>hamcrest-all</artifactId>
            <version>1.1</version>
        </dependency>
        <dependency>
            <groupId>net.thucydides</groupId>
            <artifactId>thucydides-junit</artifactId>
            <version>${thucydides.version}</version>
        </dependency>
        <dependency>
            <groupId>org.slf4j</groupId>
            <artifactId>slf4j-simple</artifactId>
            <version>1.6.1</version>
            <type>pom</type>
        </dependency>
    </dependencies>
    <build>
        <plugins>
            <plugin>
                <groupId>org.apache.maven.plugins</groupId>
                <artifactId>maven-compiler-plugin</artifactId>
                <version>2.3.2</version>
                <configuration>
                    <source>1.5</source>
                    <target>1.5</target>
                </configuration>
            </plugin>
            <plugin>
                <groupId>net.thucydides.maven.plugins</groupId>
                <artifactId>maven-thucydides-plugin</artifactId>
                <version>${thucydides.version}</version>
            </plugin>
        </plugins>
    </build>
</project>
– Run this command to be sure that everything it is running correctly: mvn package
– Create a new class contains the list of “features” that make up the application, and stories related to each feature. These stories are not the tests themselves – rather they are used to model the application requirements.
– Writing your first test:
public class Application {
	    @Feature
	    public class Search {
	        public class SearchByKeyword {}
	        public class SearchByAnimalRelatedKeyword {}
	        public class SearchByFoodRelatedKeyword {}
	        public class SearchByMultipleKeywords {}
	        public class SearchForQuote{}
	    }

	    @Feature
	    public class Backend {
	        public class ProcessSales {}
	        public class ProcessSubscriptions {}
	    }

	    @Feature
	    public class Contribute {
	        public class AddNewArticle {}
	        public class EditExistingArticle {}
	    }
	}
– Create a new test class in a package of your choice calledSearchByKeywordStoryTest.java
@Story(SearchBySingleKeyword.class)
@RunWith(ThucydidesRunner.class)
public class SearchByKeywordStoryTest {

    @Managed(uniqueSession = true)
    public WebDriver webdriver;

    @ManagedPages(defaultUrl = "http://www.wikipedia.com")
    public Pages pages;

    @Steps
    public EndUserSteps endUser;

    @Test
    public void should_display_article_about_cats() {
        endUser.is_on_the_wikipedia_home_page();
        endUser.searches_by_keyword("cats");
        endUser.should_see_article_with_title("Cat - Wikipedia, the free
 encyclopedia");
PS: @Managed and @ManagedPages are required to take care of our page objects.
– Create a step library called EndUserSteps:
public class EndUserSteps extends ScenarioSteps {

    public EndUserSteps(Pages pages) {
	super(pages);
    }

    @Step
    public void searches_by_keyword(String keyword) {
        enters(keyword);
        performs_search();
    }

    @Step
    public void enters(String keyword) {
    }

    @Step
    public void performs_search() {
    }

    @Step
    public void should_see_article_with_title(String title) {
    }

    @Step
    public void is_on_the_wikipedia_home_page() {
    }
}
– You will need create your own classes inside of each Step.
– Run the command to generate your report: mvn verify thucydides:aggregate
– Your report will be in target/thucydides directory, open the home.html
If you want to see a complete model, go to this link.
If you want to learn more about maven commands, go to this link.
If you want to see the post of John Smart with his complete example, go to this link.
Thank you guys 🙂
Sources:
https://github.com/thucydides-webtests/thucydides/wiki/Getting-Started
http://maven.apache.org/guides/introduction/introduction-to-the-lifecycle.html
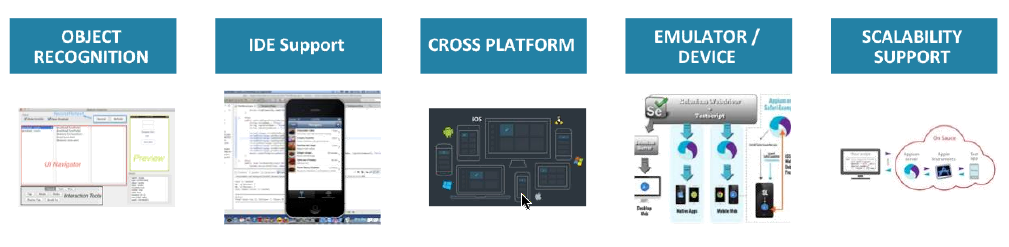
Hi guys, today I have another Webinar that I participate about Appium, how to choose the automation mobile tool, how should be the structure, etc. You can watch online or download, just click in this link to start.
You can jump the advertisement moving to 00:10:51 of the video. Also, you can jump to 00:23:12 and watch the demo. To jump the demo go to 00:40:00.

– HTML: web applications which runs in web browser.
– Native: just native elements, apps which doesn’t have html elements.
– Hybrid: mix of native elements and html elements.
– How choose the automation tool ?
– Verify how you inspect the elements.
– Scalability, How many devices supports (IOS, windows phone, tablet, kindle, ipad, etc).
– Integration with other tools like Jenkins, JIRA, etc.
– Cloud, If this tool supports cloud tests (Amazon cloud, Sauce Labs, etc).
– Automation Support, How long do you take to find the solution for some problem ? (Particularly, this is the most important for me )
Open source automation test automation framework for native, hybrid and mobile apps.
Supports: Real devices, Simulators, Native Apps, Hybrid Apps, Mobile Web Apps (IOS and Android only).
Environment: Appium, Android Studio (Sdks) and Eclipse.

Setting parameters: App device, launch device, android setting (path of sdks).
Architecture, Blueprint:



– Do some proof of concepts (The configuration it is the hard and most boring part for me).
– Share the right quantity of tests between emulators and devices.
– Distribute the right level of tests between unit (70%), integration (20%) and manual tests (10%).
– Remember that if you are using BDD, it is just 3 layers.
– Use CI since the beginning.
– Decide what must to have in the report.
– Considerate the language which the developers are using (You never know when you will need help).
Thank you guys ! See you next week 🙂
Source: link
About End-to-End tests:
“Focus on the user and all else will follow”
Unit tests take a small piece of the product and test that piece in isolation. They tend to create that ideal feedback loop:
With end-to-end tests, you have to wait: first for the entire product to be built, then for it to be deployed, and finally for all end-to-end tests to run.

Although end-to-end tests do a better job of simulating real user scenarios, this advantage quickly becomes outweighed by all the disadvantages of the end-to-end feedback loop.
Unit tests do have one major disadvantage: even if the units work well in isolation, you do not know if they work well together. For that, you can use an integration test (more simple than end-to-end tests). An integration test takes a small group of units, often two units, and tests their behaviour as a whole, verifying that they coherently work together.
Even with both unit tests and integration tests, you still need do a small number of end-to-end tests to verify the system as a whole. End to end tests are very important even that you let this for the last phase.
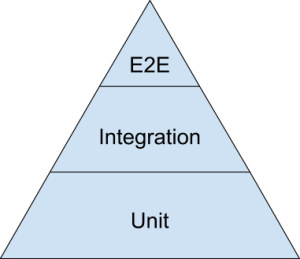
To find the right balance between all three test types, the best visual aid to use is the testing pyramid. Here is a simplified version of the testing pyramid from the opening keynote of the 2014 Google Test Automation Conference.
The bulk of your tests are unit tests at the bottom of the pyramid. As you move up the pyramid, your tests gets larger, but at the same time the number of tests (the width of your pyramid) gets smaller.
Google often suggests a 70/20/10 split: 70% unit tests, 20% integration tests, and 10% end-to-end tests. The exact mix will be different for each team, but in general, it should retain that pyramid shape.
Hope you like it guys, I read the original article and it seemed to me that the guy doesn’t think it is too important end-to-end tests. I don’t agree with it, maybe for this reason I changed the way he was speaking about (If you still want to do end-to-end tests). End-to-End tests is important as any other test phase, the difference is that you don’t need to do all the small tests in this phase. It is just my thought… And you can write your comment, suggestion too in this post.
Thank you ! See you next week 🙂