Hooks vs Backgrounds (Cucumber)

Sometimes you need some pre conditions to run your scenario or a group of scenarios sharing the same steps repeatedly. You can use background or hooks to setup these conditions. How to know what is the best to use ? Well, depends of the case. So today, I will give some examples with best practices when you should use background and when you should use hooks.

Step definition files have a corresponding method available in the before(condition) do . . .method, which has however a matching after(condition) do . . . method as well.


Use Background only to setup a pre-condition that the user needs to know


If it is not a trivial information to the user, set it up in the implementation (hooks), not in the test steps. Remember feature files should focus on What, and not How. These should be high level steps. We want to keep this simple. So, for this reason you avoid give too many details like this type of steps: “When I press the button”.


When using hooks


You can use hooks to run before/after each scenario, a group of scenarios according to the tags, all the scenarios in a feature or all the scenarios of your project. They will run before the first step of your scenario, like the background, but it won’t need any step in your feature file.


@Before and @After each scenario

Similar to JUnit @Before and @After tagging a method with either of these will cause the method to run before or after each scenario runs. Common functionality like starting or stop browsers are nice to place in these hooks. They reduce the number of common test steps in each scenario. Before hooks will be run before the first step of each scenario. They will run in the same order of which they are registered. After hooks will be run after the last step of each scenario, even when there are failing, undefined, pending or skipped steps.

You may want to finish the tests after the first failure (could be useful in some cases like Continuous Integration when fast feedback is important), for those cases add the command (ruby) in your hook:

  Cucumber.wants_to_quit = true if s.failed?


@AfterStep

You have also the possibility to create an after step hook and add for example a take screenshot action. This hook will run after each step of you scenario and you can also filter for certain scenarios using tags. This is only available for Ruby language at the moment, not for Java.


@Around

Around hooks will run “around” a scenario. This can be used to wrap the execution of a scenario in a block. The Around hook receives a scenario object and a block (Proc) object. The scenario will be executed when you invoke block.call.

The following example (ruby) will cause scenarios tagged with @fast to fail if the execution takes longer than 0.5 seconds:

Around('@fast') do |scenario, block|
  Timeout.timeout(0.5) do
    block.call
  end
end


Tagged hooks

You can filter what are the scenarios that will run this hook every time before start the scenario or after the scenario ends. The condition which enables the before/after block is the tag (false or nil). Tagged hooks can have multiple tags, and follow similar tagging AND/OR rules that the runner does. You can OR and AND tags in much the same way as you can when running Cucumber from the command line.
e.x. @Before(‘@mobile’, ‘˜@login’) for tests needing a mobile browser launched and are not tagged as login

e.x. @Before(‘@mobile, ˜@login’) for tests needing a mobile browser launched or are not tagged as login


@Before all scenarios

If you have a hook you only want to run once before all the scenarios, use a global variable. Example (ruby):

Before do 
  $dunit ||= false # define a variable before we can reference its value
  return $dunit if $dunit                  # bail if $dunit TRUE
  step "run the really slow log in method" # otherwise do it.
  $dunit = true                            # don't do it again.
end


@AfterConfiguration

You may also provide an AfterConfiguration hook that will be run after Cucumber has been configured. This hook will run only once; after support has been loaded but before features are loaded. You can use this hook to extend Cucumber, for example you could affect how features are loaded or register custom formatters programatically.


When using background


Short Backgrounds

When using background keep it as short as possible. These steps won’t be written out each time the user reads the scenario, so it’s best to have something simple that the user can remember while reading through your feature file.


Vigorous Backgrounds

Similar to the above, since these steps won’t be listed with each scenario, the more vivid, the test step is, the easier time the user will have remembering it.


Short Feature files

It’s best to keep these feature files smaller, so that the Background information is more readily available. The general rule of thumb is to keep the file small enough to still see the Background test steps at the top of page when reading any scenario.


These two methods are powerful tools, but be aware to not use them excessively.


Resources:

https://github.com/cucumber/cucumber/wiki/Hooks

https://github.com/cucumber/cucumber/wiki/Cucumber-Backgrounder

https://seleniumbycharan.wordpress.com/2015/08/25/use-of-background-hooks-tags-in-cucumber-jvm/

Appium, how to install and inspect elements on Android ?

  • Install brew:
    ruby -e "$(curl -fsSL https://raw.githubusercontent.com/Homebrew/
    install/master/install)"


  • Install Node.js: brew install node


  • Install XCode


  • Install XCode Command line


  • Install appium. app


  • Install android jdk


  • Install java


  • Export $HOME


  • Export $JAVA_HOME – If you are using Mac, your java will be at: /Library/Java/JavaVirtualMachines/jdkx.x.x.jdk/Contents/Home


  • Export $ANDROID_HOME – If you have android studio (and on Mac), your jdk will be point to /Library/Android/sdk


  • Export $PATH: $PATH:$ANDROID_HOME/tools:$ANDROID_HOME/platform-tools


  • Create an emulator with adb


Be sure you have an android emulator created, I normally use genymotion.


Inspect this app with appium


screen-shot-2016-09-24-at-13-04-41


  • Run Appium Doctor and be sure everything is setup:

screen-shot-2016-09-24-at-13-15-01

  • Click on General Settings button and fill the form like this example:

screen-shot-2016-09-24-at-13-04-55

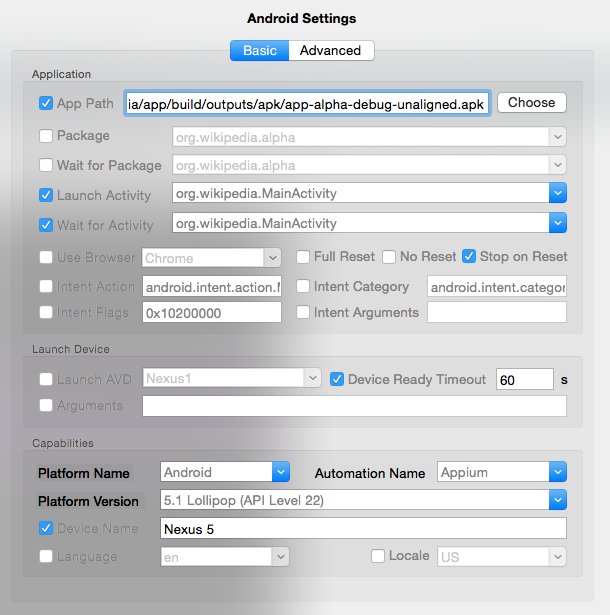
  • Click on Android Settings buttons and fill the form like this example:


screen-shot-2016-09-24-at-13-04-26

  • Open the emulator with adb or genymotion and click to Launch:

screen-shot-2016-09-24-at-13-23-20

  • After this you can click on Inspector button, which will open the app and let you inspect the elements

screen-shot-2016-09-24-at-13-22-40


Easy peasy 🙂

Thank you guys, see you next weekend !

Web automation strategy

Hey guys, today I will post about one of the approaches for web automation. This is a general strategy, which I always try to follow, but depending of the situation you need to adjust and change some priorities.


What should come first ?


  1. Critical scenarios

    Critical or basic scenarios should come first, so before you even start to think about if the validation message when you type negative time is working as expected, you should check, for instance, if the login is working properly.

    So, choose the basic/critical scenario which is the MVP first and implement it. After all the basic scenarios are implemented you can start to think about the others.Doing this, it will save time when doing the regression tests. Separate your automation in phases like, first phase, basic scenarios, second phase, second priority scenarios and so on. So, you don’t get annoyed by taking so much time trying to implement one complete feature. You do the basic things, let the automation working and move to the second phase.

  2. Maintainability

    How much effort does it take to adjust test scripts to the changed requirements, interfaces, data structure, accounts, platforms etc ? You should worry about this since the start, but we know that not everybody thinks the same and even that you have aligned this in the beginning it is common that people forget.

    So, this is the time that you can go back and change/add little things to improve your automation. For example, if your scenarios are not independent, you can implement some checks and make them run by themselves. This will save time when you run a single scenario.

  3. Browsers compatibility

    This depends of what is the most used browser by your clients. You can start implement your automation for all browsers or you can focus on the most used browser and then you adjust the automation to run on all the other browsers. If you choose to run the automation on all browsers since the beginning you need to be aware of you will spend more time implementing the same scenario. Your automation will be done for all browsers, but all other scenarios will be behind schedule since you need to spend more time on one scenario.

    So, you need to be aware of what is more important, choose the most used and delivery the automation in a short time or take more time to delivery the automation and it will be ready for all browsers already.In my opinion, I prefer to focus on the most used browsers and then implement other browsers in the next phase. When you are implementing one scenario for all browsers, it could be hard to focus and find the issue, since every time you run, it will be running on different browser instances. Same for mobile browsers, this should be done in another step. But again, this depends of the priorities of your project.

  4. Portability

    Is it easy to test your automation on another environment ? This is one of the things you need to be aware of. It could be an improvement task, since you will already have the automation and this can be implemented in the next phase of your automation.


Thank you guys ! See you next week !

Resources:

https://www.atlantbh.com/five-important-aspects-of-successful-test-automation-approach-in-agile/

Improve the architecture of your cross-platform automation

Hi guys, today I am going to talk about how to better architect your test code and obtain better cross-platform code reuse.

The idea is that you provide an implementation of page objects for each platform you need to support (e.g. iPhone, iPad, Android phone, Android tablet, mobile web, desktop web,…).


Use Page Objects

While originating in web testing, the ideas of POP apply equally well to native mobile. The most obvious benefit of this is abstraction and reuse. If you have several steps needing to navigate to details, the code is reused. Also, callers of this method need not worry about the details (e.g. query and touch) or navigating to this screen.


Don’t specify fields in your feature files

Working this way gets you complete reuse of Cucumber features as well as step definitions: the details of interacting with the screen is pushed to page object implementations.

Scenarios should be written like a user would describe them. Beware of scenarios that only describe clicking links and filling in form fields, or of steps that contain code or CSS selectors. This is just another variant of programming, but certainly not a feature description.

Declarative features are vivid, concise and contain highly maintainable steps.

For example:

Scenario: Valid login credentials
  Given I am on login page
  When I enter valid credentials
  Then I should be redirected to the management page


Define a page object for each screen

For each screen you want to automate, decide on an interface for a page object class (e.g. like LoginScreen). This means that the calling code, which is usually in a step definition, is independent of platform – hence it can be reused across platforms. For each supported platform, define a class with implementations of the page-object methods.


Don’t expose the framework in your step definitions

Use only custom steps, and in each step definition only use page objects and their methods (no direct calls to the framework (Calabash, Selenium, Appium, Robotium).


Reuse step definitions

This comes in handy when a step extends another step’s behaviour or defines a superior behaviour that consists of multiple steps. You should try to reuse steps as often as possible.This will improve the maintainability of your app: If you need to change a certain behaviour, you just need to change a single step definition.

For example (Using javascript and protractor):

 this.Given(/^I am on login page$/, function() {
    loginPage.openLoginPage();
 });


Thank you guys ! See you next week !


Resources:

https://developer.xamarin.com/guides/testcloud/calabash/xplat-best-practices/

https://blog.codeship.com/cucumber-best-practices/

Promise Manager (Protractor – WebDriverJs)

Hey guys,

I have coded in Java, C# and Ruby since I’ve started work with Automation, so about 8 years ago. It’s my first time coding in Javascript for AngularJs pages and for those who are like me you need to know that if you are working with protractor or webdriverjs they return promises from all of its browser interactions, which could lead to some confusing behaviour.


What is the promise manager ?

Protractor and webdriverjs are asynchronous and every result returns a promise. They use a custom promise library called ControlFlow, which implicitly synchronizes asynchronous actions, making it so you only have to register a promise callback when you want to catch an error or access a return value. The promise module coordinates the flow of the asynchronous tasks.

This Promise Manager ensures that calls to the browser are run in sequence, and you only need to worry about dealing with the Promises when you wish to do something with data from the page.

In practice, this means that you can ignore the returned promises while interacting with the page.


So, instead of:


driver.get('https://azevedorafaela.wordpress.com')
 .then(function() {
   return driver.findElement({class: '.searchtip'});
 })
 .then(function(search) {
   return search.sendKeys('webdriver');
 })
 .then(function() {
   return driver.findElement({class: '.button'});
 })
 .then(function(button) {
   return button.click();
 });


You can have:

 driver.get('https://azevedorafaela.wordpress.com');
 driver.findElement({class: '.searchtip'}).sendKeys('webdriver');
 driver.findElement({class: '.button'}).click();


The trick part is when you want to extract the values from the page to do an assertion for example:

 driver.get("https://azevedorafaela.wordpress.com");
    driver.getTitle().then(function(pageTitle) {
        assert.equal(pageTitle, "Rafaela Azevedo");
 });


You can find more information on the links below. Thank you ! See you next weekend 🙂


Resources: http://blog.scottlogic.com/2015/03/04/webdriverjs-and-promises.html

https://github.com/SeleniumHQ/selenium/wiki/WebDriverJs

http://seleniumhq.github.io/selenium/docs/api/javascript/module/selenium-webdriver/lib/promise.html


Sending request using a token with node.js

Hey guys, today I will post about how to use a token when sending your requests in node.js. As I am using these requests for my automated tests with cucumber.js, I am going to post the step definition, too.


The class with the API requests:


'use strict';

var request = require('sync-request');
var protractor = require('protractor');
var browser = protractor.browser;
var sprintf = require('sprintf-js').sprintf;

function API() {

 //Initialise the variables
 var token = null;
 var total = null;
 var id = null;

 return {
  //Authenticate request where it gets the token to be used after
   authenticate: function() {
   var response = request('POST', getAuthURL(), {
   headers: {
    'Content-Type': 'application/x-www-form-urlencoded'
   },
   body: getAuthBody()
 });

 var json = parseResponse(response);
 if (response.statusCode !== 200) {
  throw Error('Unable to authenticate: ' + response.statusCode);
 }

 token = json.token_auth;
 console.log('Authenticated with token:[' + token + ']');

 return token;
 },

 //Get the token from the authenticate request
 create: function() {
  var response = request('GET', getCreateURL(), {
  headers: {
  'Content-Type': 'application/json',
  'Auth-Token': token
  },
  body: getCreateBody()
 });

   var json = parseResponse(response);
   if (response.statusCode !== 200) {
    throw Error('Unable to create:' + response.statusCode);
   }

   //Get the nodes from the response, data is an array
   total = json.total;
   id = json.data[0].id;
   console.log(id);
   console.log('Created:[' + total + ']');

    return json;
   },

   //Parsing the response
   function parseResponse(response) {
    return JSON.parse(response.getBody('utf8'));
   },

   //Returning the body with the credentials from protractor.js config
   function getAuthBody(response) {
    return 'user=' + browser.params.credentials.username +
 '&pass=' + browser.params.credentials.password;
   },

   //Write the body to create the user and convert it
   function getCreateBody(response) {
   return JSON.stringify({
    deviceId: '123456789',
    name: 'Rafaela',
    description: 'Description',
    cities: [{
     'label': 'London'
    }, {
     'label': 'Oxford'
    }]
   });
 },

   //Get address and then endpoint from the protractos.js
   function getAuthURL() {
    return getPath() + '/' + browser.params.endpoints.authenticate;
   },

   //Get the host and path, easier to maintain
   function getPath() {
    return browser.params.host + '/' + browser.params.path;
   },

   function getCreateURL() {
    return getPath() + '/' + browser.params.endpoints.create;
   }

}

module.exports = API;


  • Authenticate request where it’s getting the token to be used in the Create request.


Your protractor.js with protractor and cucumber configs:

'use strict';

 var os = require('os');
 var platform = os.platform();

 //Browsers that you will run the automation
 var chrome = {
  browserName: 'chrome'
 };

 var safari = {
  browserName: 'safari'
 };

 var firefox = {
  browserName: 'firefox'
 };

 var capabilities = [chrome];

 // Enable Safari only on macos
 if (platform === 'darwin') {
 capabilities.push(safari);
 }

exports.config = {
 seleniumAddress: 'http://127.0.0.1:4444/wd/hub',
 //Point to the features path
 specs: [
 'src/features/*.feature'
 ],
 multiCapabilities: capabilities,
 noGlobals: true,
 baseUrl: 'http://localhost:5000/',
 framework: 'custom',
 frameworkPath: require.resolve('protractor-cucumber-framework'),
 cucumberOpts: {
 //Point to the step definitions and support classes
 require: 'test/steps/**/*.js',
 //Format for the cucumber report
 format: [
 'json:test-reports/cucumber-json/cucumber.json',
 'pretty'
 ],
 strict: true,
 //Tags filtering the scenarios
 tags: [
  '@regressionTests',
  '~@pending'
  ]
 },
 //Params to pass to your tests, username, passwords, etc.
 params: {
  credentials: {
   username: 'user',
   password: 'Password123'
  }
 },
 //Your site address
 host: 'http://www.testSite.com',
 //Path to use in the requests
 path: 'rest',
 //Endpoints for the requests
 endpoints: {
   authenticate: 'auth',
   create: 'create/user'
  }
 }
}
};


Your step definition with the step and calling the api functions:

'use strict';

var API = require('../api');

 var SupportSteps = function() {

 var api = new API();

 this.Given(/^I have created the user$/, function() {
       //Calling the authenticate first, you will get the token to use it
       api.authenticate();
       api.create();
     });
 };

module.exports = SupportSteps;

  • So here, you have the step definition that calls the functions to authenticate first and then to create the user after using the token.

Thank you guys ! See you next weekend 🙂

How to post a JSON request in Node.js

Hi guys, today I will post a code snippet to send a post request to the server in Node.js. This could be useful when testing integration between two different websites. For example, when you need to create/update something on a backoffice and you need to check the details on a front-end website.

  • First you need to install this request module with npm:
npm install sync-request


  • After you just need to create the js file with the code:
'use strict';

var request = require('sync-request');

var APIMounts = function() {

 var client = {
 id: '123456',
 name: 'Test Client',
 description: 'This client is used for automation',
 age: '20 years',
 city: 'London',
 interests: [{ 'music': 'Rock' }]};

 var details = {
 method: 'POST',
 url: 'http://google.com/rest/client',
 headers: {
 'Content-Type': 'application/json'
 },
 body: JSON.stringify(client)
 };

 function callback(error, response, body) {
 if (!error && response.statusCode === 200) {
 return JSON.parse(body);
 }
 }
 request(details, callback);
};

module.exports = APIMounts;


  • client is a variable that will need be formatted
  • interests contains an array of strings with key:value
  • url is the host
  • body is the client variable JSON formatted


Resources:

http://blog.modulus.io/node.js-tutorial-how-to-use-request-module

Research – QA process

Hey guys, I sent a form with some questions about the QA process in different corporations and I will post the result here, it’s interesting to know how the majority is working nowadays 🙂

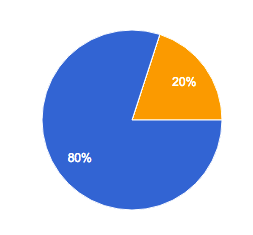
  • Which moment do you create your scenarios (validation tests) ?

Screen Shot 2016-06-04 at 16.45.10

  • 80% – Create after “In conversation” when the ticket is Ready for development 
  • 20% – Create when the ticket is in development
  • 0% – Create when the ticket is Ready for QA


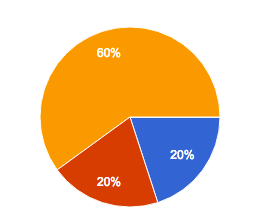
  • As a tester have you been involved in meetings about business rules of a ticket or just the PO ?

Screen Shot 2016-06-04 at 17.16.03

  • 20% – Just the PO is involved and I need to read the tickets to understand the business rules
  • 60% – I take part with devs and after we point the ticket
  • 20% – I take part since the ticket’s creation with the PO


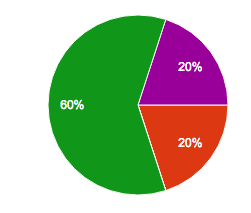
  • Do you have a brief explanation or demo about what the ticket is about ?

Screen Shot 2016-06-04 at 17.20.21

  • 0% – I have a demo before test the ticket
  • 0% – PO explains to me what the ticket is about
  • 20% – Dev explains to me what the ticket is about
  • 60% – I have a meeting in the beginning of the sprint to know what the ticket is about
  • 20% – PO and dev explain to me the ticket


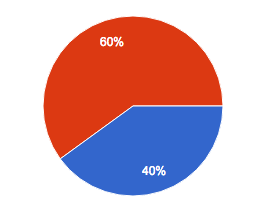
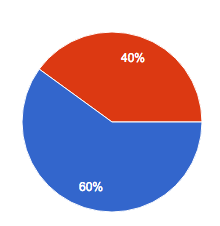
  • When you do the regression tests, do you test the integration between the platforms ?

Screen Shot 2016-06-04 at 17.27.49

  • 40% – I test the integration between the related platforms
  • 0% – Other
  • 60% – I test just the platform which will be released


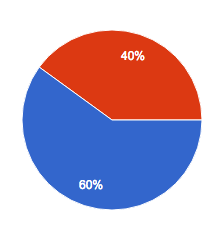
  • Have you ever performed the regression tests before the tickets be resolved ?

Screen Shot 2016-06-04 at 17.31.01

  • 60% – Yes
  • 40% – No


  • Do you have a staging environment to test each single ticket ?

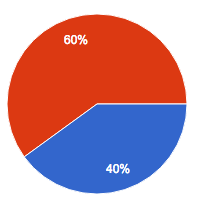
Screen Shot 2016-06-04 at 17.33.11

  • 40% – No
  • 60% – Yes


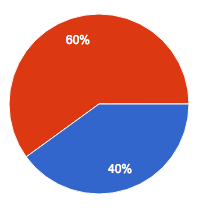
  • Do you have an UAT environment to test the group of tickets of each release ?

Screen Shot 2016-06-04 at 17.35.18

  • 40% – Yes
  • 60% – No


  • When you have tickets to be tested together…

Screen Shot 2016-06-04 at 17.36.57

  • 60% – You are notified by the developer
  • 0% – Other
  • 40% – It’s written on the ticket to be tested together with another(s) ticket(s)


Comparing @FindBy and Map repository approaches

What is this @FindBy ?

It’s an annotation on Selenium that organize the elements and using the PageFactory, these WebElements are usually initialised when a Page Object is created. It’s a best practice of Page Object Models, but more than this is a way to let your group of elements well-structured and just call when you need it.
The @FindBy annotation is used to locate one or more WebElements using a single criterion. For example:

@FindBy(id = "id_element")
private WebElement element;


To create the instance for these elements, you can use:

PageFactory.initElements(driver, this);


For the cases you want to search for all the given criteria, you can use @FindBys and for the ones you want to search for at least one of the given criteria, @FindAll

So, for example:

Using @FindAll:

@FindAll({
    @FindBy(name = "username"),
    @FindBy(name = "password")
})
private List<WebElement> loginfields;

The loginfiends list should contain the element with name = username and the element that contains name = password, 2 elements. If you use @FindBys it wouldn’t bring anything, since there is no element with two names (both of the criteria).

So, this structure makes the code much easier to read. You should place the @FindBy in the beginning of your page object class.

What is the Object repository ?

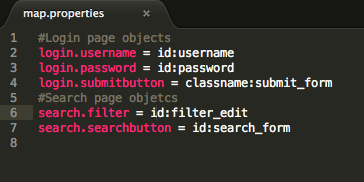
It could be a properties/text file where you place all the locators for the elements and you use selenium to call each one. The property file contains a collection of key-value pairs, with the key being a logical name identifying the object and the value containing unique objects properties used to identify the object on a screen. You can use this concept of Object Repository for any language, not only Java and not only with Selenium.

It contains the key of the element and the value to find it. The corresponding value consists of two parts: the attribute type used for uniquely identifying the object on screen and the corresponding attribute value.

Screen Shot 2016-05-21 at 20.05.19

After this, you need to create a class to get the elements . For example:

Screen Shot 2016-05-21 at 20.34.38

As you can see, objects can be identified using a number of different properties, including object IDs, CSS selectors and XPath expressions.

Now you can use these in your scripts to execute any scenario. You just need to call the Map repository and get the locator key.

Screen Shot 2016-05-21 at 20.42.57

So, in the end you just need to update this properties file with the new locators.

The aim of both of the methods is to reduce the maintenance time when you have new locators. If you are using Selenium, I suggest you to use @FindBy since it’s a good practice and the framework provides this option, but you don’t have this for all the test frameworks in the market, for those you can have a map repository.

Cheers guys, see you next weekend 🙂


Resources:

http://www.ontestautomation.com/findby-strategies-for-selenium-explained/

http://www.ontestautomation.com/building-and-using-an-object-repository-in-selenium-webdriver/

Test Automation Obstacles On Demand

Hey guys, today I will post a webinar that I’ve watched last week. It’s about the challenges of test automation:

  • Collaboration
    • Daniel explains that is easy to ask developers to write test automation and for this reason, it’s better to choose the same language of the developers
    • Assign an owner for the digital test coverage but keep the conversation open to all teams
  • Tools
  • Reports
  • Flows
  • Time
  • False negatives
  • Stability
    • Object identification is the key for robust automation
    • Assure proper Error handling
  • Security
    • Networks
    • Orientation
    • Location
    • Notifications
    • Events
    • Device events

Here is the video, but you can have a look on the slides on the link below:

Source: http://info.perfectomobile.com/Overcoming-Test-Automation-Obstacles-On-Demand-Replay.html?mkt_tok=eyJpIjoiTkRKaVlUY3lZbVk0TTJaaiIsInQiOiJZV2w2VWtxMkk0a214d29ETmNvaFpodENQeHllTUcrMkYycU05bEV1WmhIYzQyUTBhS3NoRjA5TFFuTTN6S3NcL1ZPaDQ1YWtBNmRSZDRcLyt4eVdyVk5ES1FBS0MrWVwvSU5WUGZVZ0VwVGI1ST0ifQ%3D%3D