Hello guys !!
I have a friend that asked to me somethings to start in Selenium’s world. For this reason I will write today about first steps to automate in Selenium.
In this example, we will open in the Chrome browser. Install the Chrome in your Operational System and after that, you have to download the driver too.
The link to download the driver is: http://chromedriver.storage.googleapis.com/index.html
Now, you have to download the WebDriver’s lib. You can download in this link: http://docs.seleniumhq.org/download/
Import the lib in your Java project. This is how the structure will looks like. Pay attention on the folder of Libraries in this picture below.

This is the package and the libs imported to use in our automation:

This is the code to use the chrome’s driver. You have to put this, because the Chrome won’t open without the driver and this line. If you are using Windows, you have to download the .exe file. Each OS that you use, you have a specific file to download. After write this line, you will instantiate the ChromeDriver and write the command below, to open a site in Chrome.
![]()
You can find an element of different ways. You can use the id, the classname, tagname, etc… Xpath is the last option that you have to use, because there is a lot of problems when you have to use it in mutiple browsers. So, you can look all the possibilities in the picture below:

This is the correct way to wait some element to load on your page. You have to put this after load a new page, or click on a new function. It is better put this expected conditions to wait a element than put a time to wait, because unfortunately we depend a lot of environment and browser.
![]()
You can use these commands to click and write something in specific field, respectively. You can instantiate the element and you will use only one time to search it. After that, you can use the instance to click, send words and others actions in the element without looking it again.
![]()
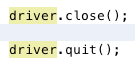
This is the command to close the browse, to close the driver, respectively, and finish your automation. After this, you can’t use the driver anymore, unless you instantiate again another WebDriver.
This is the final code ! Maybe your code will looks like with mine. Afterward, just put to run and see the automation !

Bye guys !!
