BDD Best practices

Here I am again talking about BDD  haha 😀

I am trying to implement the best practices of BDD in my company, it’s quite hard because most of them are developers and they have their own way to think which is different for Business and QA professionals. Other day I was discussing with a guy who had read a post about BDD and suddenly he entitled himself as an expert ! Really, this is the most common attitude you will find in IT atmosphere.

57221765


So, the structure is exactly like this and some people like to write the Given step in the past, but this is the thing, you don’t really need to write the first step in the past, some cases you can write in the present tense.

 Like:

Given I have xxx…
When I do xxx…
Then I should see xxxx…

The first step is a situation you have now like I am logged on the system, you don’t need write always in the past, this is not a rule. You need to write something is evident, this is the aim. So, if you want write in the past the Given, you will have something like:

Given I have logged xxx…
When I do xxx…
Then I should see xxx…

Except the Given that you can choose what is the best option for your scenarios, the When and Then you need to follow the right tenses, When in present Tense and Then in the future tense.
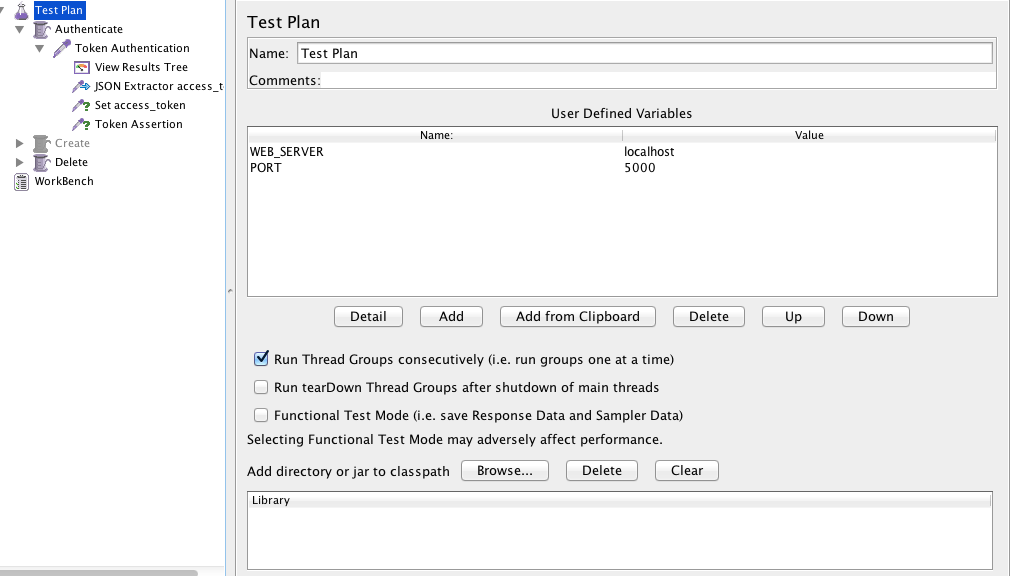
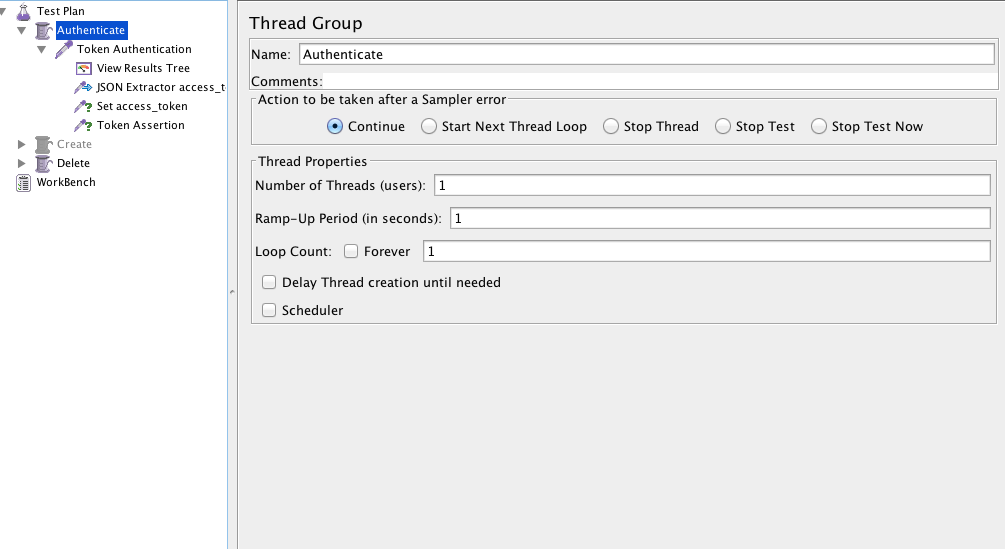
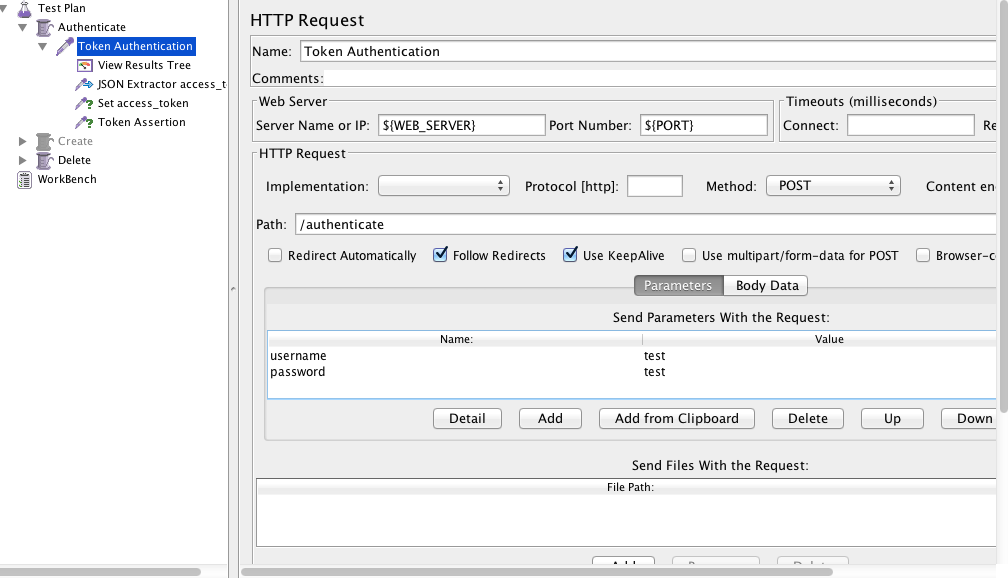
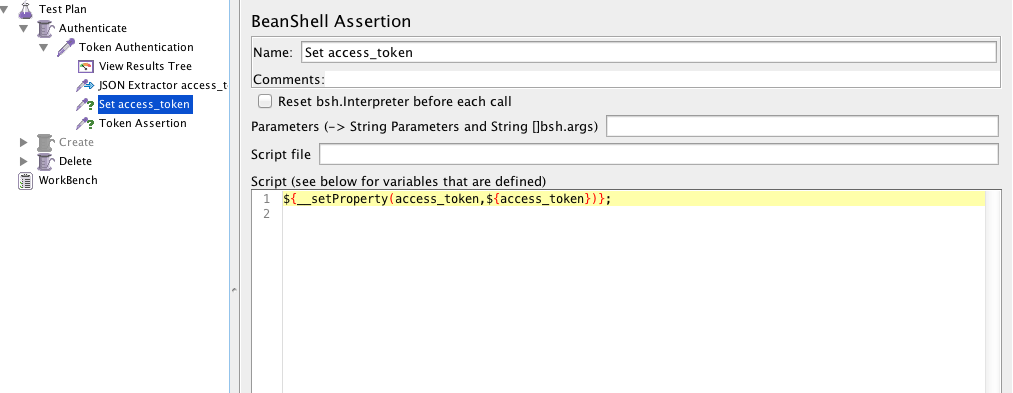
BDD structure:

bdd-best-practices-e1433515152640

The features must have .feature as the extension of the file and you need put the features in the correct path, if you don’t do that Cucumber won’t work. If you want to run with Jbehave you don’t need follow the right structure, you can change this on the pom file if you are using Maven.


Where should feature files be kept

Some people don’t like to keep them on git with the project, they would like to see the scenarios on JIRA, but you will need to update and maintain in both of the places, for this reason I always put on github.


How should we write feature files


There are generally two ways of writing feature files – Imperative and Declarative

Imperative style of writing a feature file, is very verbose, contains low level details and too much information.

Pros: person reading the feature file can follow the step-by-step

Cons: Because of too much detail, the reader can lose the point of the story and the tests. The feature file becomes too big, difficult to maintain and likely to fail due to UI updates.

Declarative style of writing a feature file is concise and to the point, contains only relevant information about the story.

Pros: The declarative style is more readable as it contains less steps in the scenario. The reader can easily understand the scope of the test and quickly identify if any key elements are missing.


Independence of Scenarios

Scenarios should be independent of one another. This means that each and every scenario is stand-alone and should not refer to or depend on functionalities/conditions in other scenarios.


Redundancy and Refactoring

  • Avoid repetitions! Repetitions or identical steps indicate the need forrefactoring. Refactoring denotes that a scenario should be split into multiple ones while the original meaning is preserved.
  • How many Givens, Whens and Thens (including Ands andButs) should you use? As a rule of thumb, there should be amaximum of 3 to 4 consecutive Givens and Thens. Otherwise this indicates a need for refactoring. Whens should be used very sparingly! Usually only include one When.
  • Generally, favour many simple scenarios over few complex ones.


Resources
:

http://www.testingexcellence.com/bdd-guidelines-best-practices/

https://blog.grandcentrix.net/gherkin-guidelines-and-best-practices/

Why do we need to have a QA separated environment ?

  • If QA is using a dev environment, that environment is likely changing. It is hard to control the state of the environment with multiple people working against it.
  • Typically, QA environments mimic more closely production environments than do development environments. This helps ensure functionality is valid in an environment that is more production-like.
  • Developers tend to have lots of tools and things running in their environment that could affect QA validation.
  • You usually setup a separate QA environment, because you want to give the testers an isolated environment on which to test, so that developers and testers can work at the same time.
  • This allows reporting on a common revision so developers know whether particular issues found by testers has already been corrected in the development code.
  • Face the distinct possibility of releasing critical defects to customers because it’s not testing in a real-world environment.
  • The test team won’t see the issues when the environment is not the same because the playing field, so to speak, is not even.
  • Testing on a qa environment provides a more accurate measure of performance capacity and functional correctness
  • As Web applications become more mission-critical for customers, it becomes increasingly important to test on environments that exactly mimic production because it’s production where customers use your application


Resourceshttp://stackoverflow.com/questions/2777283/why-should-qa-have-their-own-qa-environment-what-are-the-pros-and-cons

http://searchsoftwarequality.techtarget.com/tip/A-good-QA-team-needs-a-proper-software-staging-environment-for-testing

Polymorphic Step Definitions with Cucumber-jvm

Just a quick snippet that I am using to create Polymorphic Step Definitions with cucumber-jvm.

First you need to import picocontainer library.

When you can use it ? It’s useful if you have for example Integration and UI scenarios in the same project. For example, for mobile tests I am using robotium, but for the server tests I am using HTTPClient Apache.

Example:
import cucumber.runtime.java.picocontainer.PicoFactory;

public class TestsFactory extends PicoFactory {
public TestsFactory() {
if ("integration".equals(System.getProperty("com.rsouza.androidTest.integration"))) {
addClass(SupportIntegrationSteps.class);
addClass(SupportIntegration.class);
}
else{
addClass(SupportUI.class);
}
}
}
You just need define Cucumber to use cucumber.api.java.ObjectFactory system property.

  • Create a cucumber.properties file on your classpath and if you are using Maven, this should be src/test/resources/cucumber.properties. If you are using gradle this should be src/androidTest/res/cucumber.properties 
  • Add the following line: cucumber.api.java.ObjectFactory = my.features.CustomPicoFactory

Thank you guys ! See you next week 🙂

Resources: https://cucumber.io/blog/2015/07/08/polymorphic-step-definitions

Spoon and Cucumber take screenshot

Hi guys,

Today I will post the code that I’ve improved to make the Cucumber take the screenshots and spoon use them:

Your helper class:

public void takeScreenshot() {
    String[] formattedInfo = treatFeatureScenarioStrings();
    mFeature = formattedInfo[0];
    mScenario = formattedInfo[1];

    if (mScenario == null) {
        throw new ScreenshotException("Error taking screenshot: I'm missing a 
valid test mScenario to attach the screenshot to");
    }
    mSolo.waitForActivity(mSolo.getCurrentActivity().getLocalClassName());
    String tag = Thread.currentThread().getStackTrace()[3].getMethodName();
    ScreenshotTaker.screenshot(mSolo.getCurrentActivity(), 
mSolo.getCurrentViews(), 
tag, mFeature, mScenario);
}


/*
This method is formatting the mScenario info to get the mFeature and 
mScenario namesand format them for the same format which Spoon is 
using. The name mFeature needs to follow this
pattern: Feature Test something and mScenario: Scenario Test something
- First letter of the first word of mScenario in uppercase, the same 
for mFeature
- All the others letters need to be in lowercase
- Before mFeature's name put the word Feature and before mScenario's 
name put the word Scenario
- When Scenario Outline the prefix of the scenario needs to be diferent
*/

private String[] treatFeatureScenarioStrings() {
    String mFeatureCap = mScenarioInfo[0].substring(0, 1).toUpperCase() 
+ mScenarioInfo[0].substring(1);
    String mScenarioCap = mScenarioInfo[1].substring(0, 1).toUpperCase() 
+ mScenarioInfo[1].substring(1);
    mFeature = "Feature " + mFeatureCap.replace("-", " ");
    mScenario = "Scenario " + mScenarioCap.replace("-", " ");

    if (mScenarioInfo.length > 2) {
        mScenario = "Scenario Outline " + mScenarioCap.replace("-", " ");
    }

    return new String[]{mFeature, mScenario};
}

private static class ScreenshotException extends RuntimeException {
    ScreenshotException(final String message) {
        super(message);
    }
}


ScreenshotTaker class:

import android.app.Activity;
import android.content.Context;
import android.graphics.Bitmap;
import android.os.Build;
import android.os.Environment;
import android.util.Log;
import android.view.View;
import java.io.File;
import java.io.FileOutputStream;
import java.io.IOException;
import java.util.ArrayList;
import java.util.HashSet;
import java.util.Set;
import timber.log.Timber;
import static org.assertj.core.api.Assertions.assertThat;
public abstract class ScreenshotTaker {
private static Set<String> mClearedOutputDirectories = new HashSet();
 static final String NAME_SEPARATOR = "_";
 static final String SPOON_SCREENSHOTS = "spoon-screenshots";
 public static File screenshot(Activity activity, ArrayList<View> views
, String tag, String testClassName, String testMethodName) {
 return screenshot(activity, getRecentDecorView(views), tag, 
testClassName, testMethodName);
 }
public static File screenshot(Activity activity, View view, String tag, 
String testClassName, String testMethodName) {
 try {
 if (view == null) {
 File viewFile = null;
 Log.e("Spoon", "Unable to take screenshot of this view, because it is 
null.");
 return viewFile;
 }
File parentFolder = obtainScreenshotDirectory
(activity.getApplicationContext(), testClassName, testMethodName);
 assertThat(parentFolder).isNotNull();
 final String screenshotName = System.currentTimeMillis() + 
NAME_SEPARATOR + tag + ".png";
 File screenshotFile = new File(parentFolder, screenshotName);
getBitmapOfView(view, activity, screenshotFile);
 Log.d("Spoon", "Captured screenshot \'" + tag + "\'.");
 return screenshotFile;
 } catch (Exception var7) {
 return null;
 }
}
 private static void getBitmapOfView(final View view, Activity activity
, final File screenShotFile) {
 activity.runOnUiThread(new Runnable() {
 @Override
 public void run() {
 view.destroyDrawingCache();
 view.buildDrawingCache(false);
 Bitmap orig = view.getDrawingCache();
 android.graphics.Bitmap.Config config = null;
 if (orig == null) {
 Timber.e("Bitmap is null");
 } else {
 config = orig.getConfig();
 if (config == null) {
 config = android.graphics.Bitmap.Config.ARGB_8888;
 }
 Bitmap mBitmap = orig.copy(config, false);
FileOutputStream mFileOutput = null;
 try {
 mFileOutput = new FileOutputStream(screenShotFile);
 if (mFileOutput != null) {
 mBitmap.compress(Bitmap.CompressFormat.PNG, 100, mFileOutput);
 screenShotFile.setReadable(true, false);
 }
 mFileOutput.flush();
 mFileOutput.close();
 } catch (IOException e) {
 e.printStackTrace();
 }
 orig.recycle();
 view.destroyDrawingCache();
 }
 }
 });
 }
private static File obtainScreenshotDirectory(Context context, 
String testClassName, String testMethodName) {
 return filesDirectory(context, SPOON_SCREENSHOTS, testClassName, 
testMethodName);
 }
private static File filesDirectory(Context context, String directoryType,
 String testClassName, String testMethodName) {
 File directory = null;
 if (Build.VERSION.SDK_INT >= 21) {
 directory = new File(Environment.getExternalStorageDirectory(), "app_" + 
directoryType);
 } else {
 directory = context.getDir(directoryType, 1);
 }
if (!mClearedOutputDirectories.contains(directoryType)) {
 deletePath(directory, false);
 mClearedOutputDirectories.add(directoryType);
 }
File dirClass1 = new File(directory, testClassName);
 File dirMethod = new File(dirClass1, testMethodName);
if (!dirMethod.exists()) {
 createDir(dirMethod);
 }
return dirMethod;
 }
private static void createDir(File dir) {
 File parent = dir.getParentFile();
 if (!parent.exists()) {
 createDir(parent);
 }
if (!dir.exists() && !dir.mkdirs()) {
 Timber.e("Unable to create output dir: " + dir.getAbsolutePath());
 } else {
 Chmod.chmodPlusRWX(dir);
 }
 }
 private static void deletePath(File path, boolean inclusive) {
 if (path.isDirectory()) {
 File[] children = path.listFiles();
 if (children != null) {
 File[] arr$ = children;
 int len$ = children.length;
for (int i$ = 0; i$ < len$; ++i$) {
 File child = arr$[i$];
 deletePath(child, true);
 }
 }
 }
if (inclusive) {
 path.delete();
 }
}
/**
 * Returns the most recent DecorView
 *
 * @param views the views to check
 * @return the most recent DecorView
 */
public static final View getRecentDecorView(ArrayList<View> views) {
 if (views == null) {
 Timber.e("Error in getRecentDecorView: 0 views passed in.");
 return null;
 }
final View[] decorViews = new View[views.size()];
 int i = 0;
 View view;
for (int j = 0; j < views.size(); j++) {
 view = views.get(j);
 if (view != null && view.getClass().getName()
 .equals("com.android.internal.policy.impl.PhoneWindow$DecorView")) {
 decorViews[i] = view;
 i++;
 }
 }
 return getRecentContainer(decorViews);
 }
/**
 * Returns the most recent view container
 *
 * @param views the views to check
 * @return the most recent view container
 */
private static final View getRecentContainer(View[] views) {
 View container = null;
 long drawingTime = 0;
 View view;
for (int i = 0; i < views.length; i++) {
 view = views[i];
 if (view != null && view.isShown() && view.hasWindowFocus() && 
view.getDrawingTime() > drawingTime) {
 container = view;
 drawingTime = view.getDrawingTime();
 }
 }
 return container;
 }
}

Please fell free to improve if you have any comment and suggestion it would be great !
Thank you guys, see you next week !

Get json path from an authentication request


This example I am getting json path from an authentication request and use it in another group thread.
Remember install the json plugin for jmeter (If you don’t have), you can do that with homebrew command :

brew install jmeter --with-plugins


  • Create a test plan and set the web server and the port:


Screen Shot 2015-11-11 at 20.08.27


  • Create a Thread Group:


Screen Shot 2015-11-11 at 20.08.44

  • Create HTTP Request, use the variables for the server and the password. Put the path of the authentication page, username and the password.


Screen Shot 2015-11-11 at 20.09.09

  • Create Json Path Extractor and put the path Expression and the variable that you will use. You can test if your path is correct here.


Screen Shot 2015-11-11 at 20.10.14


  • Create a beanshell Assertion or Post processor and set the property:


${__setProperty(access_token,${access_token})};

Screen Shot 2015-11-11 at 20.10.27


  • Create a new Thread Group and a HTTP Header Manager and use the same variable you used before:


${__property(access_token)}

Screen Shot 2015-11-11 at 20.42.41


  • Create the Listener > View Result Tree and it’s done, you can run the jmeter and see if it’s getting the token and using in the next thread group


See you guys 🙂

Java Multithreading – Free course

Hi guys, today I will post the link of a free course that I’ve been doing these last days. So, if you are interested to know a bit more of java multithreading, here is the link.


Linkhttps://www.udemy.com/java-multithreading/learn/#/


It’s teaching how to manage threads, if you need lock them, synchronize… The instructor knows how to explain things in a clear way which sometimes is really hard to find. So, I hope you like it and be useful as it’s being for me.

Thank you guys ! See you next week !

Tests Coverage

As a tester you have a different way to think about the scenarios. You know that you need to think beyond the scenarios. So, how do you know when it will be enough ? When will you have 100% of tests coverage ?

You probably already found a bug out of the requirements, and in a specific sequence of steps. I normally find these kind of bugs with exploratory tests, when I have time to free my creative side and start to do different ways to test the same thing. Developers follow the requirements, they don’t do exploratory tests, usually they think even the user has the possibility to do the same step in a different way, they shouldn’t (Because it’s not the right way).

In my humble opinion, if your software allow to do the same function in 1000 different ways, you should be prepare to test every single “invalid” way, because this will increase the trust in your software. If I find a single stupid bug in an application, like an error when I send invalid characters, I start to think what type of software was delivered, like neither the basic simple stupid scenario of invalid characters was tested, imagine the more complex ones… This could be low priority, but if you ignore this, you need to face there are many people like me (critical detail vision), that see these kind of things and lose the confidence on the software and to be honest, the respect too.

Developer-Calls-It-Done-Meme

Imagine you have all the requirements:

requirements

And you have the system software in this another circle:

system

But in the real world, we don’t have every requirement covered by the system, we have something like this:

merge

Which means you will have some parts in your system not covered by your requirements and you have some parts in your requirements not covered by your system. It is exactly in this part that we, testers should start to think about. We need knowledge of both of the parts, and this takes time.

So, you don’t need to worry cover 100% of your tests in the beginning, you need to worry if you know everything about what you are testing, some scenarios you just figure out when you are testing, because you are pretending you are an user. You need a good background, someone to sit next to you, or some good documentation about what you will test, spend some time exploring the app before you start the scenarios. This will create your first impression of the software and you will be more into it and the user experience.

Finally, my advice to know if you have a good test coverage is:

  • Exploratory tests, this will help you to find unknown scenarios between system and requirements. This is a type of test you can’t automate, it involves more about your creativity than objective steps. Sometimes is just a different sequence that you do and you can find a critical bug.
  • Kick-off requirements, this is another thing that helps to reduce the unknown scenarios, like if you have an explanation about what a new function will do, you can raise and think in points which you already know and maybe nobody thought yet. As I said before, it’s better if you have a good background about what is coming.
  • System flow, the last key is try to understand the gaps and the flow of the software, like what is the flow to a function update something in database. It seems very technical, but this will help you to think about scenarios that might crash when you do in a different sequence or if you do many times, or if you don’t wait a specific time, this is quality assurance 🙂

See you next week !

Using Spoon with Cucumber

Hi guys,

Today I will post about Spoon which is a framework that I’ve been learning. I hope this helps someone too, because spoon is quite new and doesn’t have too much support if you want to run with Cucumber.

Spoon is a framework to run android reports and Cucumber is a BDD framework.

  • If you are using gradle, you need to open your build.gradle and add:
 classpath('com.stanfy.spoon:spoon-gradle-plugin:1.0.3') {
  exclude module: 'guava'
  }

  • In your app-build.gradle:
plugin 'spoon'

dependencies{
 androidTestCompile 'com.squareup.spoon:spoon-client:1.2.0'
 androidTestCompile 'info.cukes:cucumber-android:1.2.4'
 androidTestCompile 'info.cukes:cucumber-picocontainer:1.2.4'
 } 
  • Create Spoon task in the same file:

spoon {
 debug = true
 if (project.hasProperty('spoonFailNoConnectedDevice')) {
    failIfNoDeviceConnected = true
 }

 if (project.hasProperty('cucumberOptions')) {
    instrumentationArgs = ["cucumberOptions=" + "'${project.cucumberOptions}'"]
 }

}
  • The instrumentation runner:
public class Instrumentation extends CucumberInstrumentation {
@Override
public void onStart() {
    runOnMainSync(new Runnable() {
        @Override
        public void run() {
            Application app = (Application) getTargetContext().
getApplicationContext();
            String simpleName = Instrumentation.class.getSimpleName();

            // Unlock the device so that the tests can input keystrokes.
            ((KeyguardManager) app.getSystemService(KEYGUARD_SERVICE)) //
                .newKeyguardLock(simpleName) //
                .disableKeyguard();
            // Wake up the screen.
            ((PowerManager) app.getSystemService(POWER_SERVICE)) //
                .newWakeLock(FULL_WAKE_LOCK | ACQUIRE_CAUSES_WAKEUP 
| ON_AFTER_RELEASE, simpleName) //
                .acquire();
        }
    });

    super.onStart();
}

}
  • Now you can use gradle command line with spoon task and pass Cucumber arguments. Like this one:
gradle spoon -PspoonFailNoConnectedDevice -PcucumberOptions='--tags @smoke'
      • Or you can use adb command line – without spoon report generation:
adb shell am instrument -w -e cucumberOptions "'--tags @smoke'" 
com.rsouza.test/com.rsouza.test.Instrumentation
  • Instrument arguments
am instrument argument Description
-e count true Count the number of tests (scenarios)
-e debug true Wait for a debugger to attach before starting to execute the tests.
-e log true Enable Cucumber dry-run (same as –e dryRun true)
-e coverage true Enable EMMA code coverage
-e coverageFile “/path/coverage.ec Set the file name and path of the EMMA coverage report
  • Cucumber arguments

https://cucumber.io/docs/reference/jvm#third-party-runners

  • Example: Use Cucumber and adb arguments
adb shell am instrument -w -e log true -e cucumberOptions "'--tags @debug'"
 com.rsouza.test/com.rsouza.test.Instrumentation

Thank you guys ! See you next week 🙂

Choose the right test framework for mobile


Today I will post more about my experiences in developing the automation project from scratch. I developed 2 test mobile automation from scratch until now: one was with Calabash and Cucumber and the other one was with Robotium and Cucumber.

  • Support – Be sure that you will have a lot of support from the framework team. If it’s an open source you could have fast support or not, depends of how the developers are busy. So, make sure that you will have a good support when you start to use the framework, go to the github of the project and look for the open issues and what is the frequency they reply and when it was the last bug fixed. Pay attention the frequency of the answers in forums on google groups/linkedin groups/stackoverflow, etc.


  • Stability – Is stable enough ? How long this framework is in the market ? Really, you don’t want to start your automation with a lot of problems because the framework that you are using is still in beta phase or is still improving a lot of things. You need to be sure that your choice will depend more in you and your code than the framework you’ve chosen.


  • Your app – Yes, you need to know first if your app is stable, with good performance and what are the objectives of your automation. Some frameworks work very well with stable apps, but when you need to test an app with memory leaks or performance problems you won’t be able to even start a scenario. I worked with Calabash most of my mobile automation experience and to be honest I didn’t have any problems to test some unstable apps, but when I did a POC with Espresso, the first simple scenario couldn’t even go further the first step, just because the app was not stable enough (and this it wasn’t the first priority of the automation – of course if you know that you have performance issues and they are not relevant enough you should be able to carry on the automation).


  • Developers – Again, I will use the experience that I had with Espresso. The developers are from Google, which is a famous company. You could think, of course I will choose this one, because google is taking care of it. No, to be honest, I don’t really care about the company, I may consider the fact of the framework being developed from a good company, but in first place I see all the priorities above. In this example: Espresso is relative new if you compare with robotium or calabash, it takes serious about the performance of the app, so it won’t go further the automation if you have performance problems, the support is really fast and you can find a lot of people who already started use it.


  • Pressure – You need to consider this, probably you will have a developer who will need to push you to use the framework he thinks it is really good (OMG Espresso is being developed by Google, we need to use it, because reasons and stuffs). I think all of us already worked with people like this, I am not saying that you need to ignore them, but just pay attention about what is more important and WHAT IT WILL WORK FOR YOUR COMPANY/APP. Please, not all the apps or companies work in the same way, you don’t need to follow the crowd, just follow a single tip to figure out which framework is better: POC.


  • POC (Proof of concept) – The last tip and probably the most important one. If you want to know which framework will work better with your app it’s easy, take one scenario, a basic one, and automate it for the frameworks that you are in doubt 🙂


I hope this helps someone as well. If you have any suggestions/questions, please fell free to comment below. See you next week 🙂