15 Expert Tips for Using Cucumber

Hey guys, I found these excellent tips to who are working with Cucumber and Calabash. Try follow each one to get more performance and use the best practices always πŸ™‚

1. Feature Files Should Actually be Features, Not Entire Portions of an App

One feature per well named file, please, and keep the features focused.

2. Avoid Inconsistencies with Domain Language

You’ll get the most benefit out of using Cucumber when your customers are involved. To that end, make sure you use their domain language when you write stories. The best course of action is to have them involved in writing the stories.

3. Organize Your Features and Scenarios with the Same Thought You Give to Organizing Your Code

One useful way to organize things is by how fast they run. Use 2-3 levels of granularity for this:

  • Fast: scenarios that run very fast, e.g. under 1/10 of a second
  • Slow: scenarios that are slower but not painfully so, maybe under one second each
  • Glacial: scenarios that take a really long time to run

You can do this separation several different ways (and even some combination):

  • Put them in separate features
  • Put them in separate subdirectories
  • Tag them

4. Use Tags

Tags are a great way to organize your features and scenarios in non functional ways. You could use @small, @medium and @large, or maybe @hare, @tortoise, and @sloth. Using tags let you keep a feature’s scenarios together structurally, but run them separately. It also makes it easy to move features/scenarios between groups, and to have a given feature’s scenarios split between groups.

The advantage of separating them this way is that you can selectively run scenarios at different times and/or frequencies, i.e. run faster scenarios more often, or run really big/slow scenarios overnight on a schedule.

Tagging has uses beyond separating scenarios into groups based on how fast they are:

  • When they should be run: on @checkin, @hourly, @daily
  • What external dependencies they have: @local, @database, @network
  • Level: @functional, @system, @smoke
  • Etc.

5. Use Rake Tasks to Run Features

This provides a consistent environment for running features: this way each run uses the same set of options and parameters. This goes a long way toward maintaining deterministic results.

Another benefit is that this makes for easy integration with continuous integration tools. There is a single point of entry into the spec run, with all options/parameters encapsulated.

6. Don’t Get Carried Away with Backgrounds (Stick to Givens)

The larger the background, the greater the load of understanding for each scenario. Scenarios that contain all the details are self-contained and as such, can be more understandable at a glance.

7. Make Scenarios Independent and Deterministic

There shouldn’t be any sort of coupling between scenarios. The main source of such coupling is state that persists between scenarios. This can be accidental, or worse, by design. For example one scenario could step through adding a record to a database, and subsequent scenarios depend on the existence of that record.

This may work, but will create a problem if the order in which scenarios run changes, or they are run in parallel. Scenarios need to be completely independent.

Each time a scenario runs, it should run the same, giving identical results. The purpose of a scenario is to describe how your system works. If you don’t have confidence that this is always the case, then it isn’t doing its job. If you have non-deterministic scenarios, find out why and fix them.

8. Write Scenarios for the Non-Happy-Path Cases As Well

Happy path tests are easy; edge cases and failure scenarios take more thought and work. Here’s where having some good (and yet pathological) testers on the team can reap rewards.

Use rcov with your full Cucumber runs to find holes in coverage.

9. Be DRY: Refactor and Reuse Step Definitions

Especially look for the opportunity to make reusable step definitions that are not feature specific. As a project proceeds, you should be accumulating a library of step definitions. Ideally, you will end up with step definitions that can be used across projects.

10. Use a Library (Such as Chronic) for Parsing Time in Your Step Definitions

This allows you to use time in scenarios in a natural way. This is especially useful for relative times.

Background:
  Given a user signs up for a 30 day account

Scenario: access before expiry
  When they login in 29 days
  Then they will be let in

Scenario: access after expiry
  When they login in 31 days
  Then they will be asked to renew

11. Revisit, Refactor, and Improve Your Scenarios and Steps

Look for opportunities to generalize your steps and reuse them. You want to accumulate a reusable library of steps so that writing additional features takes less and less effort over time.

12. Refactor Language and Steps to Reflect Better Understanding of Domain

This is an extension of the previous point; as your understanding of the domain and your customer’s language/terminology improves, update the language used in your scenarios.

13. Use Compound Steps to Build Up Your Language

Compound steps (calling steps from steps) can help make your features more concise while still keeping your steps generalβ€”just don’t get too carried away. For example:

Given /^the user (.*) exists$/ do |name|
  # ...
end

Given /^I log in as (.*)$/ do |name|
  # ...
end

Given /^(.*) is logged in$/ do |name|
  Given "the user #{name} exists"
  Given "I log in as #{name}"
end

14. Use Parallel Step Definitions to Support Different Implementations for Features

For example, running features against Webrat and Selenium. Put these step definitions somewhere where they won’t be auto-loaded, and require them from the command line or rake task.

15. Avoid Using Conjunctive Steps

Each step should do one thing. You should not generally have step patterns containing “and.” For example:

Given A and B

should be split into two steps:

Given A
And B


Bye πŸ™‚

Font:Β https://blog.engineyard.com/2009/15-expert-tips-for-using-cucumber/

Javascript and CSS – Testing on hybrid apps

Hello everyone πŸ™‚

I am testing a hybrid app these days and I am learning a lot…Ok, but what is a hybrid app ?
Like native apps, run on the device, and are written with web technologies (HTML5, CSS and JavaScript). Hybrid apps run inside a native container, and leverage the device’s browser engine (but not the browser) to render the HTML and process the JavaScript locally. A web-to-native abstraction layer enables access to device capabilities that are not accessible in Mobile Web applications, such as the accelerometer, camera and local storage.

Summarising…. You have to test native elements mixed with web elements… Cool, don’t you think ? HaHa Hard work !

This post have some examples of a query using CSS and an action (click) using Javascript(IOS and Android platform):

Using Javascript to click: (Example)

query("webView index:1", :stringByEvaluatingJavaScriptFromString 'document.getElementsByTagName("iframe")[0].contentWindow.document.getElementByTag("a").click()')

This example, you have to write first the WebView hat contains the HTML and after put that conversor from String to Javascript. Finally, put your code in Javascript πŸ™‚
I don’t know many things about javascript, but you can use the console of the inspector of Chrome or Safari to identify web elements in mobiles (iphone,ipad,tablet).

Examples – CSS:

query("SlidePanelWebView index:2 css:'#articleContainer .currentPanel figure .video-play-button'")

query("SlidePanelWebView index:4 css:'#article_1 .data-copy p strong a'")

element_does_not_exist("WebView css:'.inner a'")

Below the explanation of each part to form a CSS query on Calabash:

query("WebView index:4 css:'#article_1 .data-copy p strong aΒ [style=\'Font:Tahoma\']'")

First: Put the element and the index that contains the element that you want. How you discover this ? You can try each index according with the position where is your element. Like in the end of a page… more chances to be the last index of the element.

Second: Write css:

–Β Third: Inside each you will choose what properties, class, id or tag you want to use to find the element.

Fourth: When you know the id of the div or the element, you can write here. Put #Β and then the id of the div… If the element that you want was not found until this point, you can use the id of the first div in the hierarchy. Like:

<div id:first>

<div id: second>

<element id: third></element>

</div>

</div>

In this example, you can use the id of the first div instead of the id’s element. And try writing the way to find the element with the tags or classes provided.

Fifth: Class, here you can use the class element. To identify that thisΒ is a class you need to put a . before the name of the class… And I used to write only the last name of the class when this has more then one class name. Example:

<div id:first>

<div class: class nameΒ second>

</div>

</div>

Sixth: The last thing that you should know it is about the tag name. Like <p>, <a href>, <strong>… When you want to find a tag you just write the tag names separated by space. Like: Β div p a , following the example bellow.

<div class: first>

<p>

<aΒ href: third></a>

</p>

</div>

Seventh: When you want to find a property in the middle of the css.You need to put [name of property=value of property]Β Like when you want to search a specific value for href:Β [href=https://azevedorafaela.wordpress.com],Β following the example bellow.

<aΒ href: https://azevedorafaela.wordpress.com></a>


More examples of queries calabash with CSS:

query("WebView index:4 css:'#three .scrollable [data-component=buttonBlock] .sectionList li span'")

query("PanelWebView css:'#article .data-copy p strong a'")

query("View index:3 css:'.viewInactive'")


If you have any suggestion, questions or comments just write below please !

Bye !!

Summary of Calabash iOS Ruby API – Assertions

Hi guys ! I hope you are well ! Here there are many commands of calabash-ios that are very useful πŸ™‚

Assertions


fail(msg="Error. Check log for details.")

check_element_exists(query)
check_element_does_not_exist(query)
check_view_with_mark_exists(expected_mark)

check_element_exists("view marked:'#{expected_mark}'")


Touch


touch(uiquery, options={})


irb(main):037:0> touch("view marked:'switch'")
irb(main):038:0> tap 'switch'
irb(main):040:0> touch("view marked:'First'", :offset => {:x => 50, :y => 0})
irb(main):041:0> touch(nil, :offset => {:x => 50, :y => 0})


Keyboard


keyboard_enter_char(chr)

irb(main):043:0> keyboard_enter_char "a"
irb(main):076:0> keyboard_enter_char "More"

keyboard_enter_text(text)

irb(main):044:0> keyboard_enter_text "The Quick Brown Fox"

done

Scroll

scroll(uiquery, direction)

irb(main):082:0> scroll "scrollView", :down


Tables


scroll_to_row(uiquery, number)

irb(main):081:0> scroll_to_row "tableView", 2

scroll_to_cell(options)

{:query => "tableView",
 :row => 0,
 :section => 0,
 :scroll_position => :top,
 :animate => true}
irb(main):003:0> scroll_to_cell(:row => 13, :section => 0)
=> ["; contentOffset: {0, 0}>. Delegate: LPThirdViewController, DataSource: LPThirdViewController"]

:row the row to scroll to
:section the section to scroll to
:scroll_position the position to scroll to :top, :bottom, :middle
:animate animate the scrolling or not

each_cell(options, &block)

{:query => "tableView", #the table view to act on
 :post_scroll => 0.3,  #a pause after each action taken
 :skip_if => nil, #an optional proc to skip some cells
 :animate => true #animate the scrolling?
}
irb(main):008:0> each_cell(:post_scroll=>0) do |row, sec|
irb(main):009:1* puts "Row #{row} in Section #{sec}"
irb(main):010:1> end
Row 0 in Section 0
Row 1 in Section 0
Row 2 in Section 0
Row 3 in Section 0
...
irb(main):001:0> table_labels = []
=> []

irb(main):002:0> each_cell(:animate => false, :post_scroll => 0.1) do |row, sec|
irb(main):003:1*  txt = query("tableViewCell indexPath:#{row},#{sec} label", :text).first
irb(main):004:1>  table_labels << txt irb(main):005:1> end
=> 1

irb(main):006:0> table_labels
=> ["Cell 0", "Cell 1", "Cell 2", "Cell 3", "Cell 4", "Cell 5", "Cell 6", "Cell 7", "Cell 8", "Cell 9", "Cell 10", "Cell 11", "Cell 12", "Cell 13", "Cell 14", "Cell 15", "Cell 16", "Cell 17", "Cell 18", "Cell 19", "Cell 20", "Cell 21", "Cell 22", "Cell 23", "Cell 24", "Cell 25", "Cell 26", "Cell 27", "Cell 28", "Cell 29"]


Rotation

rotate(dir)

irb(main):083:0> rotate :left


(Event) Playback

playback(recording, options={})

irb(main):103:0> playback "drag_switch_around", :query => "view marked:'switch'", :offset => {:x=>2, :y=>0}

record_begin and record_end

irb(main):104:0> record_begin
=> ""
irb(main):105:0> record_end "move_down"
=> "move_down_ios5_iphone.base64"


Location

set_location(options)

:place => "Tower of London"
:latitude => ..., :longitude => ...


Backdoor

backdoor(sel, arg)

- (NSString *) calabashBackdoor:(NSString *)aIgnorable;
irb(main):002:0> backdoor("calabashBackdoor:", "")
=> "YES"


Screenshot

screenshot(options={:prefix=>nil, :name=>nil})

screenshot({:prefix => "/Users/krukow/tmp", :name=>"my.png"})

screenshot_embed(options={:prefix=>nil, :name=>nil, :label => nil})

screenshot_embed({:prefix => "/Users/krukow/tmp", :name=>"my.png", :label => "Mine"})


Misc


server_version

irb(main):026:0> server_version
=> {"outcome"=>"SUCCESS", "app_name"=>"LPSimpleExample-cal", "simulator_device"=>"iPhone", "iOS_version"=>"5.1", "app_version"=>"1.0", "system"=>"x86_64", "app_id"=>"com.lesspainful.example.LPSimpleExample-cal", "version"=>"0.9.126", "simulator"=>"iPhone Simulator 358.4, iPhone OS 5.1 (iPhone/9B176)"}


client_version

irb(main):027:0> client_version
=> "0.9.127.pre1"


calabash_exit

irb(main):028:0> calabash_exit
=> []
irb(main):029:0> server_version
Errno::ECONNREFUSED: Connection refused - connect(2) (http://localhost:37265)


escape_quotes(str)

irb(main):007:0> quoted = escape_quotes("Karl's child")
=> "Karl\\'s child"
irb(main):008:0> query("view marked:'#{quoted}'")


macro(txt)

macro 'I touch "Second"'

lbl = ".......a long text......"
macro %Q[I use a step with "double" quotes and 'single' and #{lbl}]


flash(uiquery)

flash("TableView index:2")


Font:Β https://github.com/calabash/calabash-ios/wiki/03.5-Calabash-iOS-Ruby-API

Summary of Calabash iOS Ruby API – QUERY

Just a summary of useful commands !

Query

query(uiquery, *args)
irb(main):003:0> query("button index:0")
=> [{"class"=>"UIRoundedRectButton", "frame"=>{"y"=>287, "width"=>72, "x"=>100, "height"=>37}, "UIType"=>"UIControl", "description"=>">"}] 
irb(main):005:0> query("button index:0").first.keys
=> ["class", "frame", "UIType", "description"]

irb(main):006:0> query("button index:0").first["frame"]["width"]
=> 72

irb(main):031:0> query("tableView","numberOfSections")
=> [1]
irb(main):033:0> query("tableView","delegate","description")
=> [""]
irb(main):034:0> query("tableView",numberOfRowsInSection:0)
=> [30]
irb(main):035:0> query("tableView","numberOfRowsInSection"=>0)
=> [30]
irb(main):036:0> query("pickerView",:delegate, [{pickerView:nil},{titleForRow:1},{forComponent:0}])
=> ["1,0"]
[pickerView.delegate pickerView:nil titleForRow:1 forComponent:0]

classes(uiquery)

def classes(uiquery,*args)
  query_map(uiquery,:class,*args)
end
irb(main):001:0> classes("view")
=> ["UILayoutContainerView", "UITransitionView", "UIViewControllerWrapperView", "UIView", "UITextField", "UITextFieldRoundedRectBackgroundView", "UIImageView", "UIImageView", "UIImageView", "UITextFieldLabel", "UILabel", "UIRoundedRectButton", "UIButtonLabel", "UISwitch", "_UISwitchInternalView", "UIImageView", "UIView", "UIImageView", "UIImageView", "UIImageView", "UIRoundedRectButton", "UIButtonLabel", "UITabBar", "UITabBarButton", "UITabBarSelectionIndicatorView", "UITabBarSwappableImageView", "UITabBarButtonLabel", "UITabBarButton", "UITabBarSwappableImageView", "UITabBarButtonLabel", "UITabBarButton", "UITabBarSwappableImageView", "UITabBarButtonLabel", "UITabBarButton", "UITabBarSwappableImageView", "UITabBarButtonLabel"]

label(uiquery)

 def label(uiquery)
  query(uiquery, :accessibilityLabel)
end
irb(main):001:0> label("view")
[nil, nil, nil, nil, nil, nil, nil, nil, nil, nil, "Empty list", nil, nil, nil, "Mon", "Dec 17", nil, nil, nil, "Tue", "Dec 18", nil, nil, nil, nil, "Today", nil, nil, nil, "Thu", "Dec 20", nil, nil, nil, nil, nil, "Empty list", nil, nil, "12", "12", nil, nil, "1", "1", nil, nil, "2", "2", nil, nil, "3", "3", nil, nil, nil, nil, nil, "Empty list", nil, nil, "56", "56", nil, nil, "57", "57", nil, nil, "58", "58", nil, nil, nil, nil, nil, "Empty list", nil, nil, "AM", "AM", nil, nil, "PM", "PM", nil, nil, nil, nil, nil, nil, nil, nil, nil, nil, "Name", "First View", "First", "First", nil, "Second", "Second", nil, "other", "switch", nil, nil, nil, nil, nil, nil, "login", "Login", nil, "First", nil, nil, "First", "Second", nil, "Second", "Third", nil, "Third", "Fourth", nil, "Fourth"]

element_does_not_exist(uiquery)

element_exists(uiquery)

view_with_mark_exists(expected_mark)

element_exists("view marked:'#{expected_mark}'")

Waiting

wait_for(options, &block)
{:timeout => 10, #maximum number of seconds to wait
 :retry_frequency => 0.2, #wait this long before retrying the block
 :post_timeout => 0.1, #wait this long after the block returns true
 :timeout_message => "Timed out waiting...", #error message in case options[:timeout] is exceeded
 :screenshot_on_error => true # take a screenshot in case of error
}
irb(main):030:0> wait_for(:timeout => 5) { not query("label text:'Cell 11'").empty? }
irb(main):031:0> wait_for(:timeout => 5) { element_exists("label text:'Cell 20'") }
wait_for(:timeout => 30) do
    res = query("button marked:'Player play icon'", :isSelected)
    res.first == "1"        
end

wait_for_elements_exist(elements_arr, options={})

irb(main):008:0> wait_for_elements_exist( ["label text:'Cell 11'", "tabBarButton marked:'Third'"], :timeout => 2)
wait_for_elements_do_not_exist(elements_arr, options={})
wait_for_none_animating(options={})
wait_poll(opts, &block)
{:until => nil #a predicate which should return true when the condition is satisfied
 :until_exists => nil #a uiquery to function as predicate (i.e. element_exists(opts[:until_exists]))
 :timeout => 10, #maximum number of seconds to wait
 :retry_frequency => 0.2, #wait this long before retrying the block
 :post_timeout => 0.1, #wait this long after the block returns true
 :timeout_message => "Timed out waiting...", #error message in case options[:timeout] is exceeded
 :screenshot_on_error => true # take a screenshot in case of error
}
irb(main):023:0> wait_poll(:until_exists => "label text:'Cell 22'", :timeout => 20) do
irb(main):024:1* scroll("tableView", :down)
irb(main):025:1> end


Bye Guys πŸ˜€

Font:Β https://github.com/calabash/calabash-ios/wiki/03.5-Calabash-iOS-Ruby-API

Query Calabash Android

Hey guys, I will post today some queries to find elements in different ways with calabash-android in console !


Basic usage

Using the class of the elements (Button, Label, View, Webview, Tableview, etc…). If you don’t know what is the class, you can use only * to find all the elements on the screen.


Results:


You can use size, to know the qty of the elements with this class:


Filtering by class


Simple class name

Filtering by class means that we only want to look at certain types of views. This is what we’ve done before when we were searching for Button or TextView:

This is called filtering by simple name. The result shows you that the full class name isΒ android.widget.Button: this is what we call fully qualified class name and theΒ andorid.widgetpart is called package name.

When you query with simple name Calabash only looks at the last bit of the name.Β This is also case insensitive, so Button, button or bUtTOnΒ is the same in this context.


Fully qualified class name

You can also use the fully qualified class name in the query:

Interestingly this gives us two results: the login button and a checkbox. Why is the CheckBox included? In order to understand this you have to understand subclasses.

Let’s look at an example:

There are a lot different buttons in Android like ToggleButton and theΒ Switch. A ToogleButton is just a specific type of Button with some extra functionality and look. AΒ Button is just a simple button with a text in it where the ToggleButton has two states (on and off). So every ToggleButton is a Button but not every Button is a ToggleButton.

The CheckBox is also a subclass of Button – which explains why we get two results. If you use the fully qualified name in the queryΒ it will give you the class and all of it’s subclasses. So if there were ToggleButtons and Switches it would also return those.

The main distinction is this:

  • using simple name only looks at the last part of the class and does a simple comparison
  • using the qualified name looks at the class hierarchy and gives back all the class and all of it’sΒ subclasses


Filtering by property

Usually there are several buttons, textviews and edit texts on the screen so filtering by class is not enough to identify a single element.

In the query results you get back a set of properties for each view like id, text, class.

Calabash allows you to filter on these properties.

The most used property is the id. On Android every view can have an id, which is an invisible string identifier. The id is not necessarily unique and also not every view has one. Even with these restriction using id is the most reliable way to find views.


id property

Let’s try to find the login button by id:

The first part of the query is the class filtering: * means give me all the views. The second part is the property filtering: id:'login_button' means find the view that has the id login_button.

The filtering happens on the result of the first part of the query string. Previously we used "*" so the filtering was applied to all the views. But we could have used different class.


text property

Of course id is not the only property that you can filter on. Another commonly used one is the text. This is the label of the view which is visible on the screen:

This will find the view on the screen which has a text Login. Once I found them though I use id instead of text. This results in more stable tests. Labels tend to change more frequently than ids. It also eliminates all the translation and localisation problems.

What if a view doesn’t have an id? Ask the developers to add one. It’s a 5 second task and it will make your life a lot easier.


Other properties

Let’s try to find all the disabled buttons:

Notice that while we used single quotes for string parameters we’re not using anything here forΒ false.

The third type of parameter is the integer parameter (numbers). One example is the width parameter:

This gives you all the views that are exactly 200 pixel wide. Notice that we are not using the single quotes to define the value.

You can also combine the filters using multiple criteria. Let’s get all the views which are enabled and the are 50 pixel heigh:


How it works

The general syntax for property filtering is the following:

The prop is the name of the property and the value is either a string, a boolean or an integer value.

We’ve already used a couple of properties like id, text, enabled and width. There are a lot more. For starters you can use all the attributes that you see in the query results. But that’s not everything.

Every view object supports a set of methods – you can find all the supported methods on the view’s documentation. For example the View class has an isEnabled() method. When Calabash tries to resolve the property it find the following methods on the view: prop(), getProp() and isProp() in this order.

So for the enabled property it tries to find the enabled(), getEnabled() or isEnabled() methods.

If Calabash does find a method it calls it and compares the return value with the value you specified. If it doesn’t match it gets rid of that view. It also discards the view if it can’t find the appropriate methods.


Useful things

In addition to the basic query syntax there are a couple of useful things you can use.


marked

The marked keyword is a shorthand for identifying an element by it’s name. It’s a convenience method to filter by id, text or contentDescription properties.


index

The result of each query is a standard Ruby array. Because of this you can access the elements directly in it. If you want to get the first view on screen you can do it like this:

The query language also supports the index keyword. The index is very similar than using the array indexing – it gives you the element at a given index:

This is usually used with lists and other collection views. Often you just want to click on the first element on a list.

Be warned though: you should only use index if you really need it. Using index to identify elements in the layout is usually not a good idea – it leads to brittle tests and hard to diagnose problems.

Use ids, text and other identifiers and don’t rely on the ordering of the items!


Returning certain properties

Sometimes you’re only interested in certain properties not the full result. Let’s say you want to get all the id’s on the screen:

As you can see a result is an array of strings where only the ids are shown. Isn’t this much nicer?

You can put any property as the second argument of query to get the data you’re interested in. Another example to get all the labels for the enabled views:

query("* enabled:true", :text)


Predicate

Calabash supports some filters that are not present in UIScript. Particularly we support filtering by simple NSPredicates. For example searching for a string prefix:

"label {text BEGINSWITH 'Cell 1'}"

which would return the labels with text Cell 1 and Cell 10.

In general you use a NSPredicate by writing a filter: {selector OP val}, where selector is the name of an Objective-C selector to perform on the object, OP is operation, and val is a string or integer value.

Common operations

  • BEGINSWITH, prefix, e.g., "label {text BEGINSWITH 'Cell 1'}"
  • ENDSWITH, suffix, e.g., "label {text ENDSWITH '10'}"
  • LIKE, wildcard searches, e.g., "label {text LIKE 'C*ll'}"
  • CONTAINS, substring, e.g., "label {text CONTAINS 'ell'}"
  • Comparison, <, >, …
  • Case or diacritic insensitive lookups, e.g., "label {text CONTAINS[cd] 'cell'}"

To understand what additional options are available, consult the full syntax for NSPredicate documented by Apple: NSPredicate Syntax


Direction

There are four directions descendant, child, parent and sibling. These determines the direction in which search proceeds.

Often, query expressions are a sequence of ClassName expressions. For example:

 "tableViewCell label"

this means “first find all UITableViewCell views, then inside of those, find all the UILabel views”. The key here is the word inside. This is determined by the query direction.

By default the direction is descendant, which intuitively means “search amongst all subviews (or sub-views of sub-views, etc).” But you can change the traversal direction. Here is an advanced example:

label marked:'Tears in Heaven' parent tableViewCell descendant 
tableViewCellReorderControl

This query finds a label ‘Tears in Heaven’, and then proceeds to find the tableViewCell that contains this label (i.e., moving in the parent instead of descendant direction). From the tableViewCell we move down and find the tableViewCellReorderControl.

Valid directions are descendant, parent, child and sibling. Both descendant and childlooks for subviews inside a view. The difference is that descendant keep searching down in the sub-view’s subviews, whereas child only looks down one level. The direction siblingΒ searches for views that are “at the same level” as the present view (this is the same as: first find the immediate parent, then find all subviews except for the view itself).


Thank you again !

Bye πŸ™‚

Fonts:

https://github.com/calabash/calabash-ios/wiki/05-Query-syntax

http://krazyrobot.com/2014/04/calabash-using-query/

Error with signature on the app Android

If you got some of these errors when try create the signature of your app (or try run calabash-android run) on Android:


> fingerprint_from_apk': No RSA file found in META-INF. Cannot proceed. 
(RuntimeError)


Or


> jarsigner: unable to open jar file (When tryΒ re-signed)


Try these steps:


– Verify if the file zipalign is inside of the folder sdk/tools.


– If the zipalign don’t exist inside the tools folder, download onΒ this link :


–Β Give the executeΒ permissions:

chmod 777 zipalign


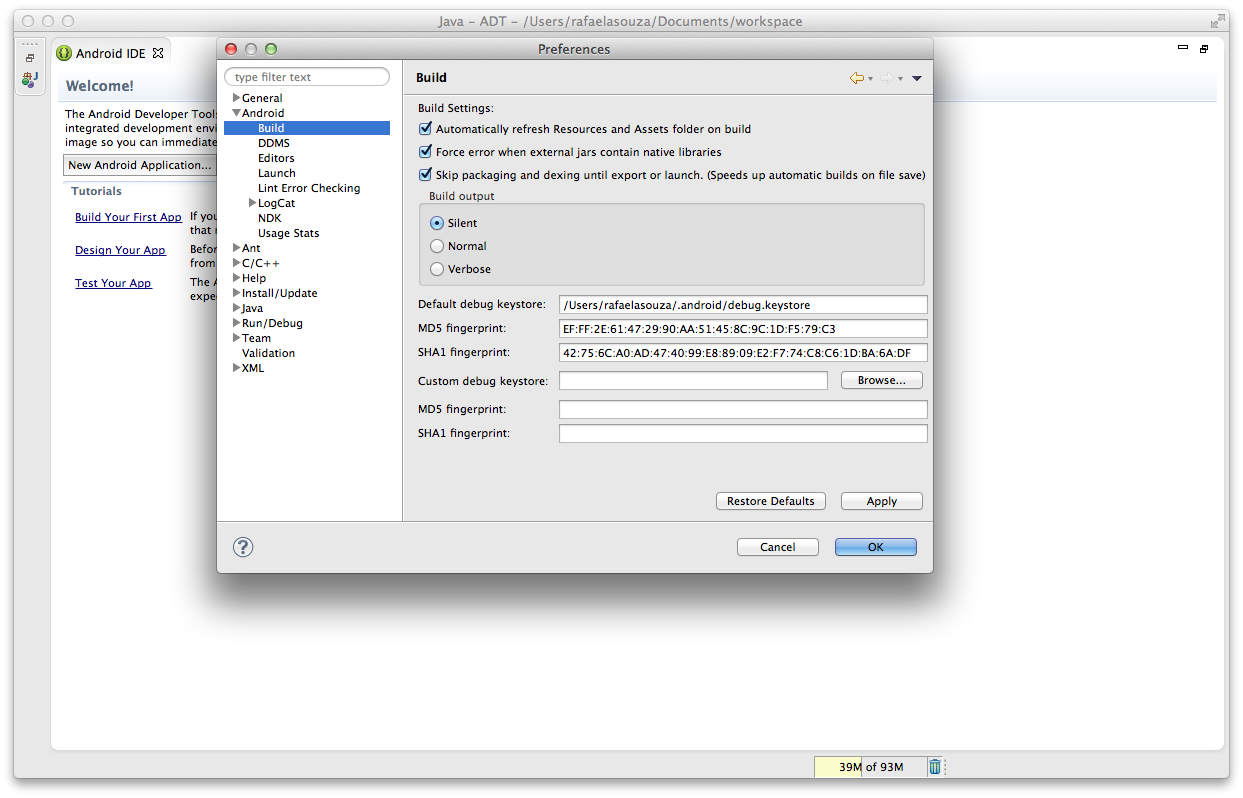
–Β Open the Eclipse, Click in Preferences:

Screen Shot 2014-07-16 at 0.06.31


– Open the Android Tab, Click on Build, Click on Apply and OK:


Screen Shot 2014-07-16 at 0.07.03
– Try runs the command again:
calabash-android resign NAMEAPP.apk
– After try run the cucumber again πŸ™‚
calabash-android runΒ NAMEAPP.apk


WorkedΒ for me !


Bye guys πŸ™‚

Calabash-Android Install Example Project

Hello guys,

Today I will post about install calabash-android in your machine. And for this I will use the project sample of this git repository:Β https://github.com/calabash/x-platform-example.git

You can do the download too if you don’t have a project neither an apk file.

Download and install ruby and RVM:

\curl -sSL https://get.rvm.io | bash -s stable --ruby
rvm install ruby 1.9.3
Install calabash-android:
sudo gem install calabash-android


Install bundler unless you already have it installed:

gem install bundler

(or sudo gem install bundler)

Install gems in theΒ Gemfile:

bundle install

iOS

To run the iOS tests, make sure Xcode 5.1 is installed with command line tools.

Run

bundle exec cucumber -p ios

Android

To run the Android tests, ensure a recent Android SDK is installed, and that

  • environment variableΒ ANDROID_HOMEΒ is set to point to the sdk folder, for example/Users/krukow/android/adt/sdk

PS: This an example of a project with generated key and certificates, so you don’t need assign the app.

Run

bundle exec calabash-android run prebuilt/Android-debug.apk -p android

This example you must to install bundle too. If you have any question or comment, just write below. Thank you again πŸ™‚


Fonts:Β https://github.com/calabash/x-platform-example

Abstract Methods and Classes

Hello guys,

I will continue with moreΒ technical posts today… πŸ™‚

What is ?Β 

AnΒ abstract classΒ is a class that is declaredΒ abstractβ€”it may or may not include abstract methods. Abstract classes cannot be instantiated, but they can be subclassed.

AnΒ abstract methodΒ is a method that is declared without an implementation (without braces, and followed by a semicolon), like this:

abstract void moveTo(double deltaX, double deltaY);

If a class includes abstract methods, then the class itselfΒ mustΒ be declaredΒ abstract, as in:

public abstract class GraphicObject {
   // declare fields
   // declare nonabstract methods
   abstract void draw();
}

When an abstract class is subclassed, the subclass usually provides implementations for all of the abstract methods in its parent class. However, if it does not, then the subclass must also be declaredΒ abstract.

An Abstract Class Example

In an object-oriented drawing application, you can draw circles, rectangles, lines, Bezier curves, and many other graphic objects. These objects all have certain states (for example: position, orientation, line color, fill color) and behaviors (for example: moveTo, rotate, resize, draw) in common. Some of these states and behaviors are the same for all graphic objects (for example: position, fill color, and moveTo). Others require different implementations (for example, resize or draw). AllΒ GraphicObjects must be able to draw or resize themselves; they just differ in how they do it. This is a perfect situation for an abstract superclass. You can take advantage of the similarities and declare all the graphic objects to inherit from the same abstract parent object (for example,Β GraphicObject) as shown inΒ the following figure.

Classes Rectangle, Line, Bezier, and Circle Inherit from GraphicObject Β 

Classes Rectangle, Line, Bezier, and Circle Inherit from GraphicObject

First, you declare an abstract class,Β GraphicObject, to provide member variables and methods that are wholly shared by all subclasses, such as the current position and theΒ moveToΒ method.Β GraphicObjectΒ also declares abstract methods for methods, such asΒ drawΒ orΒ resize, that need to be implemented by all subclasses but must be implemented in different ways. TheΒ GraphicObjectΒ class can look something like this:

abstract class GraphicObject {
    int x, y;
    ...
    void moveTo(int newX, int newY) {
        ...
    }
    abstract void draw();
    abstract void resize();
}

Each nonabstract subclass ofΒ GraphicObject, such asΒ CircleΒ andΒ Rectangle, must provide implementations for theΒ drawΒ andΒ resizeΒ methods:

class Circle extends GraphicObject {
    void draw() {
        ...
    }
    void resize() {
        ...
    }
}
class Rectangle extends GraphicObject {
    void draw() {
        ...
    }
    void resize() {
        ...
    }
}

Class Members

An abstract class may haveΒ staticΒ fields andΒ staticΒ methods. You can use these static members with a class reference (for example,AbstractClass.staticMethod()) as you would with any other class.

When ?

Abstract Classes is to create templates for future classes and offer the added benefit of letting you define functionality that your child classes can utilize later. You can’t provide an implementation for an Interface.

Why ?

Abstract Classes are a good fit if you want to provide implementation details to your children but don’t want to allow an instance of your class to be directly instantiated (which allows you to partially define a class). If you want to simply define a contract for Objects to follow, then use an Interface.

Β 
Abstract methods are useful ?

Abstract methods are useful in the same way that defining methods in an Interface is useful. It’s a way for the designer of the Abstract class to say “any child of mine MUST implement this method”.

Β 

Any question or comment, just write below ! Thank you again !Β 

Bye πŸ™‚

Β 

Font:Β http://docs.oracle.com/javase/tutorial/java/IandI/abstract.html

http://stackoverflow.com/questions/3344816/when-and-why-to-use-abstract-classes-methods

What is a Module on Ruby ?

Hello guys, I will summarise this post because there are many examples and methods that you can learn. So, today I will talk about more technical questions. What is and when you can use module on Ruby.

WHAT IS ?

AΒ ModuleΒ is a collection of methods and constants. The methods in a module may be instance methods or module methods. Instance methods appear as methods in a class when the module is included, module methods do not. Conversely, module methods may be called without creating an encapsulating object, while instance methods may not. (See below, module_function)

USING PARAMETERS

Once a module is written, its global entities (i.e., globalΒ PARAMETERs, global variables and internal functions) can be made available to other modules and programs. The program or module that wants to use a particular module must have aΒ USEΒ statement at its very beginning. TheΒ USEΒ statement has one of the following forms:

SYNTAX

The following form is the syntax of a module:

USE  module-name

USE  module-name, ONLY: name-1, name-2, ..., name-n

Here is the meaning of theseΒ USEs:

  • The first indicates that the current program or module wants to use the module whose name isΒ module-name. For example, the following main program indicates that it wants to use the content of moduleΒ SomeConstants:
    PROGRAM  MainProgram
       USE   SomeConstants
       IMPLICIT  NONE
       ..........
    END PROGRAM  MainProgram
    

    Once aΒ USEΒ is specified in a program or in a module, every global entities of that used module (i.e.,Β PARAMETERs, variables, and internal functions) becomes available to this program or this module. For example, if moduleΒ SomeConstantsΒ is:

    MODULE  SomeConstants
       IMPLICIT  NONE
       REAL, PARAMETER :: PI = 3.1415926
       REAL, PARAMETER :: g = 980
       INTEGER         :: Counter
    END MODULE  SomeConstants
    

    Then, programΒ MainProgramΒ can access toΒ PARAMETERsΒ PIΒ andΒ gΒ and variableΒ Counter.

  • However, under many circumstances, a program or a moduleΒ does notΒ want to use everything of the used module. For example, if programΒ MainProgramΒ only wants to useΒ PARAMETERΒ PIand variableΒ CounterΒ and does not want to useΒ g, then the second form becomes very useful. In this case, one should add the keywordΒ ONLYΒ followed by a colonΒ :, followed by a list of names that the current program or module wants to use.
    PROGRAM  MainProgram
       USE   SomeConstants, ONLY: PI, Counter
       IMPLICIT  NONE
       ..........
    END PROGRAM  MainProgram
    

    Thus,Β MainProgramΒ can useΒ PIΒ andΒ CounterΒ of moduleΒ SomeConstants; but,Β MainProgramΒ cannot useΒ g!USEΒ withΒ ONLY:Β is very handy, because it could only “import” those important and vital information and “ignore” those un-wanted ones.

  • There is a third, not recommended form, that can help to rename the names of a module locally. If a module has a nameΒ abc, in a program with aΒ USE, one can use a new name forΒ abc. The way of writing this renaming is the following:
    new-name => name-in-module
    

    For example, if one wants to give a new name toΒ CounterΒ of moduleΒ SomeConstants, one should write:

    NewCounter => Counter
    

    Thus, in a program, whenever it usesΒ MyCounter, this program is actually usingΒ CounterΒ of moduleΒ SomeConstants.This kind of renaming can be used withΒ ONLY:Β or withoutΒ ONLY:.

    PROGRAM  MainProgram
       USE   SomeConstants, ONLY: PI, MyCounter => Counter
       IMPLICIT  NONE
       ..........
    END PROGRAM  MainProgram
    

    The above example wants to useΒ PIΒ of moduleΒ SomeConstants. In this case, when programΒ MainProgramΒ usesΒ PI, it actually uses theΒ PIΒ of moduleΒ SomeConstants. ProgramΒ MainProgramalso usesΒ CounterΒ of moduleΒ SomeConstants; but, in this case, since there is a renaming, whenΒ MainProgramΒ usesΒ MyCounterΒ it actually usesΒ CounterΒ of moduleΒ SomeConstants.Renaming does not requireΒ ONLY:. In the following,Β MainProgramΒ can use all contents of moduleΒ SomeConstants. WhenΒ MainProgramΒ usesΒ PIΒ andΒ g, it uses theΒ PIΒ andΒ gΒ of moduleΒ SomeConstants; however, whenΒ MainProgramΒ usesΒ MyCounter, it actually usesΒ CounterΒ of moduleΒ SomeConstants.

    PROGRAM  MainProgram
       USE   SomeConstants, MyCounter => Counter
       IMPLICIT  NONE
       ..........
    END PROGRAM  MainProgram
    

    Why do we need renaming? It is simple. In your program, you may have a variable whose name is identical to an entity of a module that is beingΒ USEed. In this case, renaming the variable name would clear the ambiguity.

    PROGRAM  MainProgram
       USE   SomeConstants, GravityConstant => g
       IMPLICIT  NONE
       INTEGER :: e, f, g
       ..........
    END PROGRAM  MainProgram
    

    In the above example, sinceΒ MainProgramΒ has a variable calledΒ g, which is the same asΒ PARAMETERΒ gΒ in moduleΒ SomeConstants. By renamingΒ gΒ ofΒ SomeConstants,Β MainProgramΒ can use variableΒ gΒ for the variable andΒ GravityConstantΒ for theΒ PARAMETERΒ gΒ in moduleΒ SomeConstants.

However, renaming is not a recommended feature. You should avoid using it whenever possible.

EXAMPLES

module Mod

  include Math
  CONST = 1
  def meth
    #  ...
  end
end
Mod.class              #=> Module
Mod.constants          #=> [:CONST, :PI, :E]
Mod.instance_methods   #=> [:meth]


Public Class Methods

I will write twoΒ examples, but if you click in the link below (Fonts), you can see a lot of other examples of modulesΒ used on Ruby.

new β†’ mod
new {|mod| block } β†’ mod

Creates a new anonymous module. If a block is given, it is passed the module object, and the block is evaluated in the context of this module usingΒ module_eval.

fred = Module.new do
  def meth1
    "hello"
  end
  def meth2
    "bye"
  end
end
a = "my string"
a.extend(fred)   #=> "my string"
a.meth1          #=> "hello"
a.meth2          #=> "bye"


Assign the module to a constant (name starting uppercase) if you want to treat it like a regular module.

static VALUE
rb_mod_initialize(VALUE module)
{
    if (rb_block_given_p()) {
        rb_mod_module_exec(1, &module, module);
    }
    return Qnil;
}
module_function(string, …) β†’ self

Creates module functions for the named methods. These functions may be called with the module as a receiver, and also become available as instance methods to classes that mix in the module.Β ModuleΒ functions are copies of the original, and so may be changed independently. The instance-method versions are made private. If used with no arguments, subsequently defined methods become module functions.Β StringΒ arguments are converted to symbols.

module Mod
  def one
    "This is one"
  end
  module_function :one
end
class Cls
  include Mod
  def call_one
    one
  end
end
Mod.one     #=> "This is one"
c = Cls.new
c.call_one  #=> "This is one"
module Mod
  def one
    "This is the new one"
  end
end
Mod.one     #=> "This is one"
c.call_one  #=> "This is the new one"

               static VALUE
rb_mod_modfunc(int argc, VALUE *argv, VALUE module)
{
    int i;
    ID id;
    const rb_method_entry_t *me;

    if (!RB_TYPE_P(module, T_MODULE)) {
        rb_raise(rb_eTypeError, "module_function must be called for modules");
    }

    if (argc == 0) {
        SCOPE_SET(NOEX_MODFUNC);
        return module;
    }

    set_method_visibility(module, argc, argv, NOEX_PRIVATE);

    for (i = 0; i < argc; i++) {
        VALUE m = module;

        id = rb_to_id(argv[i]);
        for (;;) {
            me = search_method(m, id, 0);
            if (me == 0) {
                me = search_method(rb_cObject, id, 0);
            }
            if (UNDEFINED_METHOD_ENTRY_P(me)) {
                rb_print_undef(module, id, 0);
            }
            if (me->def->type != VM_METHOD_TYPE_ZSUPER) {
                break; /* normal case: need not to follow 'super' link */
            }
            m = RCLASS_SUPER(m);
            if (!m)
                break;
        }
        rb_method_entry_set(rb_singleton_class(module), id, me, NOEX_PUBLIC);
    }
    return module;
}


Guys, if you have any question, suggestion or complaint (I hope this last you don’t have) just write in the comments. Bye πŸ™‚


Fonts:Β http://www.ruby-doc.org/core-2.1.2/Module.html

http://www.cs.mtu.edu/~shene/COURSES/cs201/NOTES/chap06/mod-use.html

How To Optimize Regression Test Suite Effectively

Hi guys, I read a article about Optimize Regression Tests and for this reason I will summarizeΒ with my words what you can do more effectively with Regression Tests. According to different surveys, more than 70% of software work relates to application maintenance and improvement. This means that you will have a lot of work updating your regression test code and also keeping focus on the newer application functionality on the same time.

regression testing, optimize regression test suitesThere are a few factors that affect the effectiveness of the regression test suites. So, how to maintain the effectiveness of the regression test suite, or optimize regression test suite effectively?

  • RTS – Regression Test Selection is one of the most popular methods for test case suite optimization. Divide the test suite into reusable test cases, retestable test cases and obsolete test cases. Apart from all these, it also creates new test cases that test the program for areas not covered in current test cases.
  • TRACK MECHANISM – The effectiveness of the regression test suite can be easily maintained by monitoring the changes to the test suite. A clearly outlined process will ensure that only tests that are useful to the entire testing strategy get added to the test suite, which ensures the efficiency and usability of the test harness at a high level.
  • PERIODIC CLEANUP – Considering periodic cleanup of old tests, all the existing tests in the test suite need to be analyzed for their effectiveness in a specific scenario. In such cases, the relevant regression test suites should also be eased out. It will ensure robustness of the regression test suite for a long period of time. You can also measure the effectiveness of regression test suites on a release-to-release basis. It will allow you to know the root cause for reduction in the effectiveness of the test harness if any, and enable you to take appropriate action on the same.
  • METRICS ANALYSIS – Collection of some metrics and their analysis could also be useful when it comes to the effectiveness of the regression test suite. You can consider different metrics such as percentage of defects found by the regression tests suite, their importance, etc.

You can consider optimization of tests when the tests get lengthy or huge, evaluate different regression test selection strategies and plan and explore changes in the regression test suite framework in order to maintain the effectiveness of the regression test suite.

If you have another method, tell to us commenting below.

Thank you again πŸ™‚

References:Β http://intersog.com/blog/How-To-Optimize-Regression-Test-Suite-Effectively