New version XCode 6 – Error with Calabash 0.9.169

Hi guys, to everyone is having this problem I just have the solution for the moment, we are waiting the new release of calabash/Xcode with the issues fixed.

Error when update the Xcode to 6 and maintain calabash 0.9.169:

WARN: expected Xcode instruments version to be ‘5.1’ or ‘5.1.1’ 
        but found version ‘6.0’

        Gem needs a manual update for Xcode 6.0! 

Unable to find AutomationInstrument.bundle (RuntimeError)
I tried update the calabash to “0.10.0.pre1” but I still found problems… So I just reinstall the XCode 5 until they fix the problems:


Download Xcode 5 and reinstall: https://developer.apple.com/downloads/index.action

If you still having problems, download the project and run both scripts install.sh as sudo: https://github.com/kstenerud/iOS-Universal-Framework

So, we are tracking this bug and I hope the solution come fast 🙂

9 steps to Configure Jenkins with Calabash/Cucumber

Hi all,

I will show how configure your calabash automation and your git repository on a jenkins job in only 9 steps.

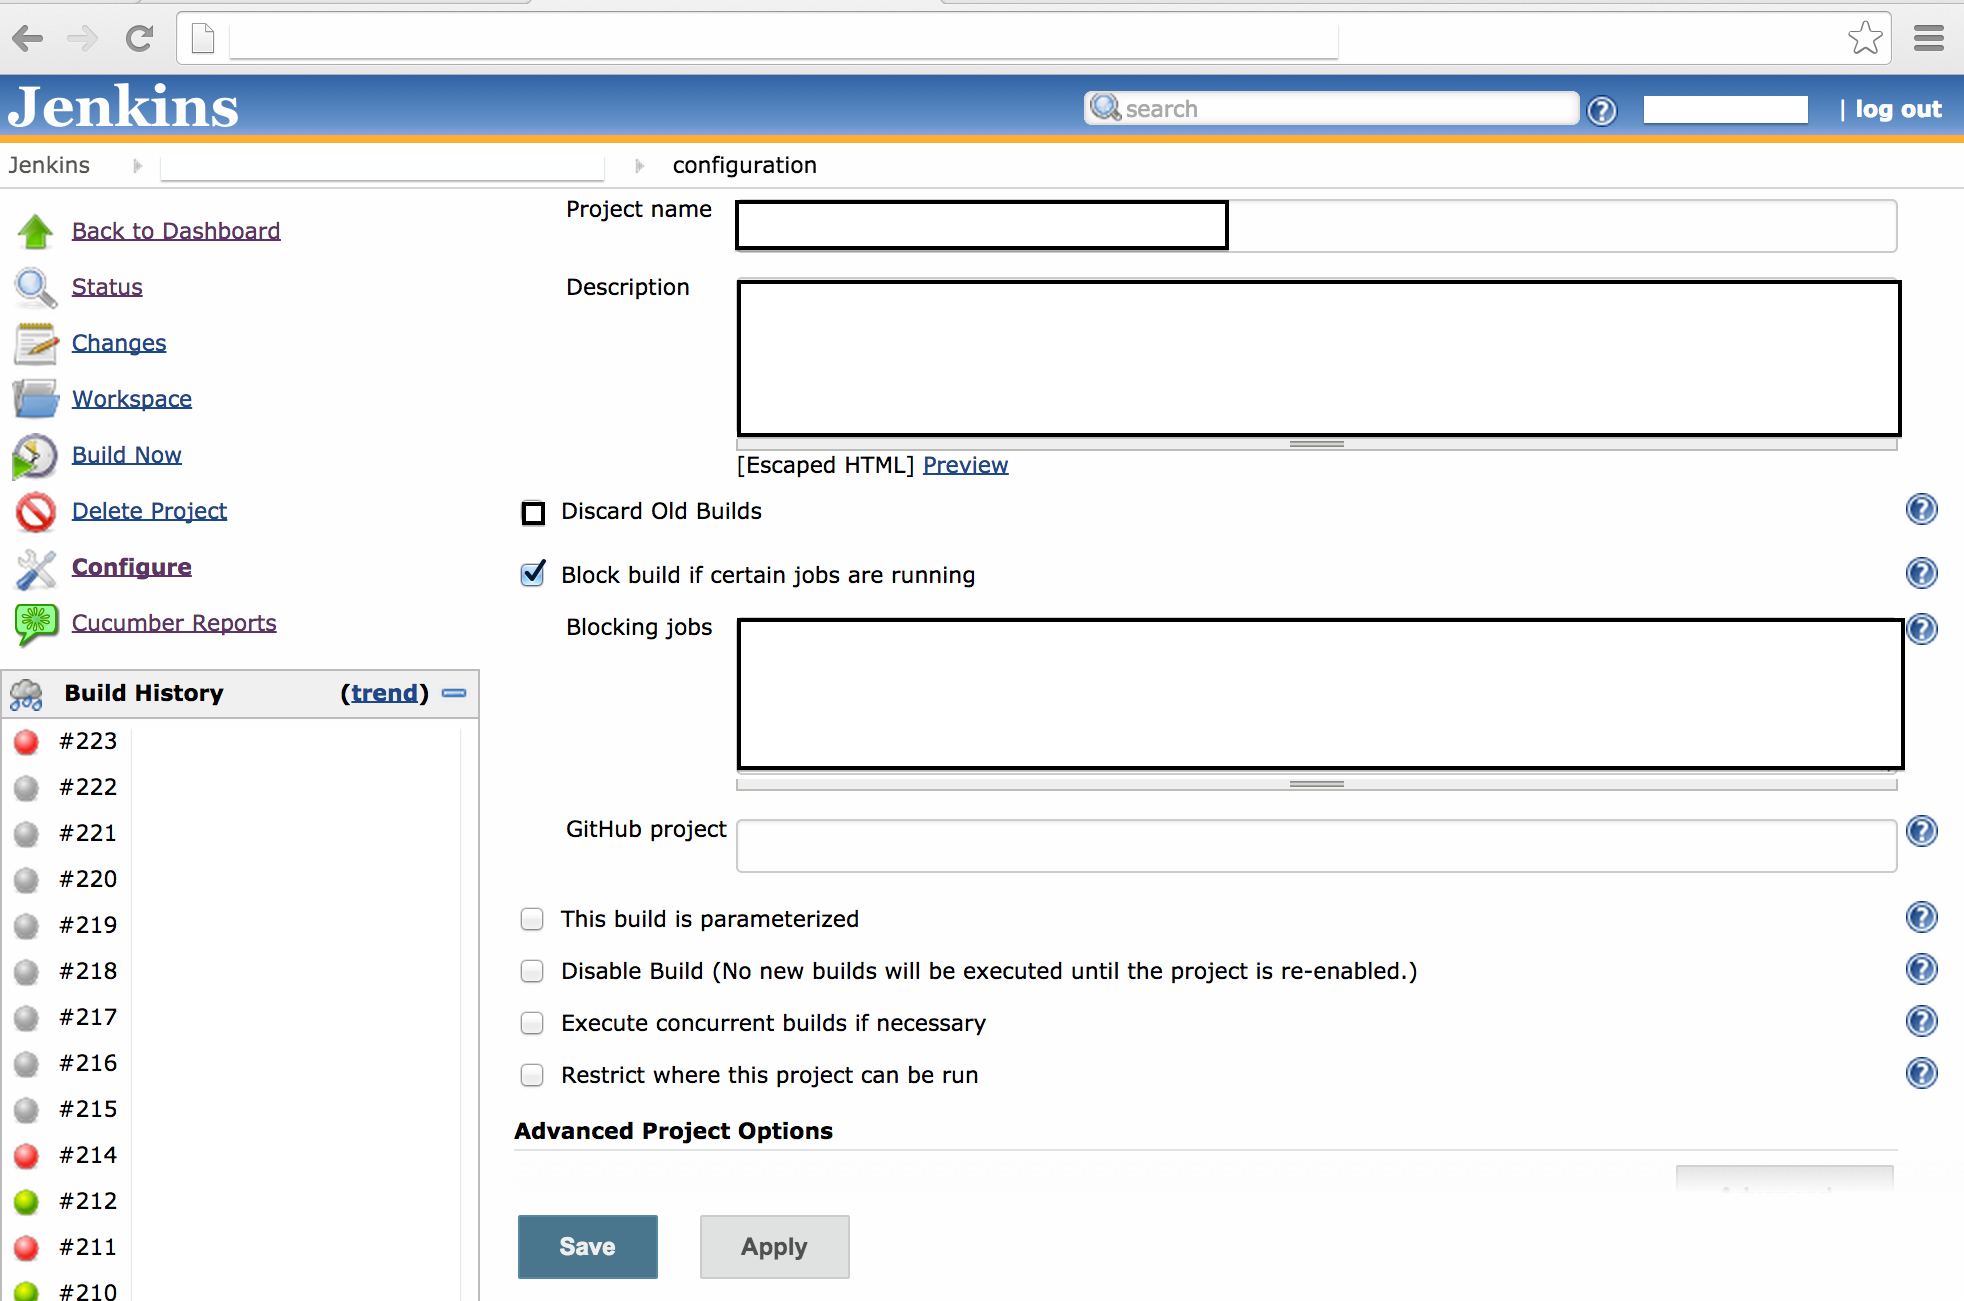
First – Create a new job and write the project name, description and Blocking jobs (If you have any, check the block build…). In this step you can choose if you want discard the old builds or not ( I advise to not discard, it is good maintain as an evidence). Git hub project: Write the URL of your project on github and the other options about your build (generally you don’t need to check).

page1

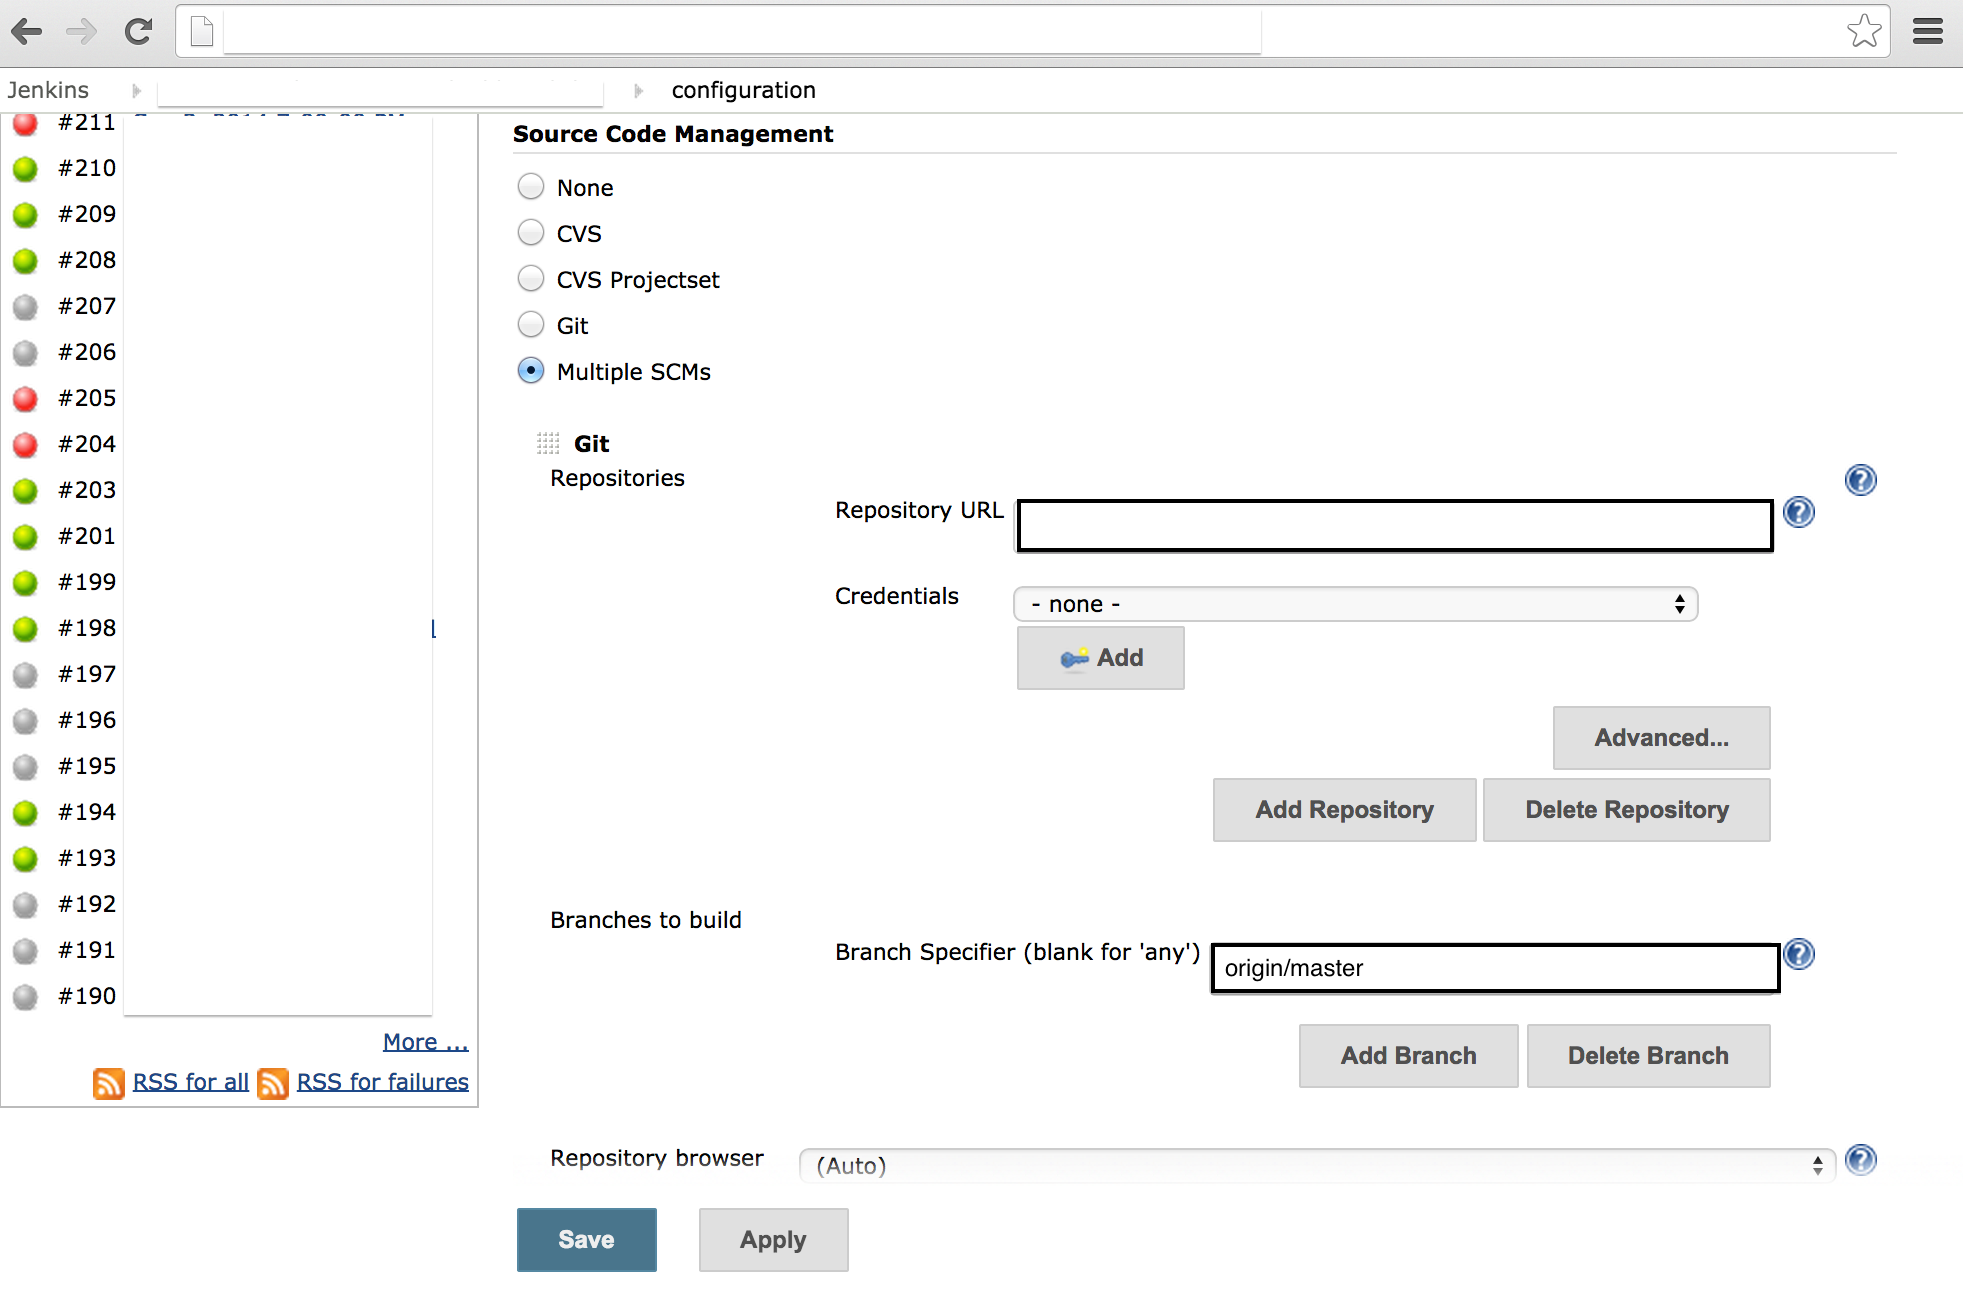
Second – Source Code Management, you need to choose if will be one or multiple repositories (Multiple SCMS in this case). After, you write the Repository URL (Example: https://github.com/xxxxx/XXXX.git), put your credentials (if you need some to clone the repository) and click to Add, If you are using multiple repositories you can add more on Add Repository button.

In the same screen, write the branch that you will use to build the app. In this example I am using this first repository to build the app with the most up to date branch (Where the devs are working)

page2

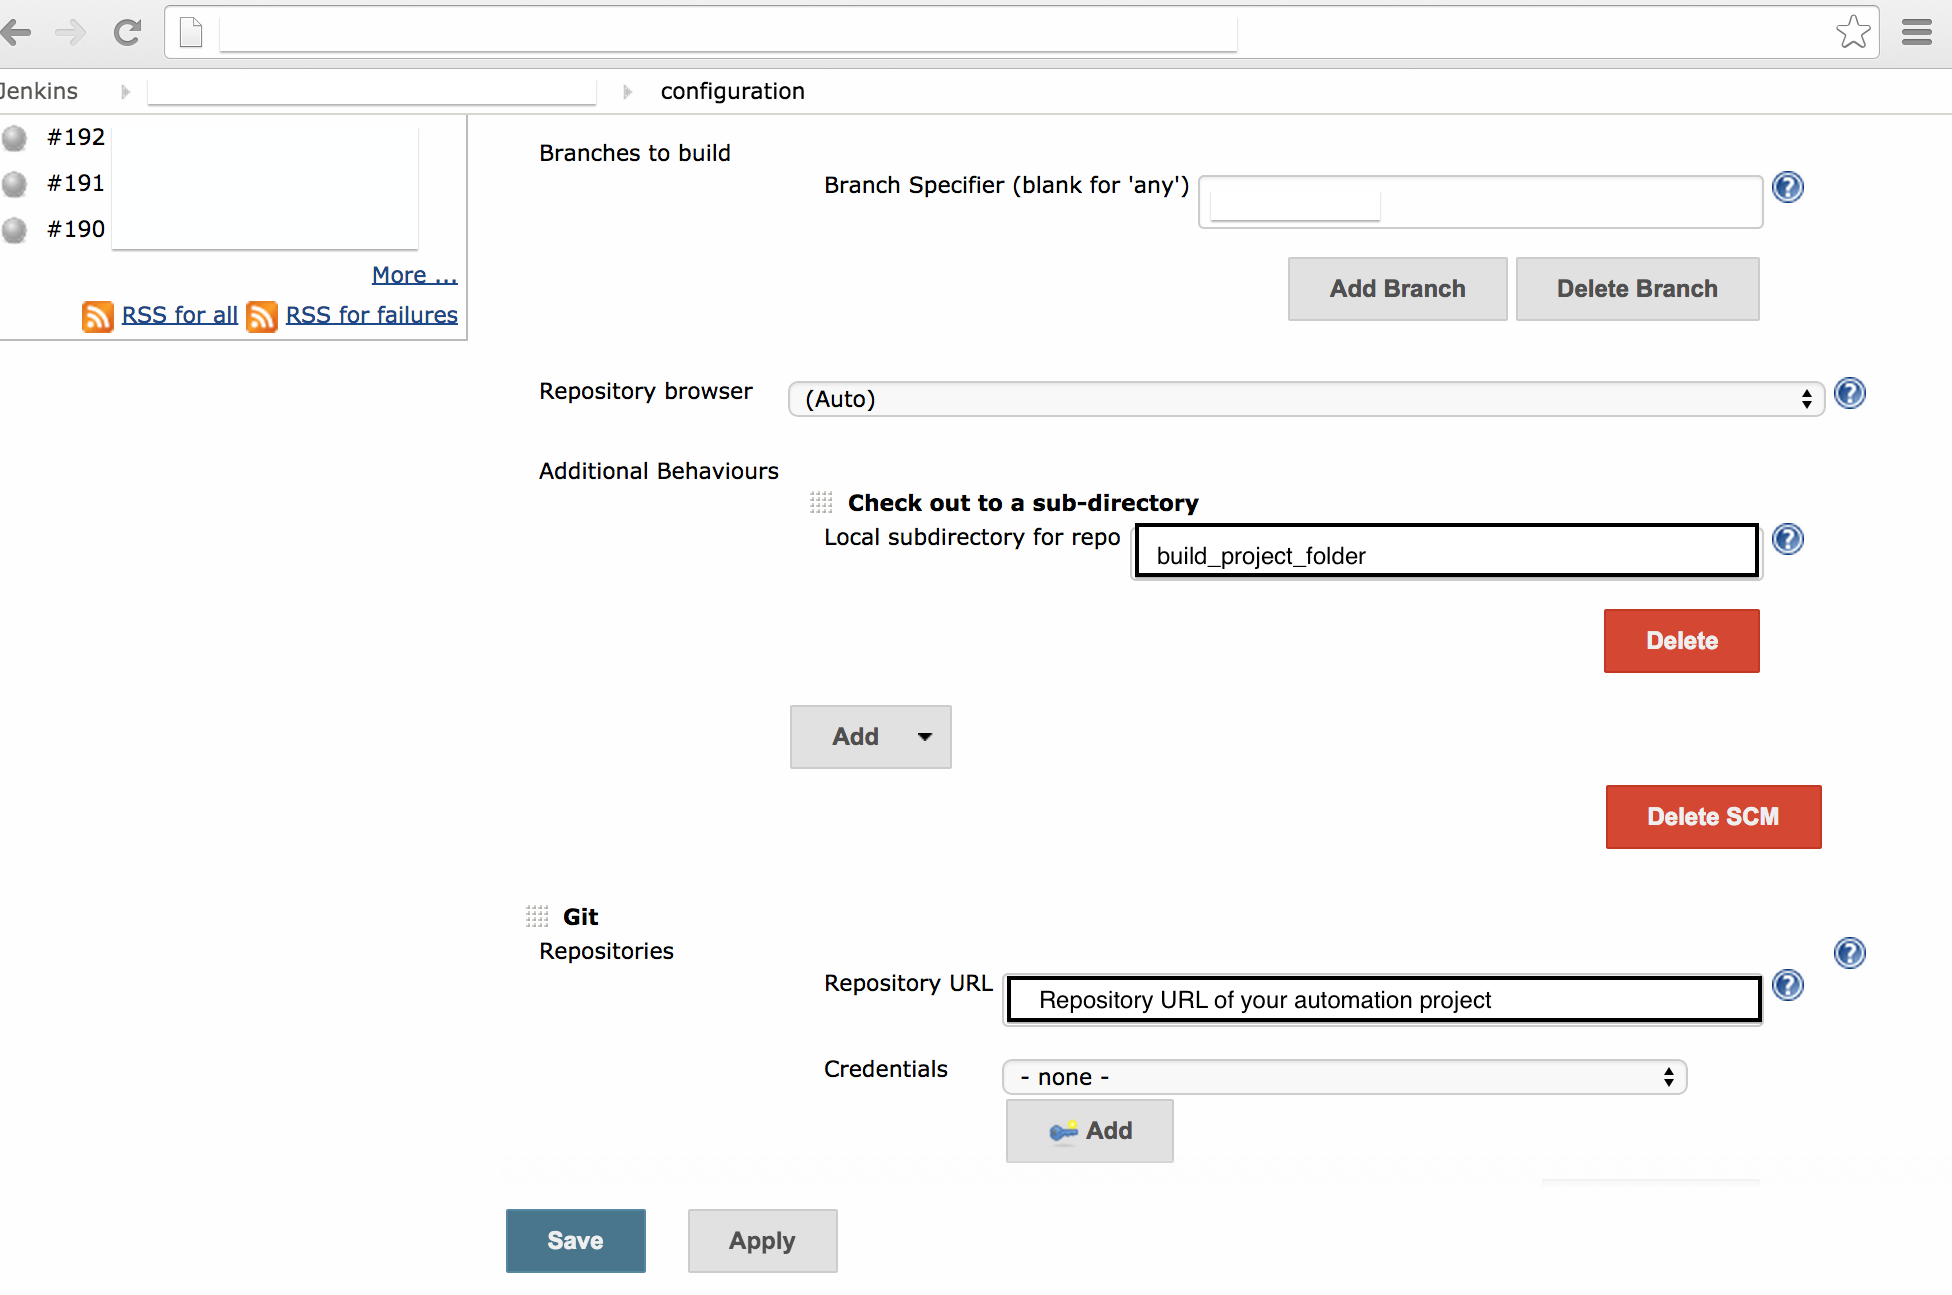
Third – Now you write the build app folder, where the build will be. After, you need to write the repository of your automation project and choose your credentials if you need one.

(That where you put your steps and features, again this is a example, maybe your calabash automation project is inside of the same repository of the app project, so you won’t need to add this second SCM)

page3

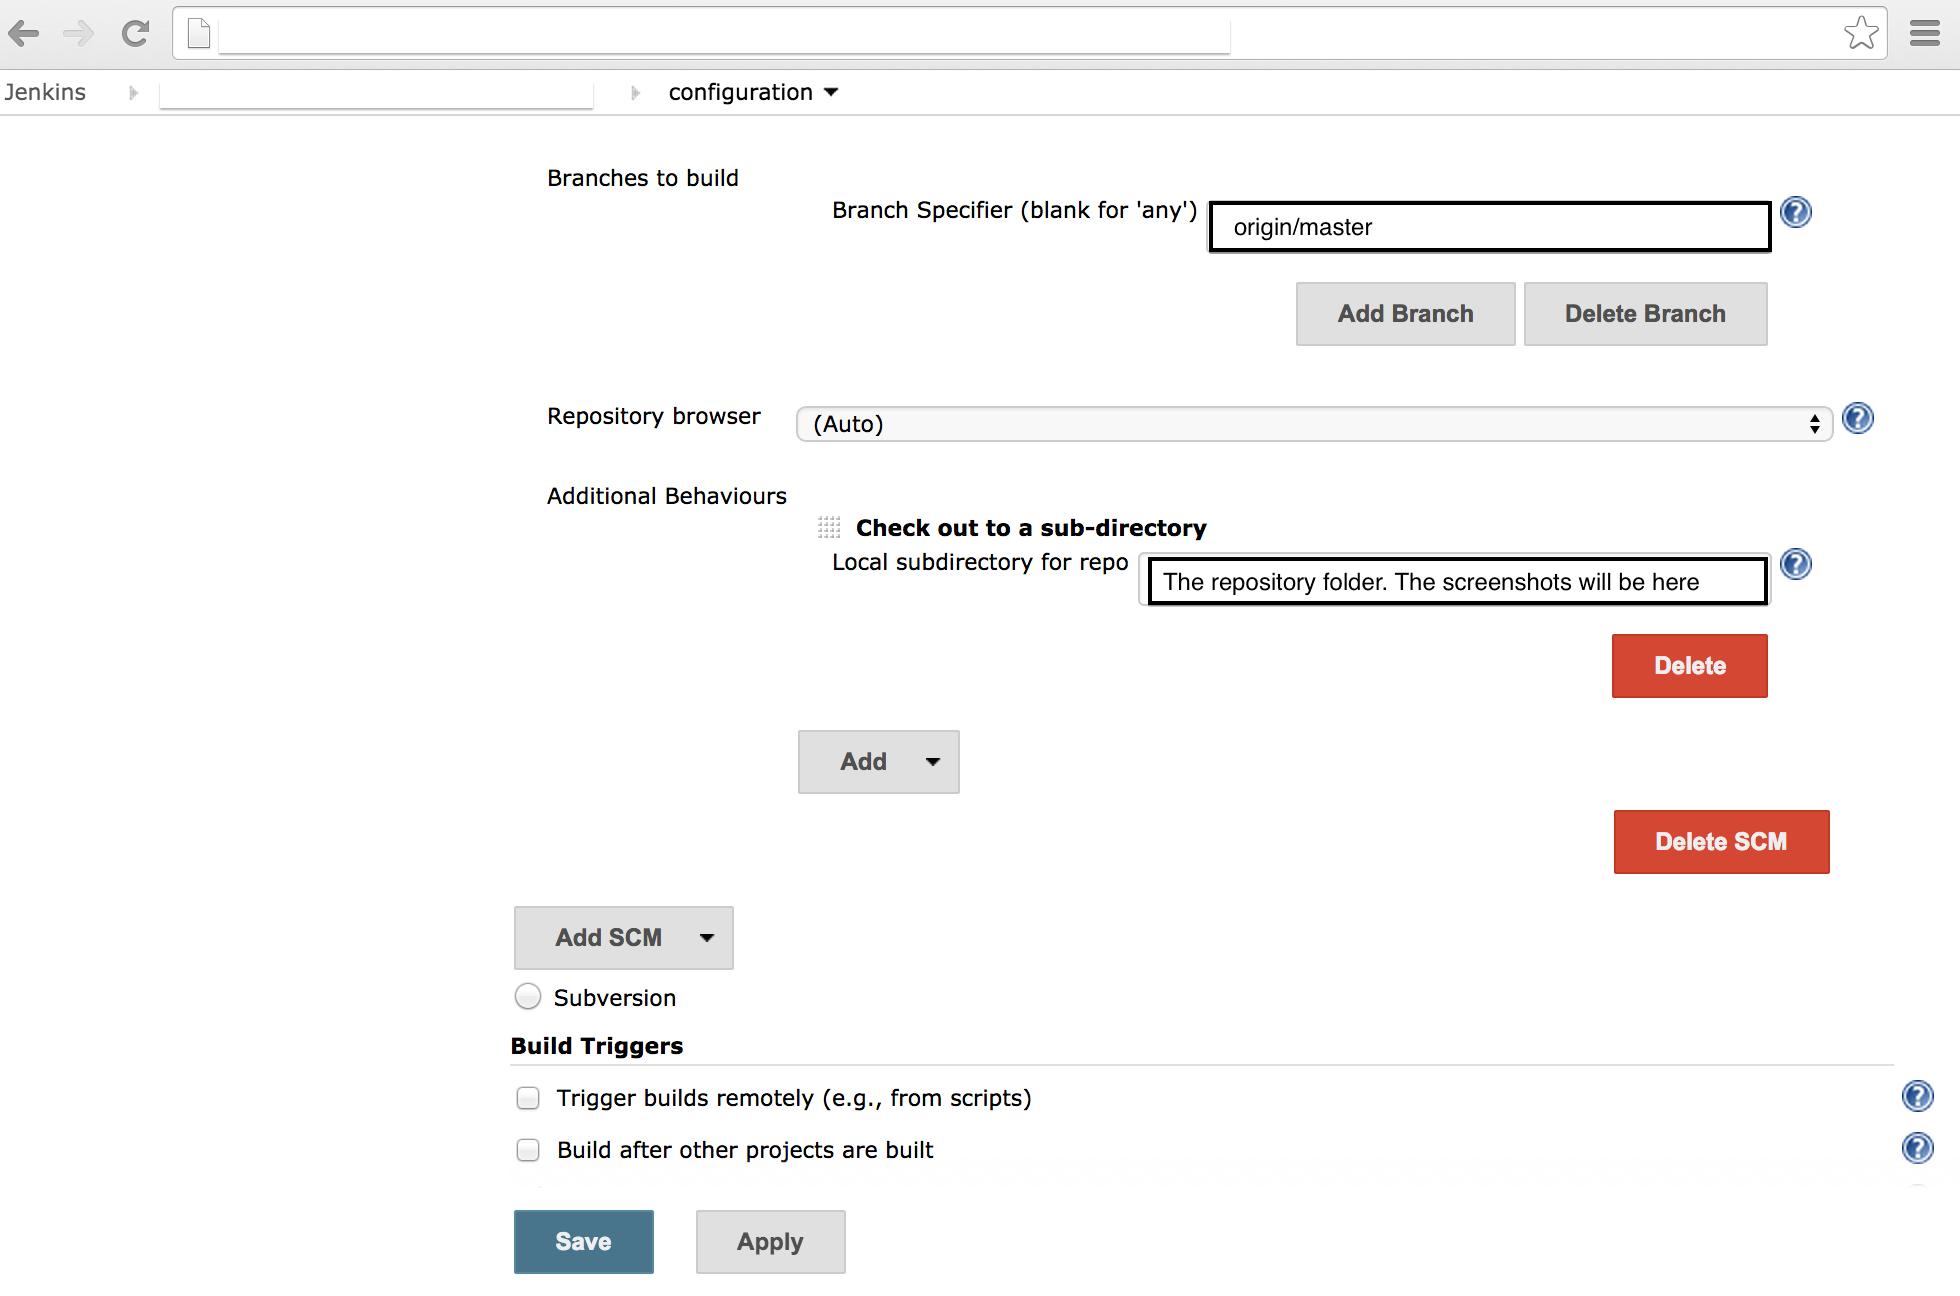
Fourth – Choose the branch of this SCM – calabash automation and the repository folder.

page4

Fifth – In this case we are building this job periodically everyday in the evening. You can schedule the build here. Follow the example and the instructions. If you want run this job after someone pushed to Github, just check the option “Build when a change is pushed to GitHub”.

In this field, you can write the script to pull, checkout and build the app from developers branch.

page5

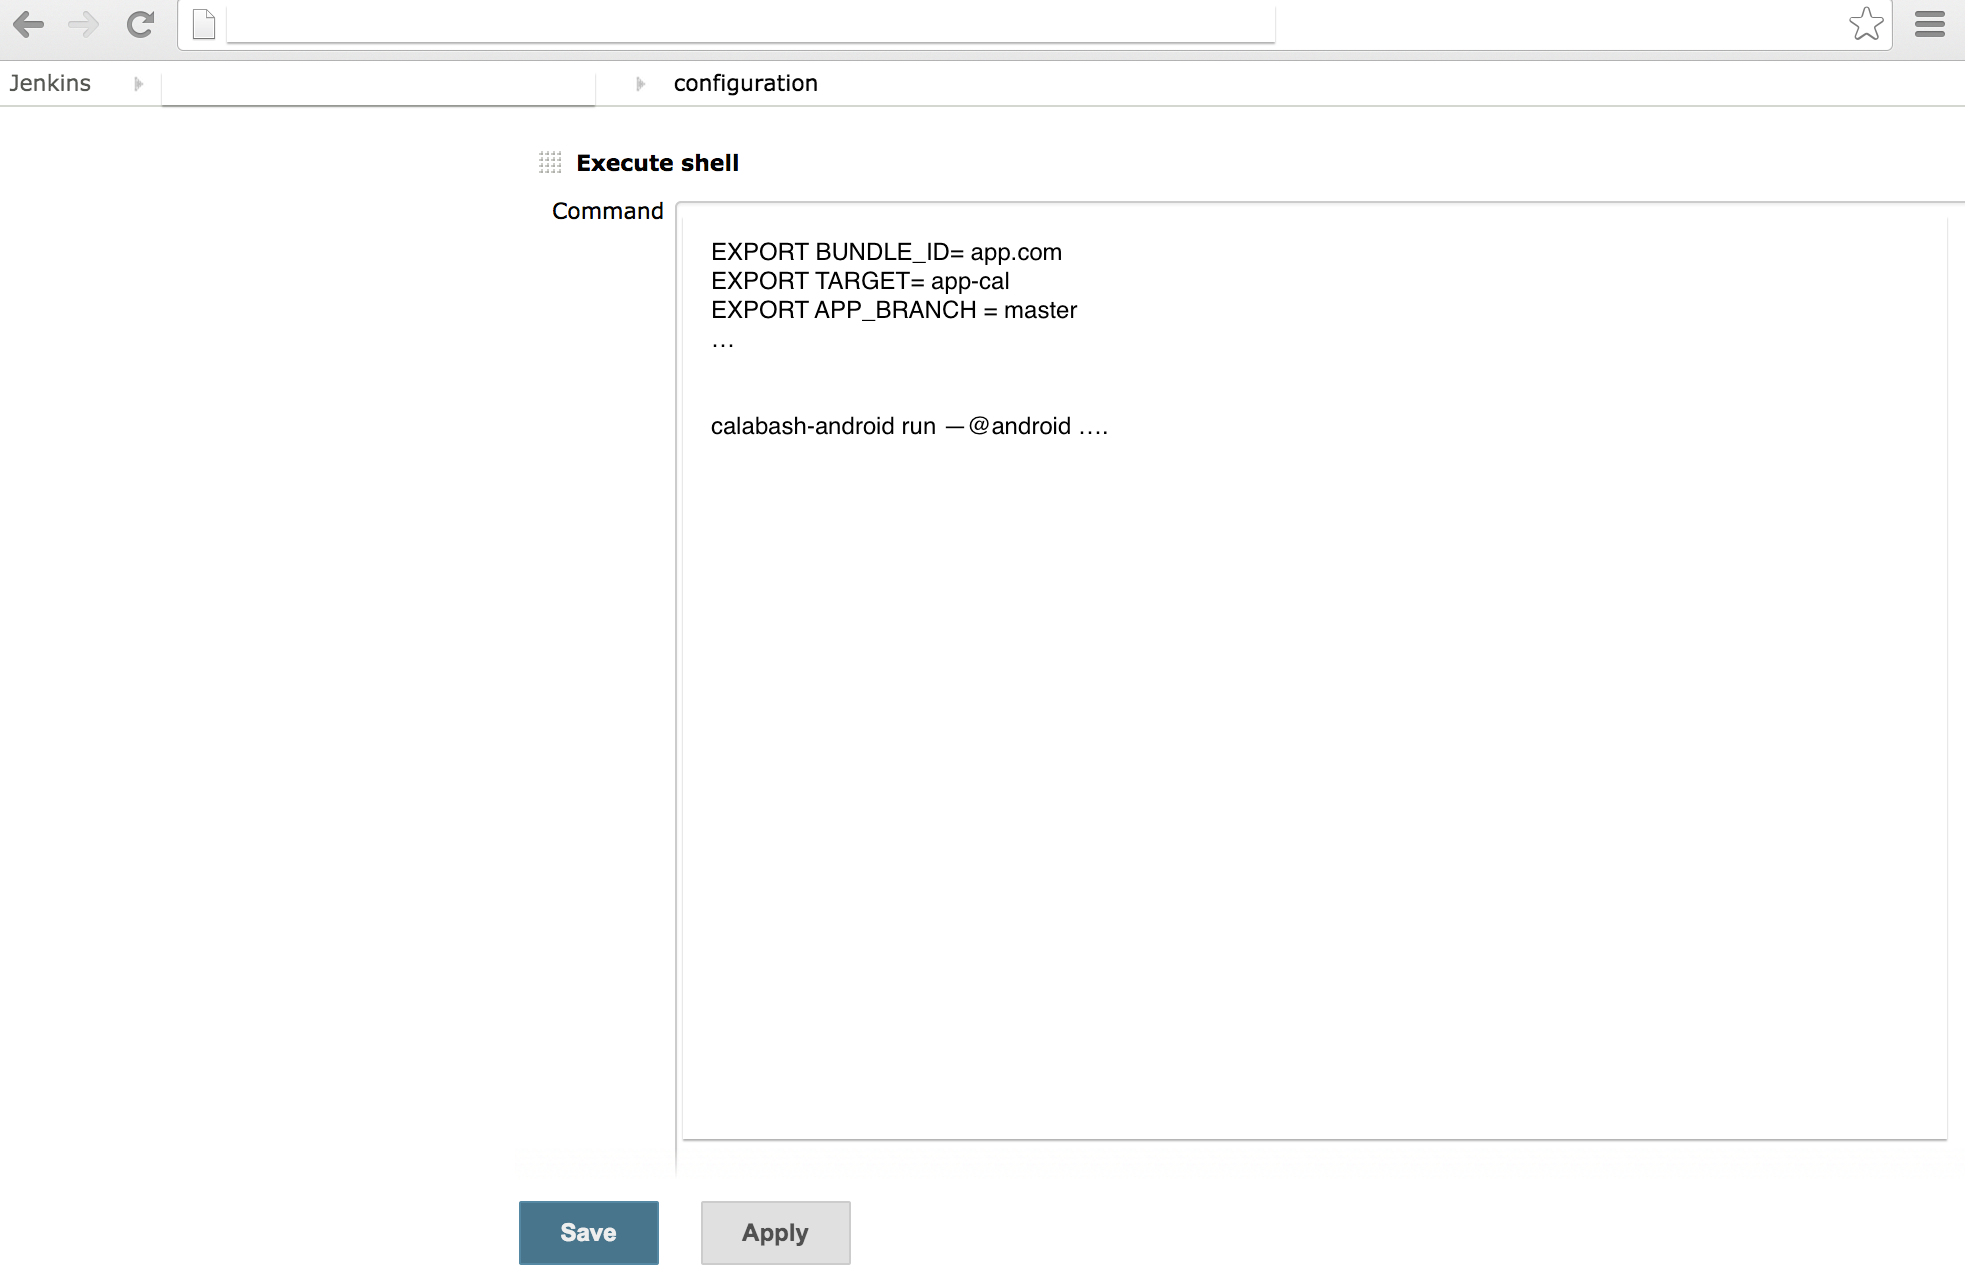
Sixth – Now you need to export the variables, as target, app_branch, bundle_id and everything. After you can write the command to run the calabash and the test.

page6

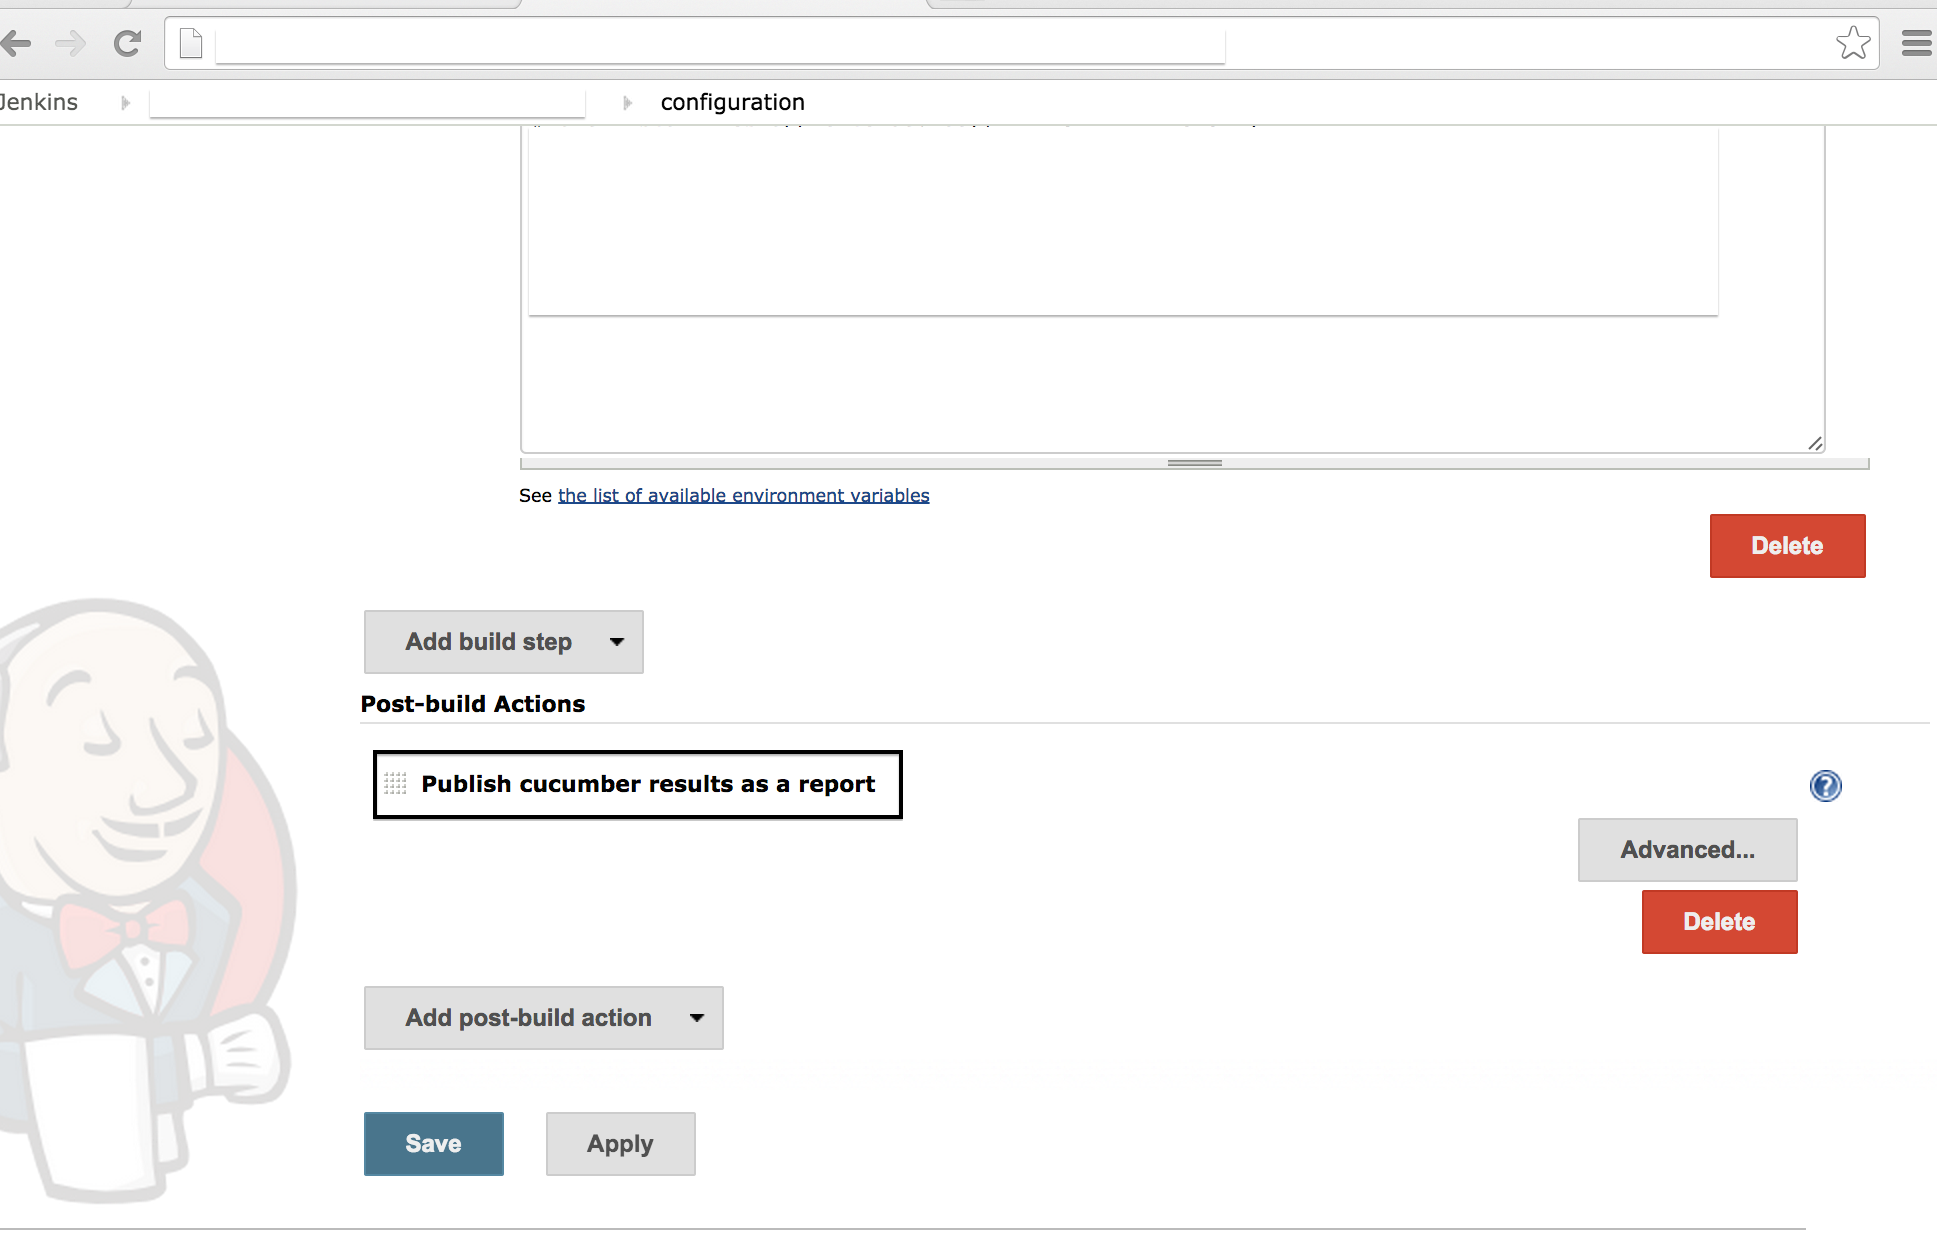
Seventh – In this step you can install a plugin of Cucumber and see the report with graphs and everything. Link of plugin: https://github.com/masterthought/jenkins-cucumber-jvm-reports-plugin-java

page8

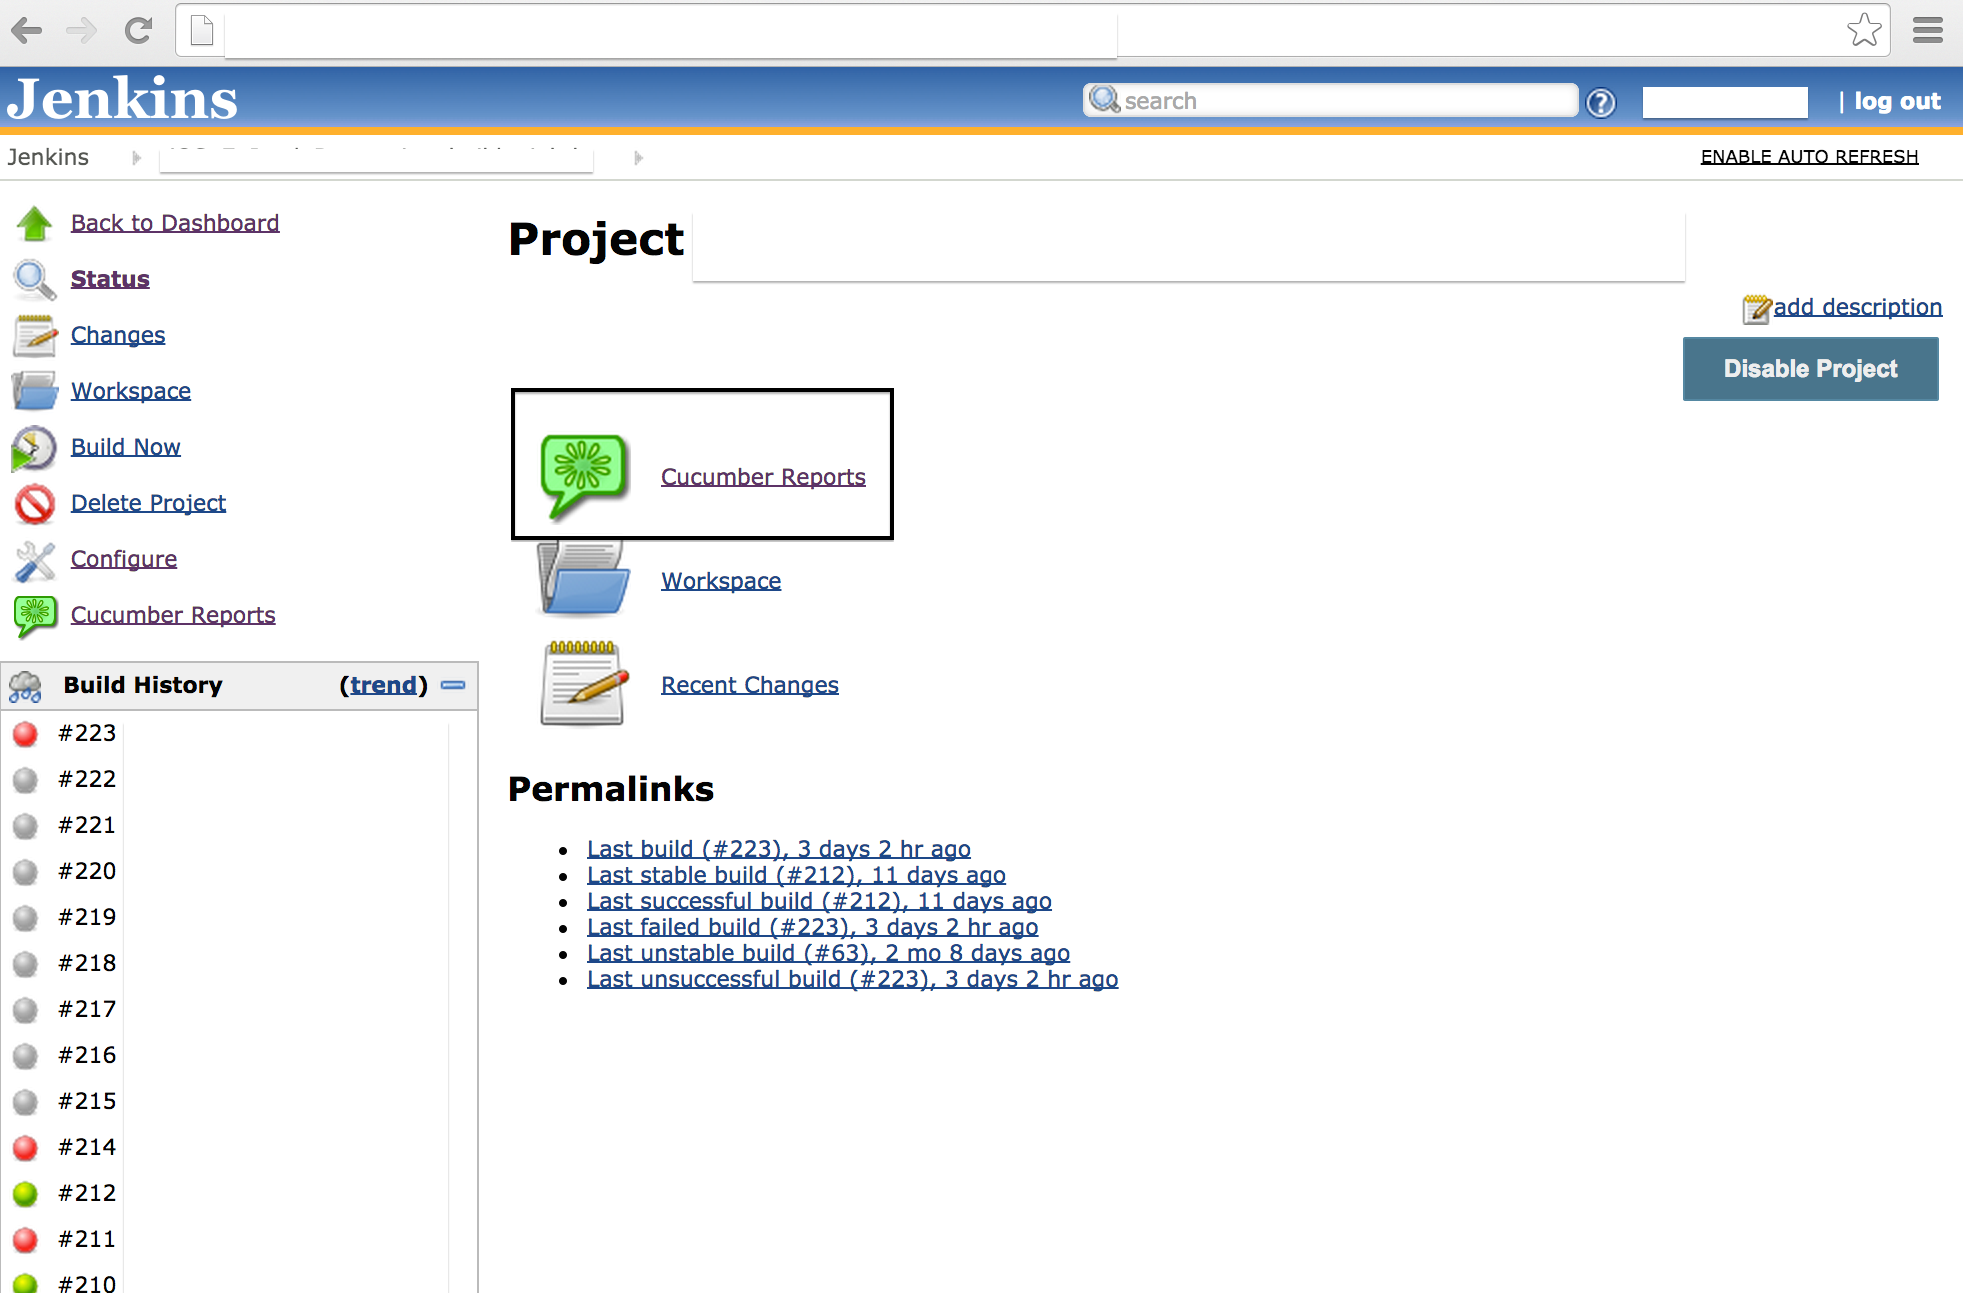
Eighth – After run the test, click on last build and on link Cucumber Reports.

page9

Ninth – You can see the report and how long is delaying each feature, how many scenarios of each feature failed and passed.

page10

If you have any question or suggestion just write below in the comments.

Thank you all !

Testing Ajax application with Selenium

Ajax, an acronym for Asynchronous JavaScript and XML, is a web development technique for creating interactive and more responsive web applications. The Ajax application works more like a desktop application, meaning that user’s request will not cause an entire page to reload every time, the web browser makes an asynchronous call to the web server to obtain the required data and update only specific parts of the current web page. As result the user gets more interactive, speedy, and usable web pages, but testing AJAX with Selenium will be challenging.

Selenium’s ‘assert’ and ‘verify’ commands might occasionally fail thanks to the asynchronous nature of the Ajax. It may happened that the result doesn’t come back from the server immediately and while ‘assert’ and ‘verify’ commands already trying to verify a new value immediately.

Not experienced testers would recommend to add a ‘pause’ command for a few seconds before the verification. The ‘pause’ suggestion may work in certain cases, because Ajax call may be not completed after pausing for a specific time due to slow machines or network. If the tester set the long pause time it will make the test unacceptably slow and drastically increase testing time.

In this type of tests you should use waitForCondition function in Selenium for Ajax testing. The waitForCondition command evaluates a JavaScript snippet repeatedly, until the snippet returns true. As soon as Selenium detects that the condition returns true, it will stop waiting and Ajax testing will resume.

It is important to note that the selenium in selenium.waitForCondition is a Java object in your test code and the selenium in selenium.browserbot is a javascript object running in the web browser.

Examples:

selenium.waitForCondition("selenium.browserbot.getCurrentWindow().loading == false", "20000");

> Condition

> Timeout miliseconds

If you are using AJAX you might find there is an AJAX object on your application. In it will be a activeRequestCount. When the AJAX.activeRequestCount goes to zero, all the AJAX calls are done. So you can wait for an AJAX call to complete with:

selenium.waitForCondition("selenium.browserbot.getCurrentWindow().AJAX.activeRequestCount == 0", "30000");

Thank you 🙂


Fonts: http://www.seleniumguide.com/p/testing-ajax-with-selenium.html

http://darrellgrainger.blogspot.co.uk/2010/03/selenium-rc-java-waitforcondition.html

How take a property inside an element in calabash-ios and calabash-android

Hello mate !


I am writing about “How take a property inside an element in calabash-ios”, look the examples:
 

IOS

– This query is taking the property :TextContent for the element in a web page.


 query("WebView css:'#testid'")[1]["textContent"]

 
– This query is taking the property :TextContent for the element.


 query("Label index:1",:textContent)
 

– Look when you want a sub-property:


[

[0] {

     "id" => "login_button",

     "enabled" => true,

     "contentDescription" => nil,

     "class" => "android.widget.Button",

     "text" => "Login",

     "rect" => {

     "center_y" => 545.0,

     "center_x" => 639.5,

     "height" => 64,

     "y" => 513,

     "width" => 195,

     "x" => 542

               },

     }

]

– This query is taking the property inside the group of properties.


 query("Label").first["rect"]["y"]


Android

– This query is taking the property :TextContent for the element in a web page.

 query("WebView css:'#testid'",:textContent)
 
– This query is taking the property :TextContent for the element.


 query("Label index:1",:textContent)
 

– Look when you want a sub-property:


 [

[0] {

     "id" => "login_button",

     "enabled" => true,

     "contentDescription" => nil,

     "class" => "android.widget.Button",

     "text" => "Login",

     "rect" => {

     "center_y" => 545.0,

     "center_x" => 639.5,

     "height" => 64,

     "y" => 513,

     "width" => 195,

     "x" => 542

               },

     }

]


– This query is taking the property inside the group of properties.


 query("Label index:1",:rect,:y)
 

If you need help or have some comment to do, please write below 🙂
 
Thank you !


Swipe and Drag – Calabash iOS and Android

Hi guys !!
I am writing examples of swipe and drag on mobile devices with calabash today. Some methods that you can use to test, these drags have the same action as the swipe. (If for some reason the swipe don’t work)
ANDROID:
  def swipe_page_to_left
    performAction('swipe', 'left')
  end

  def swipe_page_to_right
    performAction('swipe', 'right')
  end

  def scroll_to_right
    performAction('drag', 90, 0, 50, 50, 50)
  end

  def scroll_to_left
    performAction('drag', 0, 90, 50, 50, 50)
  end

def scroll_to_up
   performAction('drag', 88, 80, 90, 90, 5)
 end

 def scroll_to_down
    performAction('drag', 70, 10, 80, 0, 3)
 end

IOS
Change to down, left or right:

 swipe(:up)

If you have some question or suggest just write below !
Thank you 🙂

Simulate turn off wifi/connection on devices and simulators

Simulate disable network


Device/Simulator – Android:

%x(adb shell am start -a android.intent.action.MAIN -n com.android.settings/.wifi.WifiSettings)

(For selecting Next element on the screen)
%x(adb shell input keyevent 20)

(For selecting previous element on the screen)
%x(adb shell input keyevent 19)

(For clicking on the selected element)
%x(adb shell input keyevent 23)

So you have to use select next or select previous key events and then you the click event to toggel the wifi.

Simulator – Android:

def disable_network
%x(adb shell svc wifi disable)
end


def enable_network
%x(adb shell svc wifi enable)
end

Device/Simulator – IOS:

First, setup a WiFi router that you can use for testing.

You can turn on Airplane mode on the phone, then turn WiFi back on. This will prevent the 3G connection from providing data access.

Launch your application. Now you can simply disconnect your WiFi router to simulate a loss of connectivity.

So the only option available is switch on airplane mode on phone and connect it to the wifi. Once you want to disconnect wifi switch off the wifi router itself. You can use any laptop to create the testing wifi access point.

Summarizing you have to connect your device in a wifi connection that you can control with System commands, the problem is that you will lost the connection of your machine.

def disable_network
%x[ifconfig Wi-Fi down]
%x[ifconfig en4 down]
end


def enable_network
%x[ifconfig Wi-Fi up]
%x[ifconfig en4 up]
end

But if you have an android phone you can easily create a portable wifi Hotspot which can be controlled using adb commands.

Font: http://stackoverflow.com/questions/1077701/iphone-connectivity-testing-how-do-i-force-it-to-lose-connection

15 Expert Tips for Using Cucumber

Hey guys, I found these excellent tips to who are working with Cucumber and Calabash. Try follow each one to get more performance and use the best practices always 🙂

1. Feature Files Should Actually be Features, Not Entire Portions of an App

One feature per well named file, please, and keep the features focused.

2. Avoid Inconsistencies with Domain Language

You’ll get the most benefit out of using Cucumber when your customers are involved. To that end, make sure you use their domain language when you write stories. The best course of action is to have them involved in writing the stories.

3. Organize Your Features and Scenarios with the Same Thought You Give to Organizing Your Code

One useful way to organize things is by how fast they run. Use 2-3 levels of granularity for this:

  • Fast: scenarios that run very fast, e.g. under 1/10 of a second
  • Slow: scenarios that are slower but not painfully so, maybe under one second each
  • Glacial: scenarios that take a really long time to run

You can do this separation several different ways (and even some combination):

  • Put them in separate features
  • Put them in separate subdirectories
  • Tag them

4. Use Tags

Tags are a great way to organize your features and scenarios in non functional ways. You could use @small, @medium and @large, or maybe @hare, @tortoise, and @sloth. Using tags let you keep a feature’s scenarios together structurally, but run them separately. It also makes it easy to move features/scenarios between groups, and to have a given feature’s scenarios split between groups.

The advantage of separating them this way is that you can selectively run scenarios at different times and/or frequencies, i.e. run faster scenarios more often, or run really big/slow scenarios overnight on a schedule.

Tagging has uses beyond separating scenarios into groups based on how fast they are:

  • When they should be run: on @checkin, @hourly, @daily
  • What external dependencies they have: @local, @database, @network
  • Level: @functional, @system, @smoke
  • Etc.

5. Use Rake Tasks to Run Features

This provides a consistent environment for running features: this way each run uses the same set of options and parameters. This goes a long way toward maintaining deterministic results.

Another benefit is that this makes for easy integration with continuous integration tools. There is a single point of entry into the spec run, with all options/parameters encapsulated.

6. Don’t Get Carried Away with Backgrounds (Stick to Givens)

The larger the background, the greater the load of understanding for each scenario. Scenarios that contain all the details are self-contained and as such, can be more understandable at a glance.

7. Make Scenarios Independent and Deterministic

There shouldn’t be any sort of coupling between scenarios. The main source of such coupling is state that persists between scenarios. This can be accidental, or worse, by design. For example one scenario could step through adding a record to a database, and subsequent scenarios depend on the existence of that record.

This may work, but will create a problem if the order in which scenarios run changes, or they are run in parallel. Scenarios need to be completely independent.

Each time a scenario runs, it should run the same, giving identical results. The purpose of a scenario is to describe how your system works. If you don’t have confidence that this is always the case, then it isn’t doing its job. If you have non-deterministic scenarios, find out why and fix them.

8. Write Scenarios for the Non-Happy-Path Cases As Well

Happy path tests are easy; edge cases and failure scenarios take more thought and work. Here’s where having some good (and yet pathological) testers on the team can reap rewards.

Use rcov with your full Cucumber runs to find holes in coverage.

9. Be DRY: Refactor and Reuse Step Definitions

Especially look for the opportunity to make reusable step definitions that are not feature specific. As a project proceeds, you should be accumulating a library of step definitions. Ideally, you will end up with step definitions that can be used across projects.

10. Use a Library (Such as Chronic) for Parsing Time in Your Step Definitions

This allows you to use time in scenarios in a natural way. This is especially useful for relative times.

Background:
  Given a user signs up for a 30 day account

Scenario: access before expiry
  When they login in 29 days
  Then they will be let in

Scenario: access after expiry
  When they login in 31 days
  Then they will be asked to renew

11. Revisit, Refactor, and Improve Your Scenarios and Steps

Look for opportunities to generalize your steps and reuse them. You want to accumulate a reusable library of steps so that writing additional features takes less and less effort over time.

12. Refactor Language and Steps to Reflect Better Understanding of Domain

This is an extension of the previous point; as your understanding of the domain and your customer’s language/terminology improves, update the language used in your scenarios.

13. Use Compound Steps to Build Up Your Language

Compound steps (calling steps from steps) can help make your features more concise while still keeping your steps general—just don’t get too carried away. For example:

Given /^the user (.*) exists$/ do |name|
  # ...
end

Given /^I log in as (.*)$/ do |name|
  # ...
end

Given /^(.*) is logged in$/ do |name|
  Given "the user #{name} exists"
  Given "I log in as #{name}"
end

14. Use Parallel Step Definitions to Support Different Implementations for Features

For example, running features against Webrat and Selenium. Put these step definitions somewhere where they won’t be auto-loaded, and require them from the command line or rake task.

15. Avoid Using Conjunctive Steps

Each step should do one thing. You should not generally have step patterns containing “and.” For example:

Given A and B

should be split into two steps:

Given A
And B


Bye 🙂

Font: https://blog.engineyard.com/2009/15-expert-tips-for-using-cucumber/

Summary of Calabash iOS Ruby API – Assertions

Hi guys ! I hope you are well ! Here there are many commands of calabash-ios that are very useful 🙂

Assertions


fail(msg="Error. Check log for details.")

check_element_exists(query)
check_element_does_not_exist(query)
check_view_with_mark_exists(expected_mark)

check_element_exists("view marked:'#{expected_mark}'")


Touch


touch(uiquery, options={})


irb(main):037:0> touch("view marked:'switch'")
irb(main):038:0> tap 'switch'
irb(main):040:0> touch("view marked:'First'", :offset => {:x => 50, :y => 0})
irb(main):041:0> touch(nil, :offset => {:x => 50, :y => 0})


Keyboard


keyboard_enter_char(chr)

irb(main):043:0> keyboard_enter_char "a"
irb(main):076:0> keyboard_enter_char "More"

keyboard_enter_text(text)

irb(main):044:0> keyboard_enter_text "The Quick Brown Fox"

done

Scroll

scroll(uiquery, direction)

irb(main):082:0> scroll "scrollView", :down


Tables


scroll_to_row(uiquery, number)

irb(main):081:0> scroll_to_row "tableView", 2

scroll_to_cell(options)

{:query => "tableView",
 :row => 0,
 :section => 0,
 :scroll_position => :top,
 :animate => true}
irb(main):003:0> scroll_to_cell(:row => 13, :section => 0)
=> ["; contentOffset: {0, 0}>. Delegate: LPThirdViewController, DataSource: LPThirdViewController"]

:row the row to scroll to
:section the section to scroll to
:scroll_position the position to scroll to :top, :bottom, :middle
:animate animate the scrolling or not

each_cell(options, &block)

{:query => "tableView", #the table view to act on
 :post_scroll => 0.3,  #a pause after each action taken
 :skip_if => nil, #an optional proc to skip some cells
 :animate => true #animate the scrolling?
}
irb(main):008:0> each_cell(:post_scroll=>0) do |row, sec|
irb(main):009:1* puts "Row #{row} in Section #{sec}"
irb(main):010:1> end
Row 0 in Section 0
Row 1 in Section 0
Row 2 in Section 0
Row 3 in Section 0
...
irb(main):001:0> table_labels = []
=> []

irb(main):002:0> each_cell(:animate => false, :post_scroll => 0.1) do |row, sec|
irb(main):003:1*  txt = query("tableViewCell indexPath:#{row},#{sec} label", :text).first
irb(main):004:1>  table_labels << txt irb(main):005:1> end
=> 1

irb(main):006:0> table_labels
=> ["Cell 0", "Cell 1", "Cell 2", "Cell 3", "Cell 4", "Cell 5", "Cell 6", "Cell 7", "Cell 8", "Cell 9", "Cell 10", "Cell 11", "Cell 12", "Cell 13", "Cell 14", "Cell 15", "Cell 16", "Cell 17", "Cell 18", "Cell 19", "Cell 20", "Cell 21", "Cell 22", "Cell 23", "Cell 24", "Cell 25", "Cell 26", "Cell 27", "Cell 28", "Cell 29"]


Rotation

rotate(dir)

irb(main):083:0> rotate :left


(Event) Playback

playback(recording, options={})

irb(main):103:0> playback "drag_switch_around", :query => "view marked:'switch'", :offset => {:x=>2, :y=>0}

record_begin and record_end

irb(main):104:0> record_begin
=> ""
irb(main):105:0> record_end "move_down"
=> "move_down_ios5_iphone.base64"


Location

set_location(options)

:place => "Tower of London"
:latitude => ..., :longitude => ...


Backdoor

backdoor(sel, arg)

- (NSString *) calabashBackdoor:(NSString *)aIgnorable;
irb(main):002:0> backdoor("calabashBackdoor:", "")
=> "YES"


Screenshot

screenshot(options={:prefix=>nil, :name=>nil})

screenshot({:prefix => "/Users/krukow/tmp", :name=>"my.png"})

screenshot_embed(options={:prefix=>nil, :name=>nil, :label => nil})

screenshot_embed({:prefix => "/Users/krukow/tmp", :name=>"my.png", :label => "Mine"})


Misc


server_version

irb(main):026:0> server_version
=> {"outcome"=>"SUCCESS", "app_name"=>"LPSimpleExample-cal", "simulator_device"=>"iPhone", "iOS_version"=>"5.1", "app_version"=>"1.0", "system"=>"x86_64", "app_id"=>"com.lesspainful.example.LPSimpleExample-cal", "version"=>"0.9.126", "simulator"=>"iPhone Simulator 358.4, iPhone OS 5.1 (iPhone/9B176)"}


client_version

irb(main):027:0> client_version
=> "0.9.127.pre1"


calabash_exit

irb(main):028:0> calabash_exit
=> []
irb(main):029:0> server_version
Errno::ECONNREFUSED: Connection refused - connect(2) (http://localhost:37265)


escape_quotes(str)

irb(main):007:0> quoted = escape_quotes("Karl's child")
=> "Karl\\'s child"
irb(main):008:0> query("view marked:'#{quoted}'")


macro(txt)

macro 'I touch "Second"'

lbl = ".......a long text......"
macro %Q[I use a step with "double" quotes and 'single' and #{lbl}]


flash(uiquery)

flash("TableView index:2")


Font: https://github.com/calabash/calabash-ios/wiki/03.5-Calabash-iOS-Ruby-API

Summary of Calabash iOS Ruby API – QUERY

Just a summary of useful commands !

Query

query(uiquery, *args)
irb(main):003:0> query("button index:0")
=> [{"class"=>"UIRoundedRectButton", "frame"=>{"y"=>287, "width"=>72, "x"=>100, "height"=>37}, "UIType"=>"UIControl", "description"=>">"}] 
irb(main):005:0> query("button index:0").first.keys
=> ["class", "frame", "UIType", "description"]

irb(main):006:0> query("button index:0").first["frame"]["width"]
=> 72

irb(main):031:0> query("tableView","numberOfSections")
=> [1]
irb(main):033:0> query("tableView","delegate","description")
=> [""]
irb(main):034:0> query("tableView",numberOfRowsInSection:0)
=> [30]
irb(main):035:0> query("tableView","numberOfRowsInSection"=>0)
=> [30]
irb(main):036:0> query("pickerView",:delegate, [{pickerView:nil},{titleForRow:1},{forComponent:0}])
=> ["1,0"]
[pickerView.delegate pickerView:nil titleForRow:1 forComponent:0]

classes(uiquery)

def classes(uiquery,*args)
  query_map(uiquery,:class,*args)
end
irb(main):001:0> classes("view")
=> ["UILayoutContainerView", "UITransitionView", "UIViewControllerWrapperView", "UIView", "UITextField", "UITextFieldRoundedRectBackgroundView", "UIImageView", "UIImageView", "UIImageView", "UITextFieldLabel", "UILabel", "UIRoundedRectButton", "UIButtonLabel", "UISwitch", "_UISwitchInternalView", "UIImageView", "UIView", "UIImageView", "UIImageView", "UIImageView", "UIRoundedRectButton", "UIButtonLabel", "UITabBar", "UITabBarButton", "UITabBarSelectionIndicatorView", "UITabBarSwappableImageView", "UITabBarButtonLabel", "UITabBarButton", "UITabBarSwappableImageView", "UITabBarButtonLabel", "UITabBarButton", "UITabBarSwappableImageView", "UITabBarButtonLabel", "UITabBarButton", "UITabBarSwappableImageView", "UITabBarButtonLabel"]

label(uiquery)

 def label(uiquery)
  query(uiquery, :accessibilityLabel)
end
irb(main):001:0> label("view")
[nil, nil, nil, nil, nil, nil, nil, nil, nil, nil, "Empty list", nil, nil, nil, "Mon", "Dec 17", nil, nil, nil, "Tue", "Dec 18", nil, nil, nil, nil, "Today", nil, nil, nil, "Thu", "Dec 20", nil, nil, nil, nil, nil, "Empty list", nil, nil, "12", "12", nil, nil, "1", "1", nil, nil, "2", "2", nil, nil, "3", "3", nil, nil, nil, nil, nil, "Empty list", nil, nil, "56", "56", nil, nil, "57", "57", nil, nil, "58", "58", nil, nil, nil, nil, nil, "Empty list", nil, nil, "AM", "AM", nil, nil, "PM", "PM", nil, nil, nil, nil, nil, nil, nil, nil, nil, nil, "Name", "First View", "First", "First", nil, "Second", "Second", nil, "other", "switch", nil, nil, nil, nil, nil, nil, "login", "Login", nil, "First", nil, nil, "First", "Second", nil, "Second", "Third", nil, "Third", "Fourth", nil, "Fourth"]

element_does_not_exist(uiquery)

element_exists(uiquery)

view_with_mark_exists(expected_mark)

element_exists("view marked:'#{expected_mark}'")

Waiting

wait_for(options, &block)
{:timeout => 10, #maximum number of seconds to wait
 :retry_frequency => 0.2, #wait this long before retrying the block
 :post_timeout => 0.1, #wait this long after the block returns true
 :timeout_message => "Timed out waiting...", #error message in case options[:timeout] is exceeded
 :screenshot_on_error => true # take a screenshot in case of error
}
irb(main):030:0> wait_for(:timeout => 5) { not query("label text:'Cell 11'").empty? }
irb(main):031:0> wait_for(:timeout => 5) { element_exists("label text:'Cell 20'") }
wait_for(:timeout => 30) do
    res = query("button marked:'Player play icon'", :isSelected)
    res.first == "1"        
end

wait_for_elements_exist(elements_arr, options={})

irb(main):008:0> wait_for_elements_exist( ["label text:'Cell 11'", "tabBarButton marked:'Third'"], :timeout => 2)
wait_for_elements_do_not_exist(elements_arr, options={})
wait_for_none_animating(options={})
wait_poll(opts, &block)
{:until => nil #a predicate which should return true when the condition is satisfied
 :until_exists => nil #a uiquery to function as predicate (i.e. element_exists(opts[:until_exists]))
 :timeout => 10, #maximum number of seconds to wait
 :retry_frequency => 0.2, #wait this long before retrying the block
 :post_timeout => 0.1, #wait this long after the block returns true
 :timeout_message => "Timed out waiting...", #error message in case options[:timeout] is exceeded
 :screenshot_on_error => true # take a screenshot in case of error
}
irb(main):023:0> wait_poll(:until_exists => "label text:'Cell 22'", :timeout => 20) do
irb(main):024:1* scroll("tableView", :down)
irb(main):025:1> end


Bye Guys 😀

Font: https://github.com/calabash/calabash-ios/wiki/03.5-Calabash-iOS-Ruby-API