Continuous integration

Nowadays we talk a lot about Continuous Delivery (CD), and there is a good reason for that. In the same way that developing code driven by tests was a defining change in the past few years, the practice of releasing new versions of a system continually is becoming the next big thing.

However, though there are a lot of tools to help you implement CD, it is no simple task. In this post I’ll walk you through how the team I’m on is implementing CD using automation as the first step to our goal.

The Problem

Initially, the deployment process on the project was basically manual. Although we had a document with the task details, almost every time the deployment failed, it was necessary to have some experienced person identify issues and solve them. Besides that, the document changed at each iteration, to accommodate modifications to scripts that had to be run to fix issues. This made the process even more chaotic.

Another big issue was that by being super fragile, the process was very time consuming and the deployment had to happen during a low system utilization period. Which meant that the team had to update the system with the new features at night. Final straw! The team decided to invest in improving this process. And when I say “the team” I really mean across all project roles, and not only the group of developers. We collectively researched what could be improved and how to implement the fixes. Working together with the project managers and the client was critical to providing senior management with visibility of the problem. It then stopped being a team issue and became a company-wide issue.

To give a little bit of context about the project, the codebase is about 6 or 7 years old and was started with one of the first versions of the Rails framework. Today we are using Ruby 1.8 and Rails 2.3. The production environment is located in a private data center and has more than 20 boxes dedicated to run the web server, database and so on. All configuration changes are made by Puppet, which is run at every deployment. The team has a 3-week iteration and we deploy at the end of each iteration.

Solution: Take 1

The first step of improvements was to try to automate the deployment process. Depending on a manual process that is constantly changing was the biggest problem. We set off making the deployment to be as simple as running a one-line script. The automation started right from getting the Git tag for the correct version to be deployed to triggering specific scripts that had to be run at every iteration transparently. At the end of the first improvement phase, the team had a deploy script that with a simple command line would do all the system state validations, update the code and database and verify that it was in a consistent state. However, even with an automated script, the process was still unreliable. We often had to complete the deployment manually due to failures in the run.

Solution: Take 2

Then we started the second phase of improvements – we changed the entire deploy script, splitting the process into steps, where every step was atomic. Thus, in case of a failure we didn’t have to restart the whole process, just from the failed step onwards. This change helped reduce the complexity and made it a lot faster. We also investigated the common deployment issues and fixed them for good.

Result?

The deployments that usually averaged 5 to 6 hours, with a maximum of 10 hours, were down to 2 hours at the end of the two improvement phases. The project and company management were thrilled and this further boosted the team’s morale.

The next steps on our Continuous Delivery journey, will be to split code, data and infrastructure changes, so it will be possible to release new versions with no system downtime. There are a lot of techniques to help with that, and right now we are investigating the context so that we can chose the solution that will be the best fit for us. Stay tuned for more…


Font: http://www.thoughtworks.com/insights/blog/automacao-como-pontape-inicial-para-entrega-continua
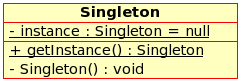
Singleton

What is: Singleton is a design pattern that restricts the instantiation of a class to one object. The concept is sometimes generalized to systems that operate more efficiently when only one object exists, or that restrict the instantiation to a certain number of objects. 

When to use: This is useful when exactly one object is needed to coordinate actions across the system.

Image


How to use in JAVA:

public class SingletonDemo {
    private static SingletonDemo instance = null;
    private SingletonDemo() { }
    public static synchronized SingletonDemo getInstance() {
        if (instance == null) {
            instance = new SingletonDemo();
        }
        return instance;
    }
}

Or (I prefer this last one, it is more simple and easy to understand):

public class Singleton {
    private static final Singleton INSTANCE = new Singleton();
 
    private Singleton() {}
 
    public static Singleton getInstance() {
        return INSTANCE;
    }
}

This method has a number of advantages:

  • The instance is not constructed until the class is used.
  • There is no need to synchronize the getInstance() method, meaning all threads will see the same instance and no (expensive) locking is required.
  • The final keyword means that the instance cannot be redefined, ensuring that one (and only one) instance ever exists.

This is a very simple explanation, but helped me a lot. If you have some question, just write in the comments.

See you in the next post !

HP LoadRunner 11.00 – Enhanced Reporting Capabilities – Customising your report.

Hi guys, I found this video to help in customising our report in LoadRunner. I hope that it helps. There is no sound in the video.

HP LoadRunner Analysis 11.00 enhancements include:
* Fully customizable report templates that allow you to control the content and format of a report.
* Ability to exports the report to different formats, such as Word, Excel, PDF, or HTML for any reporting purpose.
* Use of Analysis Session templates, to associate multiple report templates, each in a different time range.
* Automatic report generation upon creation of Analysis data via standalone Analysis.

QTP – Introduce Steps to automatize

Hello guys,

Today I will show how identify all the tasks that are common in most of the test cases you automate in QTP.

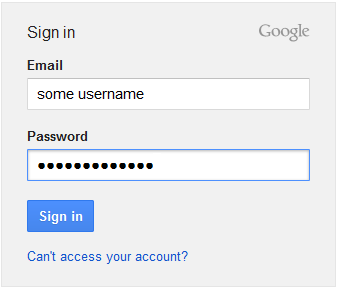
I will use the example of login in Gmail:

Image

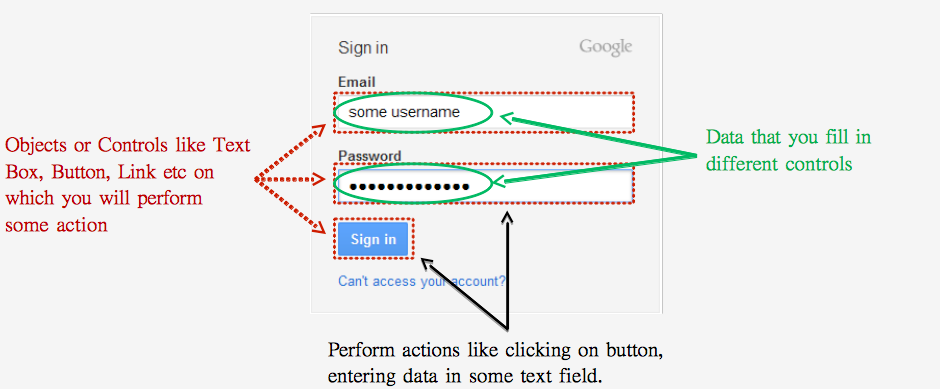
So, we have these actions and these fields/buttons:

Image

Like in Selenium, you have to identify the objects as unique, before entering the email id, you should know that which of the two text boxes in the Gmail Login screen is the ‘Email’ field. Once you correctly identify the email field, you can then enter email id in that field. Consequently, you should try to find out the unique properties which are available with that object only.

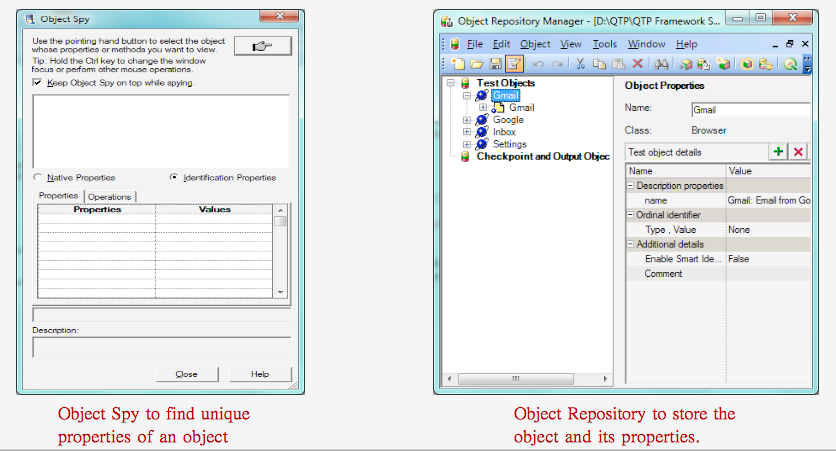
QTP provides a unique mechanism using which you can identify the unique properties of the objects. This mechanism is called Object Spy.  Along with this, QTP also provides a storehouse called Object Repository where you can store these objects together with their properties.

Image

Now, you can perform some actions in each control, like a button you can click and each control has your action. But if the field is a textbox or combobox ? So, you can click in the control and choose if you want to put some text/data or if you can choose the data in a list.

QTP has its own set of pre-defined function libraries that contain all the operations associated with different objects. QTP also provides an intelli-sense option  where when you write an object in your code, QTP will automatically show all the functions and properties associated with that object.

Image

QTP has its own inbuilt mechanism called Data Table where you can save the test data and later use it in the test scripts. QTP provides its own set of functions using which you can retrieve data from the Data Table.

Even if your data is stored in some external files such as Excel sheets or XML files, QTP provides you with many methods using which you can fetch data from these external sources.

Image

Like any language, you should need to combine all individual operations together and execute them.

QTP also provides many methods which you can use to store your reusable and non-reusable code. These mechanisms are –

– Actions: Actions are one of the most common ways in which you can save code in QTP.  You can save both reusable and non-reusable code in Actions.

– Function Libraries: Function Library is another very popular method that you would use in almost all your QTP projects. Function Library is primarily used to store reusable code.

– Business/Scripted Components: Though used less frequently, this is one more place where you can store your code.

Very easy, isn’t it ? This is the basic to introduce QTP. If you have some doubt, you can to write below !

Thank you 🙂

Behat, Mink and Selenium

Hello guys !

I will explain a simple tutorial of “How can you use BDD with Selenium and PHP.”

– First thing you have to install Behat:

– Install Composer

– Create a composer.json file in your root directory

1
2
3
4
5
6
7
8
9
{
“require”: {
“behat/behat”: “2.4.*@stable”,
“behat/mink”: “1.5.*@stable”,
“behat/mink-goutte-driver”: “*”,
“behat/mink-extension”: “*”,
“behat/mink-selenium2-driver”: “*”
}
}


– Run composer install

– Create a behat.yml file


1
2
3
4
5
6
7
8
default:
paths:
features: features
bootstrap: %behat.paths.features%/bootstrap
extensions:
Behat\MinkExtension\Extension:
goutte: ~
selenium2: ~


– Initialize your Behat project with vendor/bin/behat –init. Note: bin directories are configurable in composer.json. If your composer file has a bin directory, use that path instead of vendor/bin.

– Create a feature file, e.g. test.feature
1
2
3
4
5
6
7
8
9
10
Feature: Drupal.org search
In order to find modules on Drupal.org
As a Drupal user
I need to be able to use Drupal.org search
@javascript
Scenario: Searching for “behat”
Given I go to “http://drupal.org“
When I search for “behat“
Then I should see “Behat Drupal Extension“


– Edit FeatureContext.php to extend from MinkContext. Note: You will need to add the use statement, use Behat\MinkExtension\Context\MinkContext. Run vendor/bin/behat

– Second Step: Adding Selenium as an optional driver

– Download Selenium Server

– Run java -jar /path/to/selenium-server-standalone-2.37.0.jar

– Add selenium2: ~ to your behat.yml

– Add a @javascript tag above your scenario

– Run vendor/bin/behat

– Third Step: Adding new step definitions

– Add the step you want to create in your scenario, e.g.

– When I search for “behat” Run vendor/bin/behat

– Copy the step definition template to FeatureContext.php and replace the PendingException with your code.

1
2
3
4
5
6
7
8
/**
* @When /^I search for “([^”]*)”$/
*/
public function iSearchFor($arg1)
{
$this->fillField(‘Search Drupal.org’, $arg1);
$this->pressButton(‘Search’);
}


Resources: http://lin-clark.com/blog/2013/11/26/quickstart-testing-with-behat-mink-selenium/

BDD in resume

Behavior Driven Development is a term very used in actual days…

Developers, testers, managers talking about BDD. Frequently we heard complains about BDD like:


– The client don’t mind about the tests.

Make all sense that because the client wants that his software is finished and working. Unfortunately, the word test brings a negative image. But we talking about BDD, which is a development by behaviour and it isn’t anything with tests. Testing is something that you don’t can do while there isn’t software. Testing means to verify and BDD we are specifying before of anything.

BDD is an activity of design, where you build parts of a function according with the expected behaviour. In BDD we go out of the vision of tests and enter in the perspective oriented by specifications, what means that this complain born with a bad colocation.


– The client don’t want write the scenarios.

This is the second more used complain. The cliente should write the scenarios by himself. If the client write the scenarios, he won’t benefit himself of cognitive diversity. This diversity only appears in groups heterogeneous that work together.

The client needs the advices of engineers who knows the technical aspects of the problem that he is trying to resolve. He needs of paradigm of an QA Analyst, which will help with the create of scenarios that anyone though before. Otherwise, the solution that the client though can be more complex than the solution needs be.


– The client needs interact directly with the tool.

This isn’t the idea. What he really need to do is to provide informations to the team about the problem that he wants resolve.

– You can achieve the same result without a specific language of domain(DSL)

To finalize, the highlight idea behind the BDD is the focus in prevent fails of communication. This means have all in team  communicating in a frequently form, better and based in real examples – not only in abstraction and imperatives requirements.

Tools of BDD are only complements to this complete agile methodology.

You can read some books like:

– Specification by example – Gojko Adzic;

– TheRSpec Book – David Chelimsky;

– Gojko on BDD: Busting the Myths;


Bye , bye !

Steps to implement a Automation process

Hello guys, i saw a link in the internet with 7 steps about how implement automation tests and I will explain in other words what he told:

  1. Leadership support. Ask support of your boss to automatize the tests, show to him what you will win: time, money, effort. Search about cases in companies that was a success, show the positive points… You have to convince your boss that you will have a lot of gains.
  2. Choose the tool. Search about the tools on the market. You can make a POC with the tool and analyse if will supplement your needs. Make a prove of concept with a little part of your functionality. Costs/benefits ? You have to analyse according to the product will be tested. You can choose some free tools like WebDriver/Selenium or a shareware tool like QTP from HP. 
  3. Language. Talk with your team if they can learn another language and what are the languages that they know. Look in the development team what is the language that they use, take this into consideration too (if you need something about the language, they can help you). Choose a language that the team have more facility to use/learn, the language that the development team use, the effort of change the language.
  4. Time and Schedule. Now that you convinced your boss to automatize the tests and you know the tools that you will use, you have to plan the schedule. NEVER EVER AUTOMATE EVERYTHING !! This is a common error and impossible to do ! Remember the main objective of automated tests is REGRESSION. You have to put criteria what you will automate, like: What is the most used function/process ? …. What is the function/process most important ? … What is the function/process that have more bugs ? Measure the initial investment and don’t forget to show the objective, the results you will achieve. How much time/effort/money you will save ? How you can spend the time saved with another activities ?
  5. Workout. “A stupid with a tool still is a stupid person.” Form a team of automation and equality the level of knowledge. Make some meetings to prepare people in your team to use the tool with wisdom. It is better everyone know everything in your team, but we know that we can have some people who have facility to learn something in specific. 
  6. Include the Automation in your development. You have to know what to do and when do it. Involve SQA, or the team who have the responsibility of the process in the company. They have to learn this new process that will be deployed. 
  7. Structure of Scripts. Make Defaults. This will help you when one person of your team have to change something in the script of other person. Like Parameters, the structure of your automated tests, the name of variable, the comments, the name of classes… It is better that you separate the scripts according to the experience and facility of each person in your team. So, if someone likes and has facility to do the script with the structure, you have to let he/she do this. If you know that a specific person in your team has facility to write scripts about the business, you have to let he/she do this and become the main center of the scripts of business. Focus on reutilize. Yes, enjoy the scripts and have less work. Continuous Integration ! Without this your work will be lagged. You have to update the scripts and use they after each modification to know if they continue working. We have a tool called Jenkins that it help us with this part. The developers can change something and after the deploy, Jenkins will run the scripts of regression tests to know if something in application was broken.


Did you understand everything ? I wrote running today !

If someone has some question, go ahead and comment below 🙂


Fonts: http://www.infoq.com/br/presentations/automacao-testes-7-passos-sucesso?utm_source=infoq&utm_medium=related_content_link&utm_campaign=relatedContent_presentations_clk


Help to energy industry won’t be cheaper

In my last class of conversation of my course, there was a Japanese guy who told me that he would like to visit Brazil. I just told to him that he have another places better to visit. He didn’t understand and asked me the reason that I don’t like my country. So, I will tell about one reason and avail the news that I saw in a site.

Lately in Brazil, we are having a problem with dry weather. Everyday the temperature here is very high and it isn’t raining the sufficient to supports the number of air conditioners turned on and the other spends with energy.

Even more, we have elections this year and the Brazil Cup. Yeah, the politicians don’t want stay with a bad image…. Really… This year will occurs many things with interest politic.

OK, with theses informations I think we can continue.

Brazil decreased the value of the energy in 2012 and now it have to increase again to support this lack in industries or it can increase the value of petrol on Petrobras. BUT… if it do this, the people won’t like of ways that government is trying control the situation because will occur a inflation with the prices…  So, for this reason the politics won’t increase any prices and Who will pay the debts with the energy ?

The people’s money ! Yes, the public safes… We will pay the selfish particular interests of politicians… like always here in Brazil. But not everyone here in Brazil will be injured. The most people will be injured is the people who works and don’t need of “Bolsa Família”, a Brazilian program whose pays a salary to the poor people with a lot of kids…
After the elections, the politicians will have to inflate the prices or not… I really don’t know but anyway the people will pay in the end. Future of Brazil is this… will deteriorate more and more… because of ignorant people, a lot of corrupt politicians. In fact, I think the people will finish with everything in this world. Yes, a pessimist (or realist) thought.

But here in Brazil the people don’t know anything and they want keeps in their ignorance.. They like the ignorance.. it is a bless !

Or.. they think that they know something… I think this is the worst type of person !

Median Class supports Brazil in its shoulders (:

Haha, just my opinion… I am not cursing anyone xD

Fonts:

http://www.infomoney.com.br/mercados/acoes-e-indices/noticia/3239489/socorro-eletricas-nao-saira-barato-veja-quem-vai-pagar-conta

http://www2.planalto.gov.br/imprensa/noticias-de-governo/preco-da-energia-eletrica-cai-a-partir-de-5-de-fevereiro-do-ano-que-vem-garante-edison-lobao-no-bom-dia-ministro

http://g1.globo.com/economia/noticia/2013/01/reservatorios-de-usinas-do-sudeste-e-nordeste-continuam-em-queda-ons.html

Selenium First Steps

Hello guys !!

I have a friend that asked to me somethings to start in Selenium’s world. For this reason I will write today about first steps to automate in Selenium.

In this example, we will open in the Chrome browser. Install the Chrome in your Operational System and after that, you have to download the driver too.

The link to download the driver is: http://chromedriver.storage.googleapis.com/index.html

Now, you have to download the WebDriver’s lib. You can download in this link: http://docs.seleniumhq.org/download/

Import the lib in your Java project. This is how the structure will looks like. Pay attention on the folder of Libraries in this picture below.

structure

This is the package and the libs imported to use in our automation:

libs_import

This is the code to use the chrome’s driver. You have to put this, because the Chrome won’t open without the driver and this line. If you are using Windows, you have to download the .exe file. Each OS that you use, you have a specific file to download. After write this line, you will instantiate the ChromeDriver and write the command below, to open a site in Chrome.

comands-initial

You can find an element of different ways. You can use the id, the classname, tagname, etc… Xpath is the last option that you have to use, because there is a lot of problems when you have to use it in mutiple browsers. So, you can look all the possibilities in the picture below:

how-find-element-and-use


This is the correct way to wait some element to load on your page. You have to put this after load a new page, or click on a new function. It is better put this expected conditions to wait a element than put a time to wait, because unfortunately we depend a lot of environment and browser.

how-wait-until

You can use these commands to click and write something in specific field, respectively. You can instantiate the element and you will use only one time to search it. After that, you can use the instance to click, send words and others actions in the element without looking it again.

commands

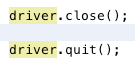
This is the command to close the browse, to close the driver, respectively, and finish your automation. After this, you can’t use the driver anymore, unless you instantiate again another WebDriver.

how-close-browser

This is the final code ! Maybe your code will looks like with mine. Afterward, just put to run and see the automation !

code-complete

Bye guys !!