What is TDD ?

The first step is to quickly add a test, basically just enough code to fail.  Next you run your tests, often the complete test suite although for sake of speed you may decide to run only a subset, to ensure that the new test does in fact fail.  You then update your functional code to make it pass the new tests.  The fourth step is to run your tests again.  If they fail you need to update your functional code and retest.  Once the tests pass the next step is to start over (you may first need to refactor any duplication out of your design as needed, turning TFD into TDD).
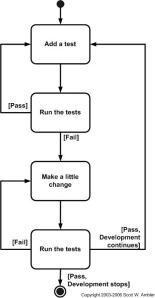
tddSteps

I like to describe TDD with this simple formula:

   TDD = Refactoring + TFD.

TDD completely turns traditional development around. When you first go to implement a new feature, the first question that you ask is whether the existing design is the best design possible that enables you to implement that functionality.  If so, you proceed via a TFD approach.  If not, you refactor it locally to change the portion of the design affected by the new feature, enabling you to add that feature as easy as possible.  As a result you will always be improving the quality of your design, thereby making it easier to work with in the future.

Instead of writing functional code first and then your testing code as an afterthought, if you write it at all, you instead write your test code before your functional code.   Furthermore, you do so in very small steps – one test and a small bit of corresponding functional code at a time.   A programmer taking a TDD approach refuses to write a new function until there is first a test that fails because that function isn’t present.  In fact, they refuse to add even a single line of code until a test exists for it.  Once the test is in place they then do the work required to ensure that the test suite now passes (your new code may break several existing tests as well as the new one).   This sounds simple in principle, but when you are first learning to take a TDD approach it proves require great discipline because it is easy to “slip” and write functional code without first writing a new test.  One of the advantages of pair programming is that your pair helps you to stay on track.

There are two levels of TDD:

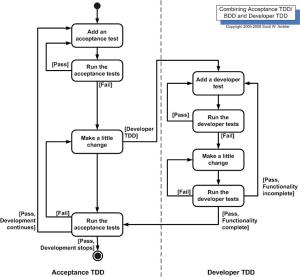
  1. Acceptance TDD (ATDD).  With ATDD you write a single acceptance test, or behavioral specification depending on your preferred terminology, and then just enough production functionality/code to fulfill that test.  The goal of ATDD is to specify detailed, executable requirements for your solution on a just in time (JIT) basis. ATDD is also called Behavior Driven Development (BDD).
  2. Developer TDD. With developer TDD you write a single developer test, sometimes inaccurately referred to as a unit test, and then just enough production code to fulfill that test.  The goal of developer TDD is to specify a detailed, executable design for your solution on a JIT basis.  Developer TDD is often simply called TDD.
atdd

Note that Figure 2 assumes that you’re doing both, although it is possible to do either one without the other.  In fact, some teams will do developer TDD without doing ATDD, see survey results below, although if you’re doing ATDD then it’s pretty much certain you’re also doing developer TDD.  The challenge is that both forms of TDD require practitioners to have technical testing skills, skills that many requirement professionals often don’t have (yet another reason why generalizing specialists are preferable to specialists).

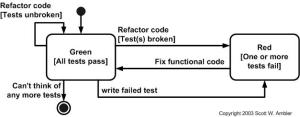
An underlying assumption of TDD is that you have a testing framework available to you.  For acceptance TDD people will use tools such as Fitnesse or RSpec and for developer TDD agile software developers often use the xUnit family of open source tools, such as JUnit or VBUnit, although commercial tools are also viable options.  Without such tools TDD is virtually impossible.  Figure 3 presents a UML state chart diagram for how people typically work with such tools.  This diagram was suggested to me by Keith Ray.
tddStates

Kent Beck, who popularized TDD in eXtreme Programming (XP) (Beck 2000), defines two simple rules for TDD (Beck 2003).  First, you should write new business code only when an automated test has failed.  Second, you should eliminate any duplication that you find.  Beck explains how these two simple rules generate complex individual and group behaviour:

You develop organically, with the running code providing feedback between decisions.

  • You write your own tests because you can’t wait 20 times per day for someone else to write them for you.
  • Your development environment must provide rapid response to small changes (e.g you need a fast compiler and regression test suite).
  • Your designs must consist of highly cohesive, loosely coupled components (e.g. your design is highly normalized) to make testing easier (this also makes evolution and maintenance of your system easier too).

For developers, the implication is that they need to learn how to write effective unit tests.  Beck’s experience is that good unit tests:

  • Run fast (they have short setups, run times, and break downs).
  • Run in isolation (you should be able to reorder them).
  • Use data that makes them easy to read and to understand.
  • Use real data (e.g. copies of production data) when they need to.
  • Represent one step towards your overall goal.


Font: http://www.agiledata.org/essays/tdd.html
 

2 Ways to make a Repository of WebElements WebDriver

Hello my friends 🙂

I hope that you are ok !! I will post today a technique to save the webelements in one file, or in various files but more organized and with this is easier to do maintenance when the website have some xpath, id, classname, tagname or link modified. I used this repository on xml in Bovespa. In this post I will show 2 ways to do this repository:


  • First – Create a class with the objects:

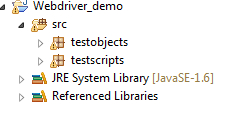
–  Create the project, you may follow the structure bellow:

OR-2-1

– Create a  class under testObjects Package (PageLogin.java)

– Create a  class under testScripts Package  (TestPageLogin.java)

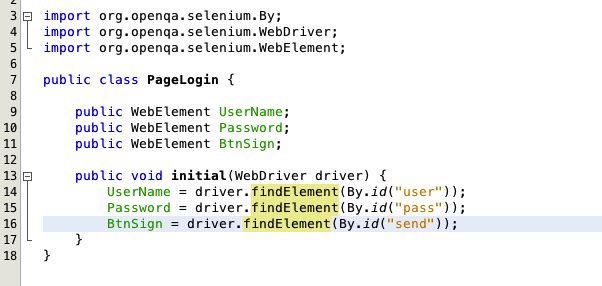
– Open your PageLogin.java and write the code :
1
Don’t forget the package of this class is testObjects, so put in the first line:
package testObjects;


– After this, open TestPageLogin.Java and write :
 

2

Don’t forget the package of this class is testScripts, so put in the first line:

package testScripts;


  • Second – Create a OR file (You can use XML too)

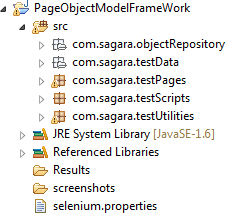
– Create the project, you may follow the structure bellow:

OR-1.1

– Create a text file with the Extension as .OR  under the object Repository Package (in this case: com.sagara.objectrepository)


– Create a java class under test Pages package (in this case: com.sagara.testPages)


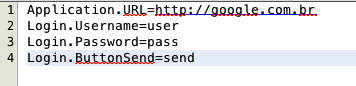
– Open your .OR file and write the objects informations with a structure like this:


1

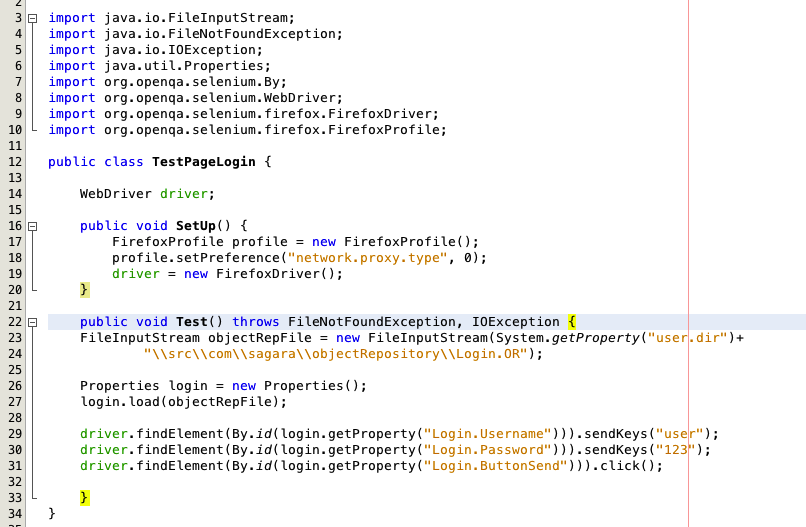
– Open your class Java and write the below code to get the objects information’s from the OR file and use it:

2

I hope that I has helped, if you have some doubts just let your comment 🙂

Bye guys !

Font: http://way2automationtesting.blogspot.in/2014/02/creating-object-repository-in-selenium.html

Using variables, data information, BD in Cucumber

Hello everyone again 🙂

I will describe to you how we can use some data and variables in ours features of cucumber. For this I will use the same last example of feature, the search. To use this data, we will have to change somethings. Look:

Feature: Search

Scenario Outline: Search                                   > Don’t forget to write Scenario Outline when you use Examples.

And look for: “<keyword>”

Examples:
|keyword |
|Nike |
|Paris |

The keyword is the variable, that I will use to substitute the data in the table of Examples. This table Examples should be this name “Examples:”. I already tried others name and the cucumber don’t recognise others names of BD. So this table with data should be this format too:

Examples:

|variable1|variable2|variable3|… >This is the title of each field, variables

|Data 1| Data 2| Data 3|… > This is the data of each column that will be used in the first interaction

|Data 4| Data 5| Data 6|… > This is the data of each column that will be used in the second interaction

|Data 7| Data 8| Data 9|… > This is the data of each column that will be used in the third interaction

… and this is the way ahead.

Don’t forget the |, these are the lines of each column, and they separate the datas. In my example, the cucumber will execute the first search with the keyword = Nike and the second search with keyword = Paris and after the execution will be stopped. Because I don’t have more data to use in the table.

You can just run the command: cucumber, and the calabash will show you in yellow of your terminal, what is the step missed. So you need copy this step and put in the file of ruby.

Given(/^look for: “(.*?)”$/) do |arg1|

After this you can implement the code in ruby that this step will do. Look that this step that calabash showed to you has a regex in the local of your variable. This is normal, and you have to have a regex in the local of the variables.

After this, you can just change the name of this variable. In the final of sentence this variable is showed like: |arg1| and I changedfor the title of the field in the feature’s table . Look, everything that between | is a variable that you can use in the code. And my code was:

#encoding: utf-8
require ‘calabash-cucumber’
require ‘calabash-cucumber/keyboard_helpers’

Given(/^look for: “(.*?)”$/) do |keyword|
tap ‘icon openmenu’
sleep STEP_PAUSE
touch(“Label text:’buscar'”)
keyboard_enter_text keyword
end

Just this, now it is only run the command cucumber and wait for results !

I hope that I have helped you guys 🙂

I will post many examples, with more fields after. Just an observation: Cucumber have a limit of this fields and you can’t have many tables inside of Examples. If you have many scenarios inside this feature you can have another table of Examples, but each table should be after each scenario.

Bye !!

Cucumber and the steps

Hello everybody !

Now you can write your steps in cucumber and implement in ruby and calabash… I am using Sublime, but you can use whatever IDE that supports ruby to write the features and the rb.

Steps – Example:

Feature: Search – True And False Results      # This is the name of the feature

Scenario Outline: Search                                 # This is the name of scenario

And look for: something                              # This is one step

And save the file like Search.feature -> in the folder features (Remember the folders of calabash have to stay inside of project’s folder), in this case I wrote a case of search of an app.

If you run now, without write the ruby file, the console will show the step you have to use in the ruby file, the calabash changes somethings of your feature to run in ruby.

And the code in ruby is:

#encoding: utf-8
require ‘calabash-cucumber’
require ‘calabash-cucumber/keyboard_helpers’

Given look for: something do                     # This is the step of the feature
tap ‘icon openmenu‘                                   # This is the command to tap in something in your app, you have to know first a id or label (I will explain how you can take this informations in a next post)
sleep 3                                                       # This command is to stop the execution for 3 seconds
touch(“Label text:‘buscar‘”)                       # This command is to touch, like the tap, but you can use this command with querys too, different of tap that just use label or id
keyboard_enter_text “something“             # This command is to write something in the field wich you touched in the last command
end                                                            # This finalize this step, you have to write this every final of step

Save the file like Search.rb inside the folder step_definitions. Don’t forget the words in bold, every file of ruby and calabash have to have this words on head. This means that you have to import the lib of cucumber in this file and the file will accept the words of your feature file.

Run cucumber in the terminal, you have to inside of the project’s folder.

If the simulator don’t open, you have to write the local that your app is inside the param APP_BUNDLE_PATH. So will stay like this:

APP_BUNDLE_PATH=”Local of your app” cucumber 

If you wants open the console, the command is:

calabash-ios console

If the console don’t open for the same reason in the step here, you have to write the param of APP_BUNDLE_PATH again.

APP_BUNDLE_PATH=”Local of your app” calabash-ios console

If you wants install another lib in ruby you have to install in your terminal. I had to install a lib to generate a CPF. The command is:

gem install cpf_cnpj

After this, I just had import in the file of ruby like we did with cucumber, and stay like this:

require ‘cpf_cnpj‘

For now it is this 🙂  I will write many things about this in next time !

Bye Bye !!

Cucumber – First Steps

Hello Guys !

I hope that you didn’t had any problem with installation, BUT how I had, I will put some solutions and some things that I discovered using everyday.

1 – The calabash don’t support IOS 7, you have to start with instruments (But I still didn’t get) and nevertheless you can’t use the tool record and play for the drag gesture.

2 – If your app isn’t generated in the root folder, you have to write in the launch.app inside the Support’s folder where is your app builded with framework. Like, I generated with my user, rafaela, so the initial folder is: Users/rafaela/Library… and for calabash find the app alone, you have to builded the app in /var/root/Library….

3 – When I have to start the app with console, I have to write the folder where it is, for the same reasons in the step before, like: APP_BUNDLE_PATH=”XXX/XxxxxX/DerivedData/” calabash-ios console

Cucumber and Calabash – IOS Automation

Hello guys !

I will teach how configure the cucumber and calabash in your mac and some others issues that I had when I set up cucumber. Write this commands in the terminal and inside of the project’s folder.

– First you have to install and update the rvm and ruby stable in your mac:

\curl -sSL https://get.rvm.io | bash -s stable –ruby

– Uninstall others ruby and Clean the rvm if needed

sudo rvm uninstall 2.0.0

sudo rvm cleanup all

– Use the last stable version of the ruby

sudo rvm get stable

– Search in the list the latest version of ruby

sudo rvm list known

– Install the ruby

sudo rvm install 2.1.2

– Let the last version Default

rvm –default use 2.1.2

– And install cucumber

sudo gem install cucumber

– and calabash-cucumber

sudo gem install calabash-cucumber

– Create the folders of the cucumber

sudo calabash-ios gen

– In the folder of the X-code project

sudo calabash-ios setup

Just remember to install the calabash on Workspace, not on the Project.

Maybe you will have to install pods and other things of your project, like here I had. After that you can generate the build of the calabash of your project, but remember you have to change the target the project to YourProject-cal.

I had some problems, like to calabash to find the folder of the app’s build. And I just edited the line of APP_BUNDLE_PATH inside the 01_launch.rb in the folder features/support and put the full path where the app is.

– To test if the configuration is ok, just write in the terminal > inside project’s folder

cucumber

If you have any problem, just comment below. In next steps I will show how you can run the tests and functions in general.

Bye 🙂

CTAL-TM ! Free practice !

Hello guys,

Sorry for my absence, but it is really necessary. I started study for my Exam CTAL-TM and the exam will be on December, 6.

For now, I will put a site that I am doing the simulate of the exam. It is very hard to find some simulated or files to study for this exam, and I didn’t know that until now.

http://www.free-online-exams.com/Pages/Exams/DumpsQA.aspx?d=ISTQB-iSQI&c=CTAL-TM-UK&q=1

Wish me Good studies !

Thank you 🙂

What Automatize, what don’t Automatize, Objectives and Benefits of Automation

Hello guys, I feeling need of explain about what is the objectives in automation.

So let’s go !

Objectives of Automation

  • Testing and automation have different objectives
  • Run regression tests overnight and weekends
  • Reduce testing staff
  • Find more bugs
  • Reduce elapsed time for testing
  • Automate x% of the testing (Yes, DON’T automates 100% every time, because neither ever it is possible automate everything)
  • If useful tests, then making use of under-used resource is a good idea
  • Run most important tests using spare resource (top 10% of usefulness rating, run out of hours)
  • Find more regression bugs (measured by increase in DDP of regression tests by 10% over 6 months)
  • Reduce elapsed time of tool-supported activities (measured for maintenance & failure analysis time)
  • Improve automation support for testers (testers rate usefulness of automation support, how often utilities/automation features are used)
  • Remember: Good objectives for automation are: measurable, realistic and achievable
  • Improve the completeness and consistency

What automatize ?

  • Regression Test
  • Smoke Tests
  • Repeated Tasks
  • Mathematical Calculations
  • Critical Functionalities

What don’t automatize ?

  • Prototypes
  • Functionality that are little used
  • Functionality that needs visual inspection
  • New Functionalities

Benefits of Automation

Automation offers system-wide and network-wide benefits by simplifying your operating environment. You can reduce the amount of manual intervention required to manage operating systems, subsystems, application programs, network devices, and many other products.

The need to simplify operations increases as you add hardware and software products to your data center, data centers to your network, and personnel to your data-processing staff. By simplifying your operations, NetView automation can help you meet required service levels, contain costs, and make efficient use of your operation staff.

NetView automation helps you:

Improve system and network availability
Remove constraints to growth
Increase operator productivity
Ensure more consistent operating procedures

Fonts:

http://pic.dhe.ibm.com/infocenter/tivihelp/v3r1/index.jsp?topic=%2Fcom.ibm.itnetviewforzos.doc_5.2%2Fdqal2mst31.htm

http://www.bcs.org/upload/pdf/aug09-automationobjectives.pdf

http://www.slideshare.net/intellecta/introducao-a-automao-de-testes-de-softwares