New version XCode 6 – Error with Calabash 0.9.169

Hi guys, to everyone is having this problem I just have the solution for the moment, we are waiting the new release of calabash/Xcode with the issues fixed.

Error when update the Xcode to 6 and maintain calabash 0.9.169:

WARN: expected Xcode instruments version to be ‘5.1’ or ‘5.1.1’ 
        but found version ‘6.0’

        Gem needs a manual update for Xcode 6.0! 

Unable to find AutomationInstrument.bundle (RuntimeError)
I tried update the calabash to “0.10.0.pre1” but I still found problems… So I just reinstall the XCode 5 until they fix the problems:


Download Xcode 5 and reinstall: https://developer.apple.com/downloads/index.action

If you still having problems, download the project and run both scripts install.sh as sudo: https://github.com/kstenerud/iOS-Universal-Framework

So, we are tracking this bug and I hope the solution come fast 🙂

9 steps to Configure Jenkins with Calabash/Cucumber

Hi all,

I will show how configure your calabash automation and your git repository on a jenkins job in only 9 steps.

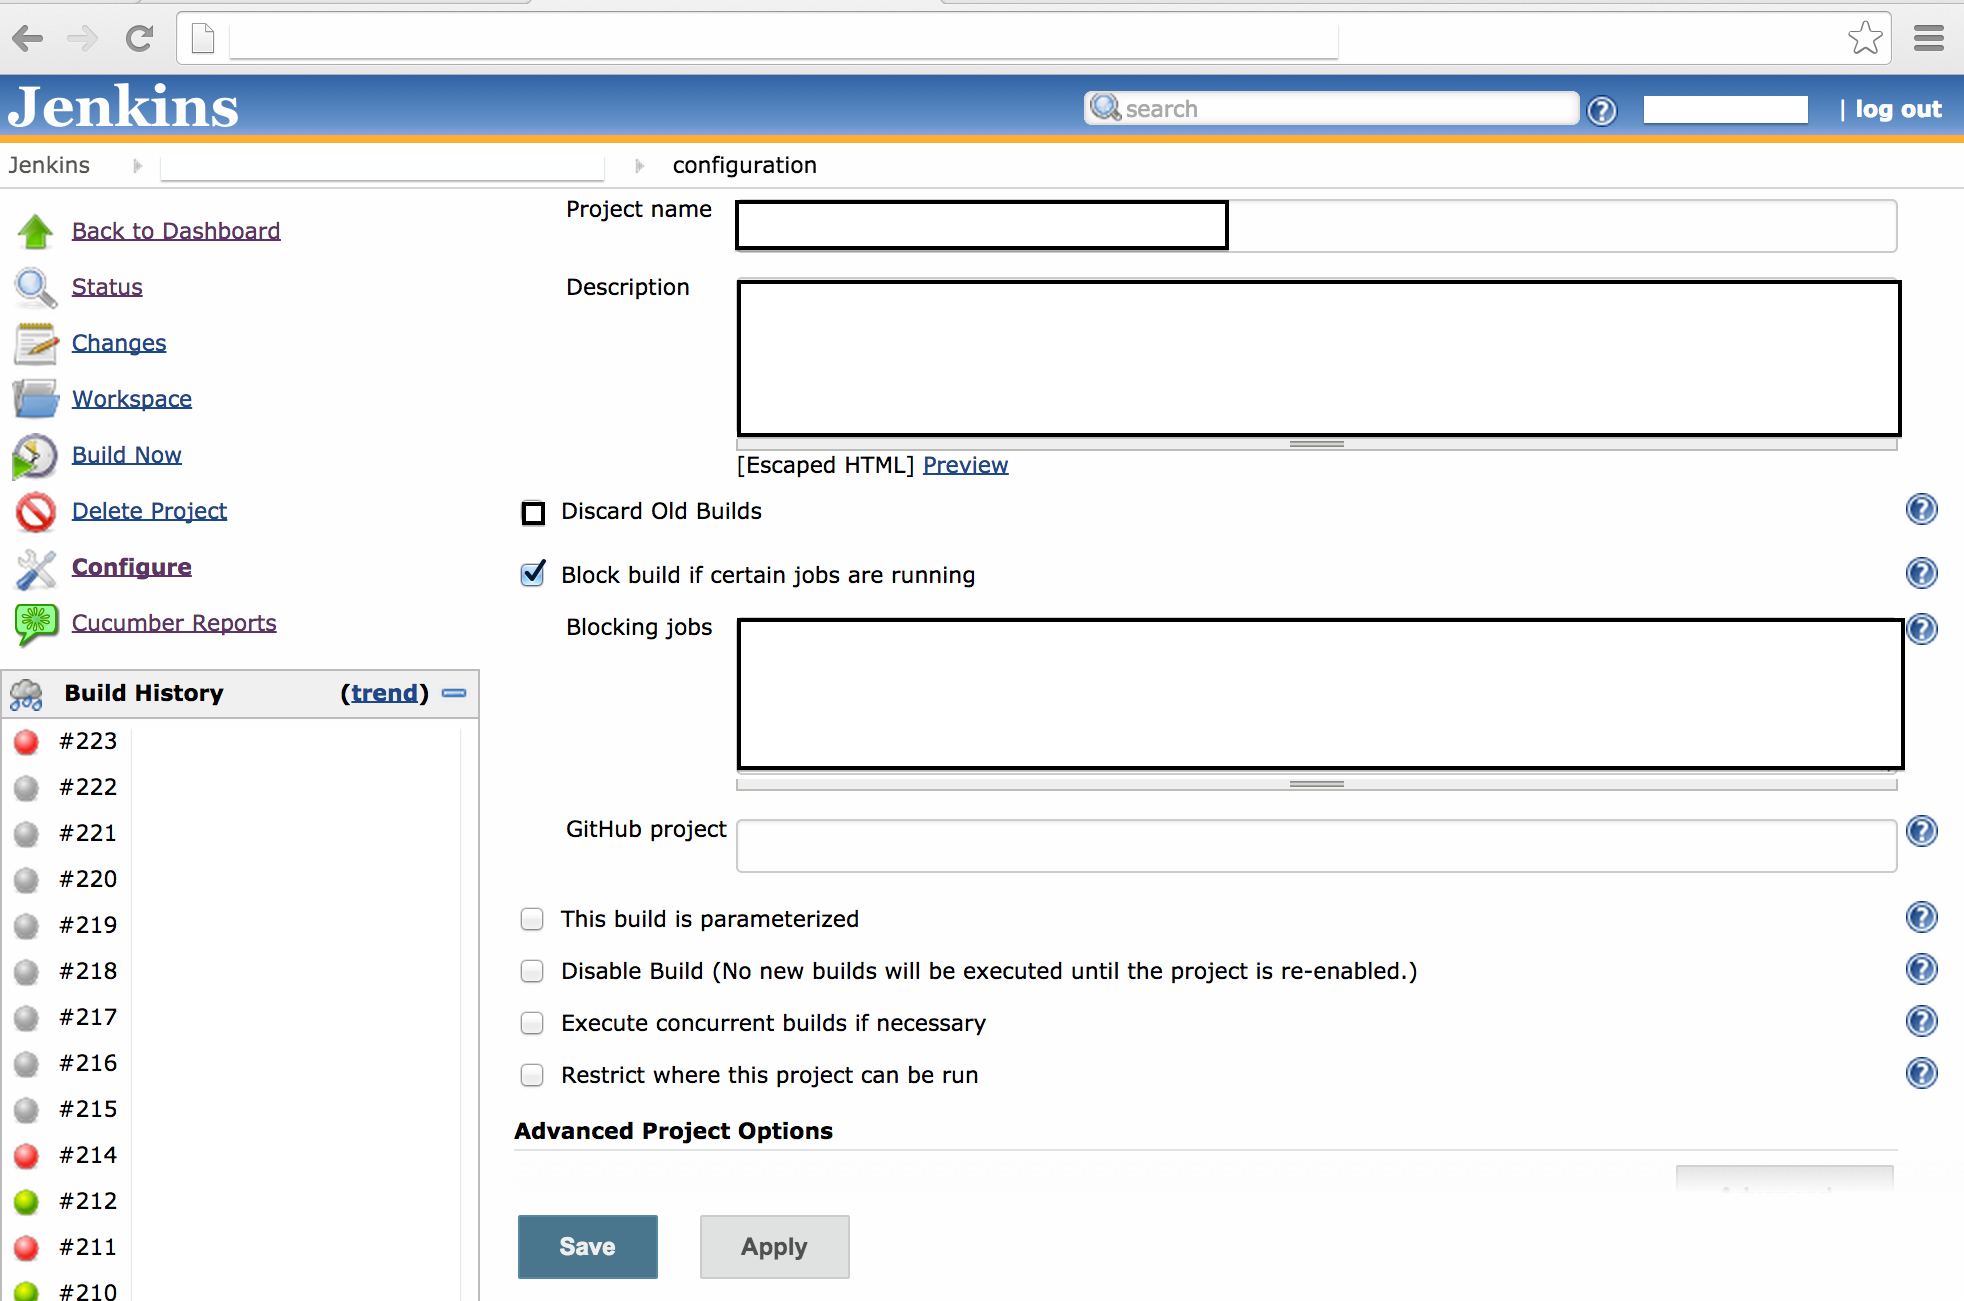
First – Create a new job and write the project name, description and Blocking jobs (If you have any, check the block build…). In this step you can choose if you want discard the old builds or not ( I advise to not discard, it is good maintain as an evidence). Git hub project: Write the URL of your project on github and the other options about your build (generally you don’t need to check).

page1

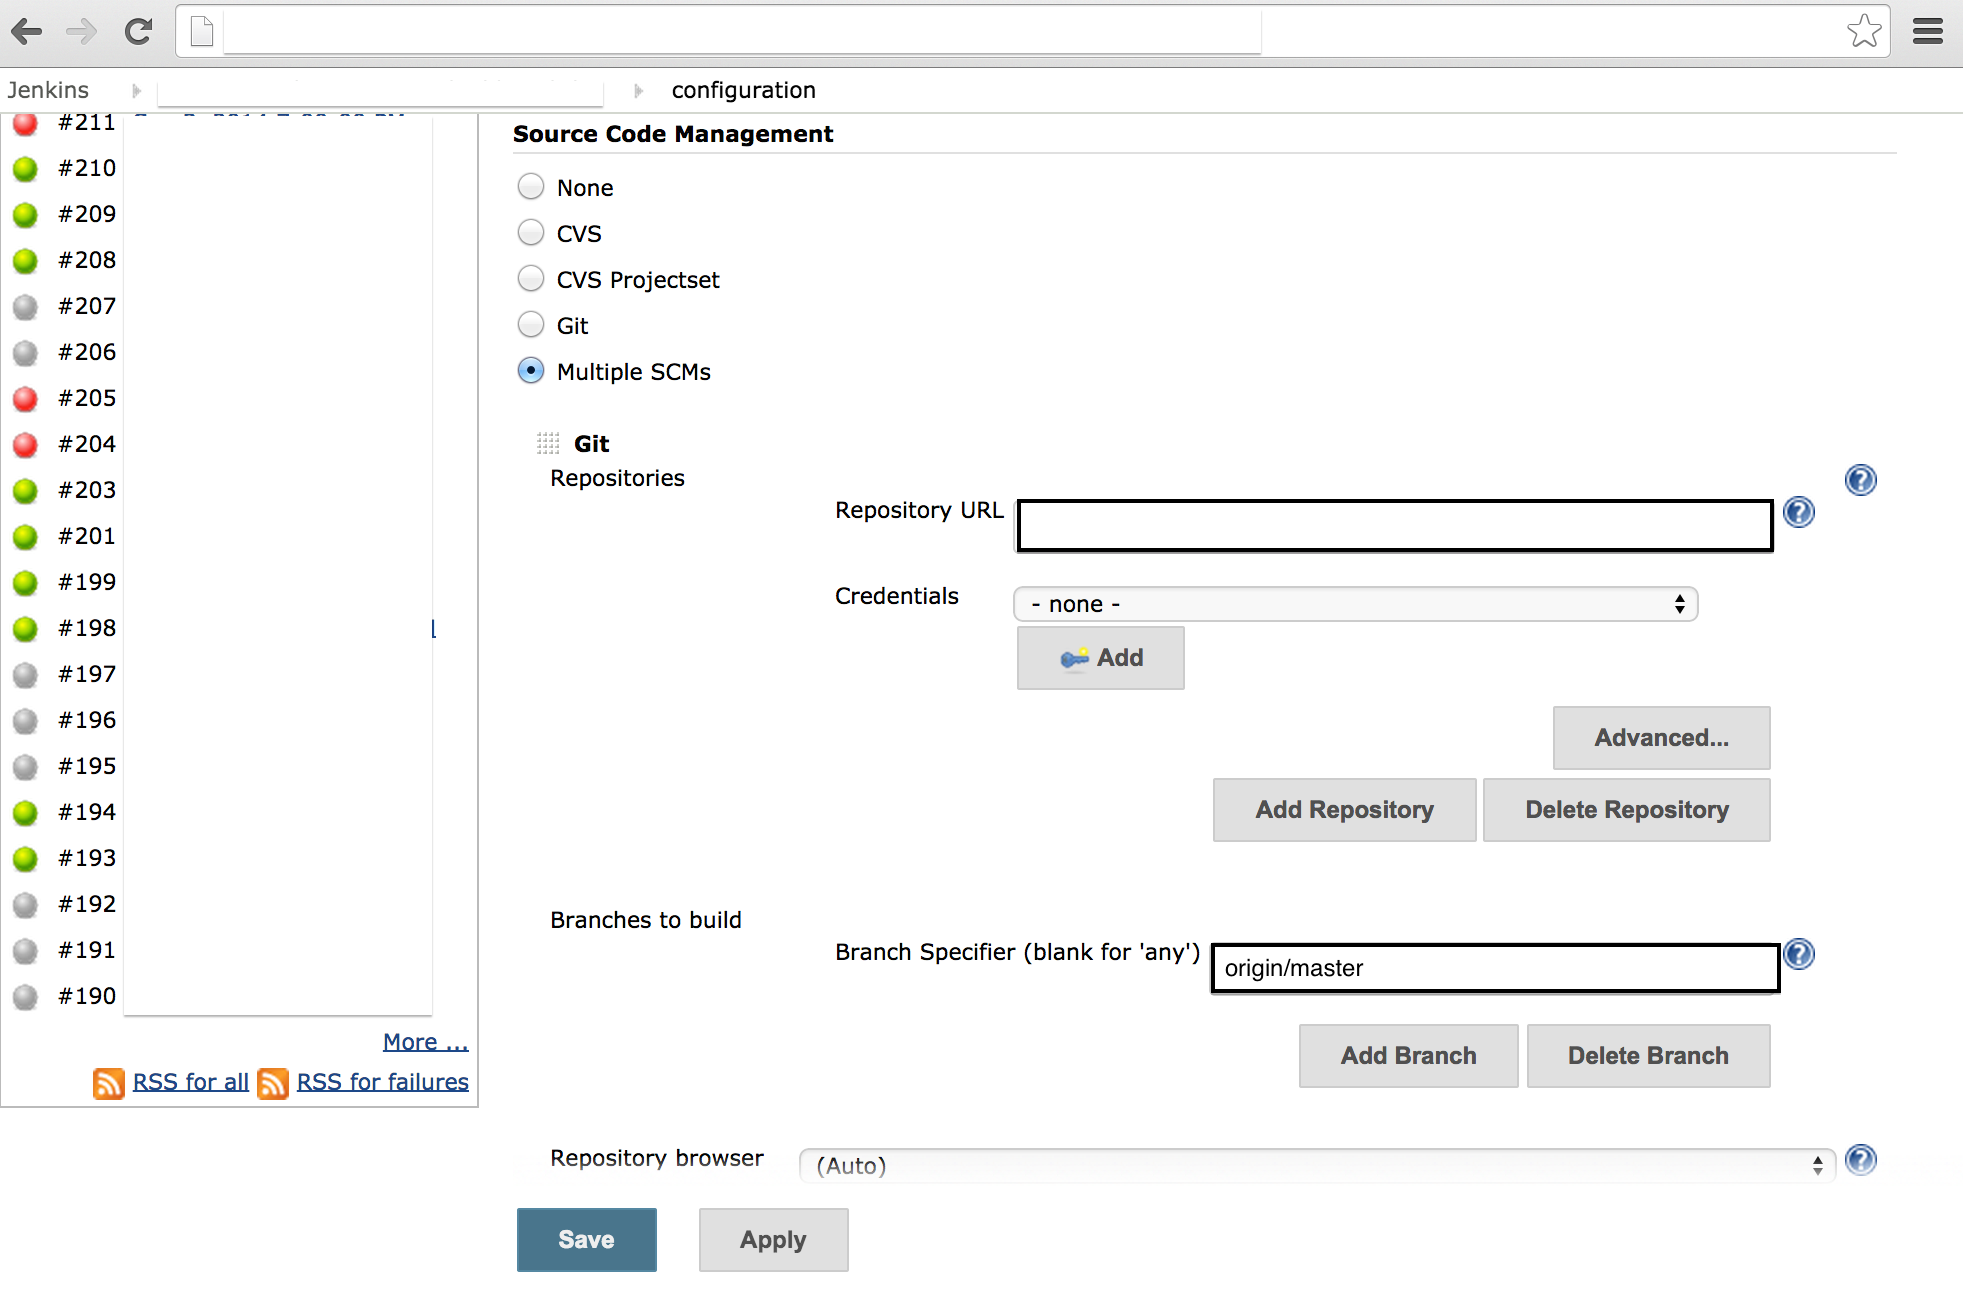
Second – Source Code Management, you need to choose if will be one or multiple repositories (Multiple SCMS in this case). After, you write the Repository URL (Example: https://github.com/xxxxx/XXXX.git), put your credentials (if you need some to clone the repository) and click to Add, If you are using multiple repositories you can add more on Add Repository button.

In the same screen, write the branch that you will use to build the app. In this example I am using this first repository to build the app with the most up to date branch (Where the devs are working)

page2

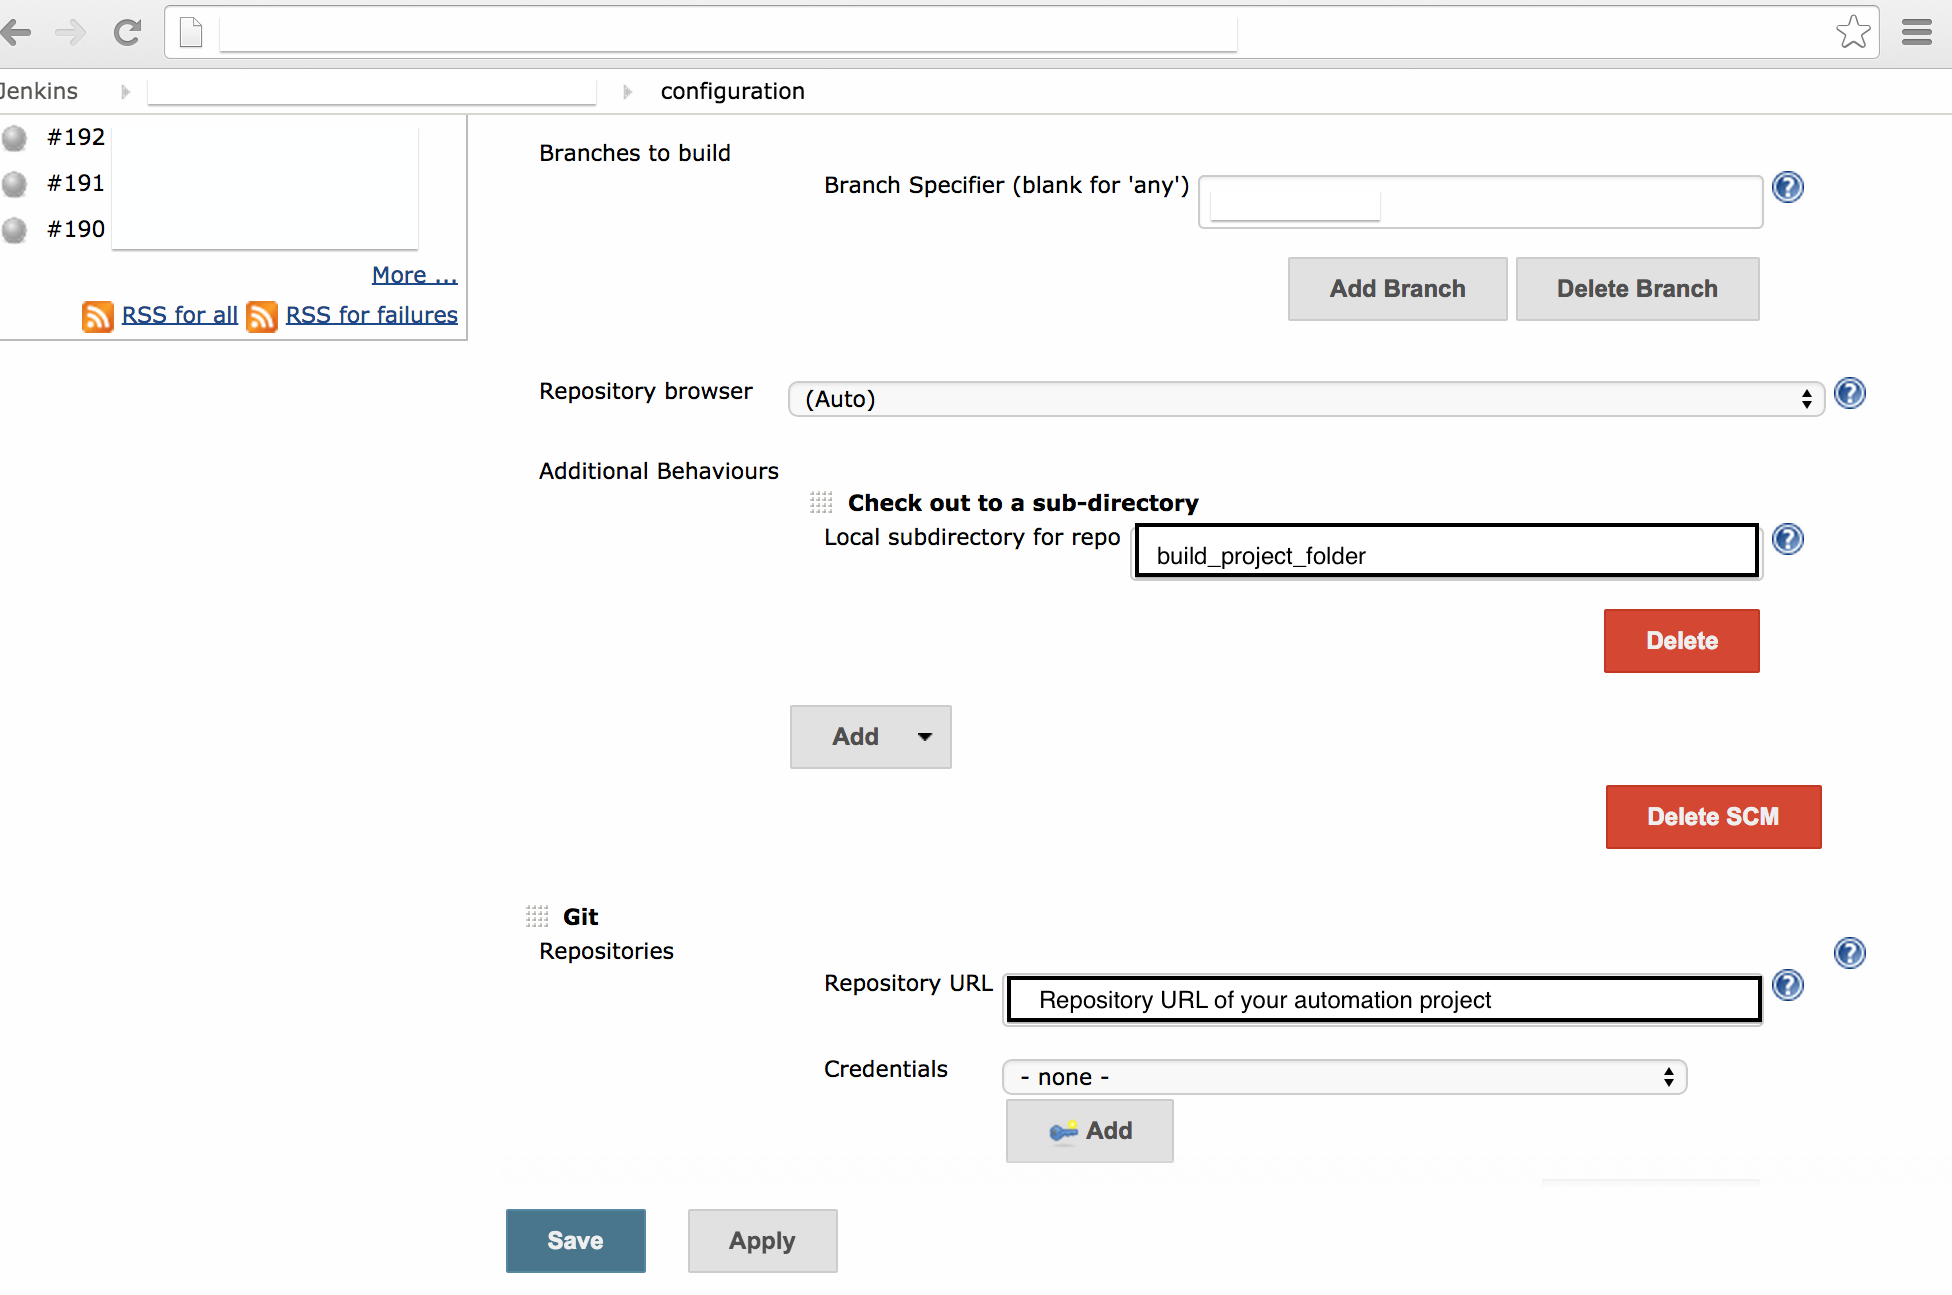
Third – Now you write the build app folder, where the build will be. After, you need to write the repository of your automation project and choose your credentials if you need one.

(That where you put your steps and features, again this is a example, maybe your calabash automation project is inside of the same repository of the app project, so you won’t need to add this second SCM)

page3

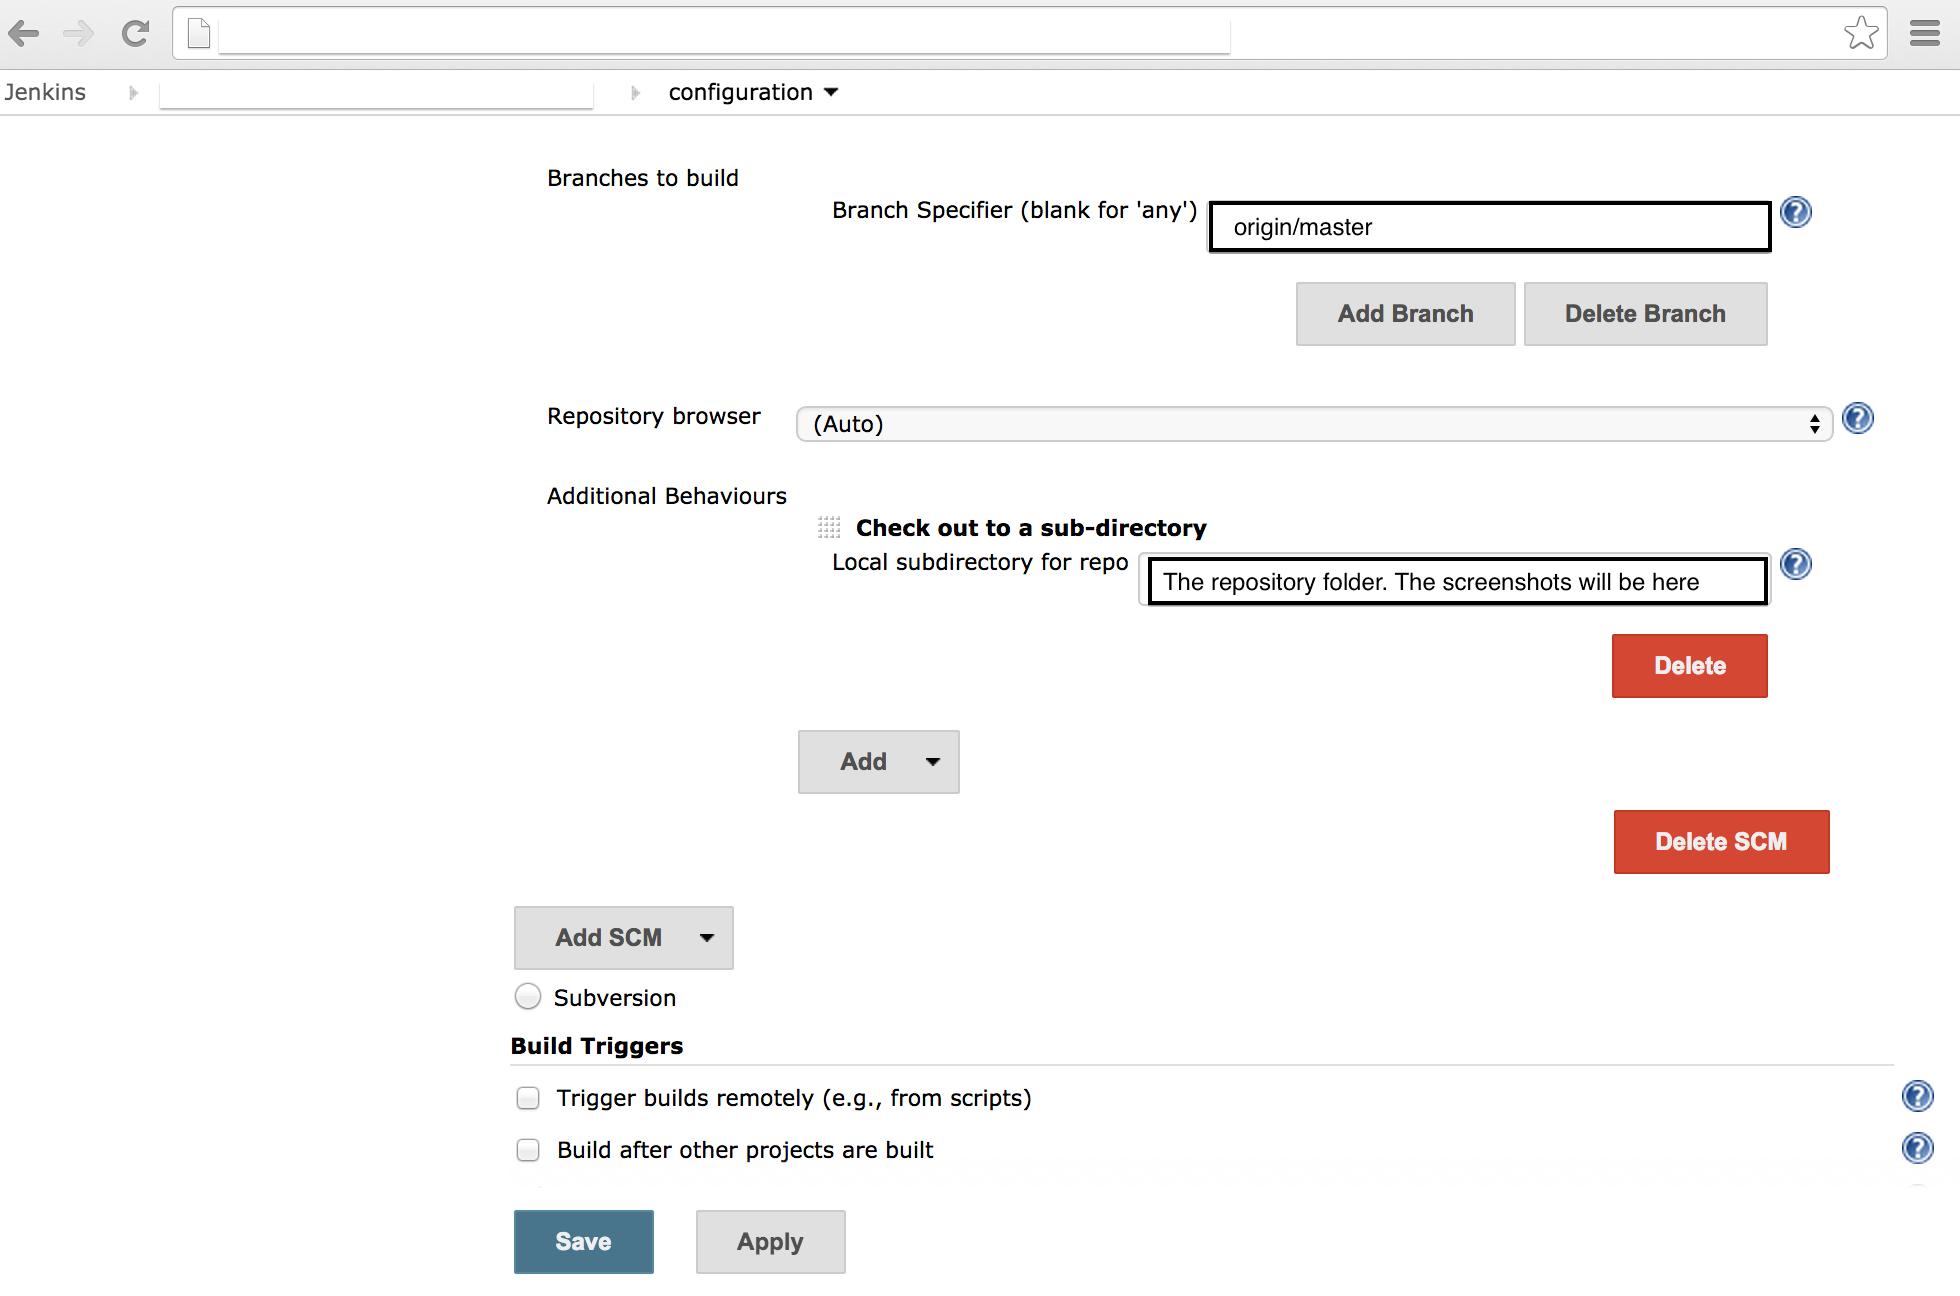
Fourth – Choose the branch of this SCM – calabash automation and the repository folder.

page4

Fifth – In this case we are building this job periodically everyday in the evening. You can schedule the build here. Follow the example and the instructions. If you want run this job after someone pushed to Github, just check the option “Build when a change is pushed to GitHub”.

In this field, you can write the script to pull, checkout and build the app from developers branch.

page5

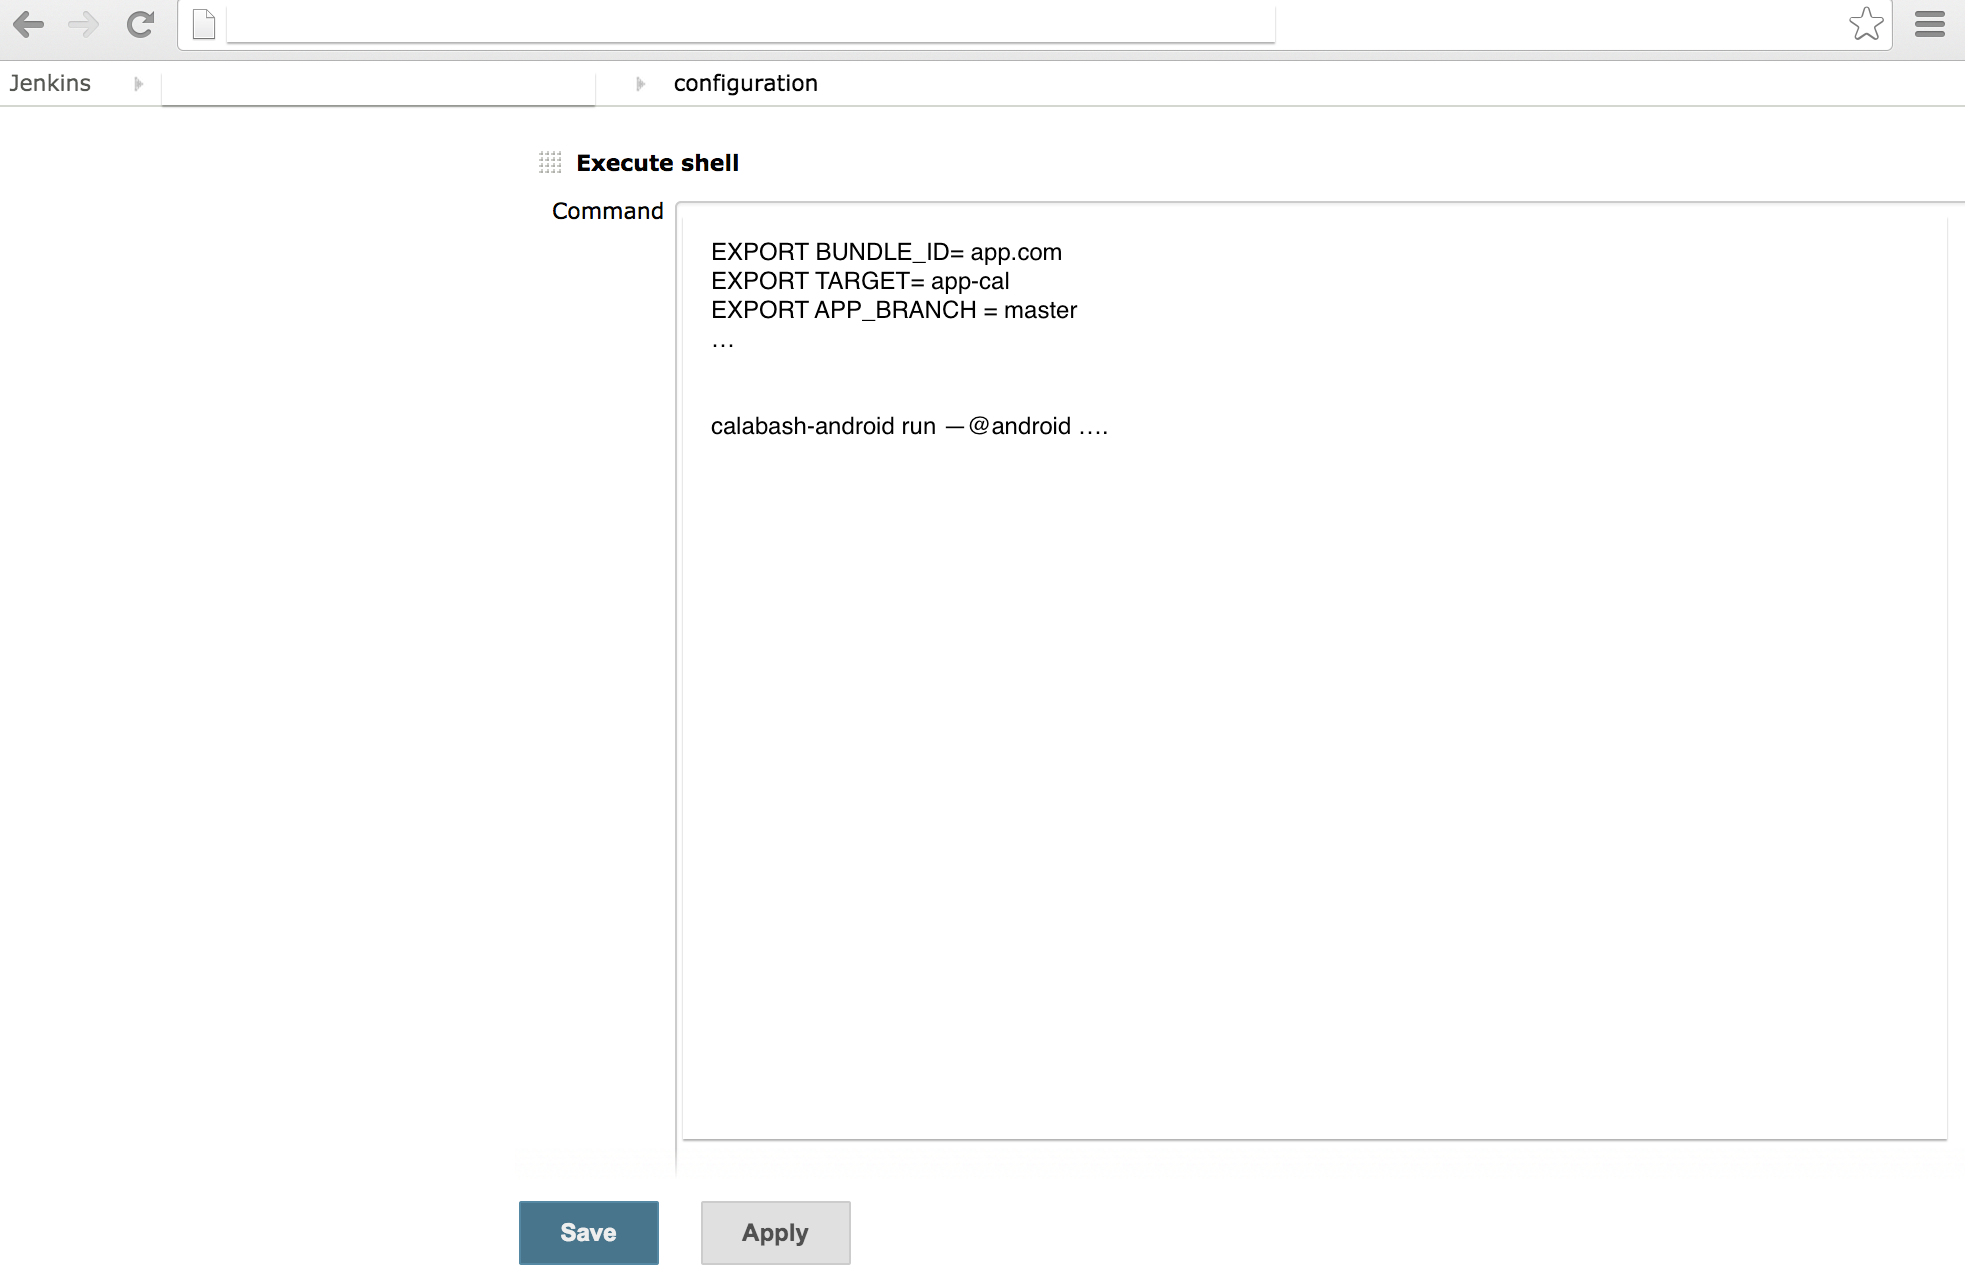
Sixth – Now you need to export the variables, as target, app_branch, bundle_id and everything. After you can write the command to run the calabash and the test.

page6

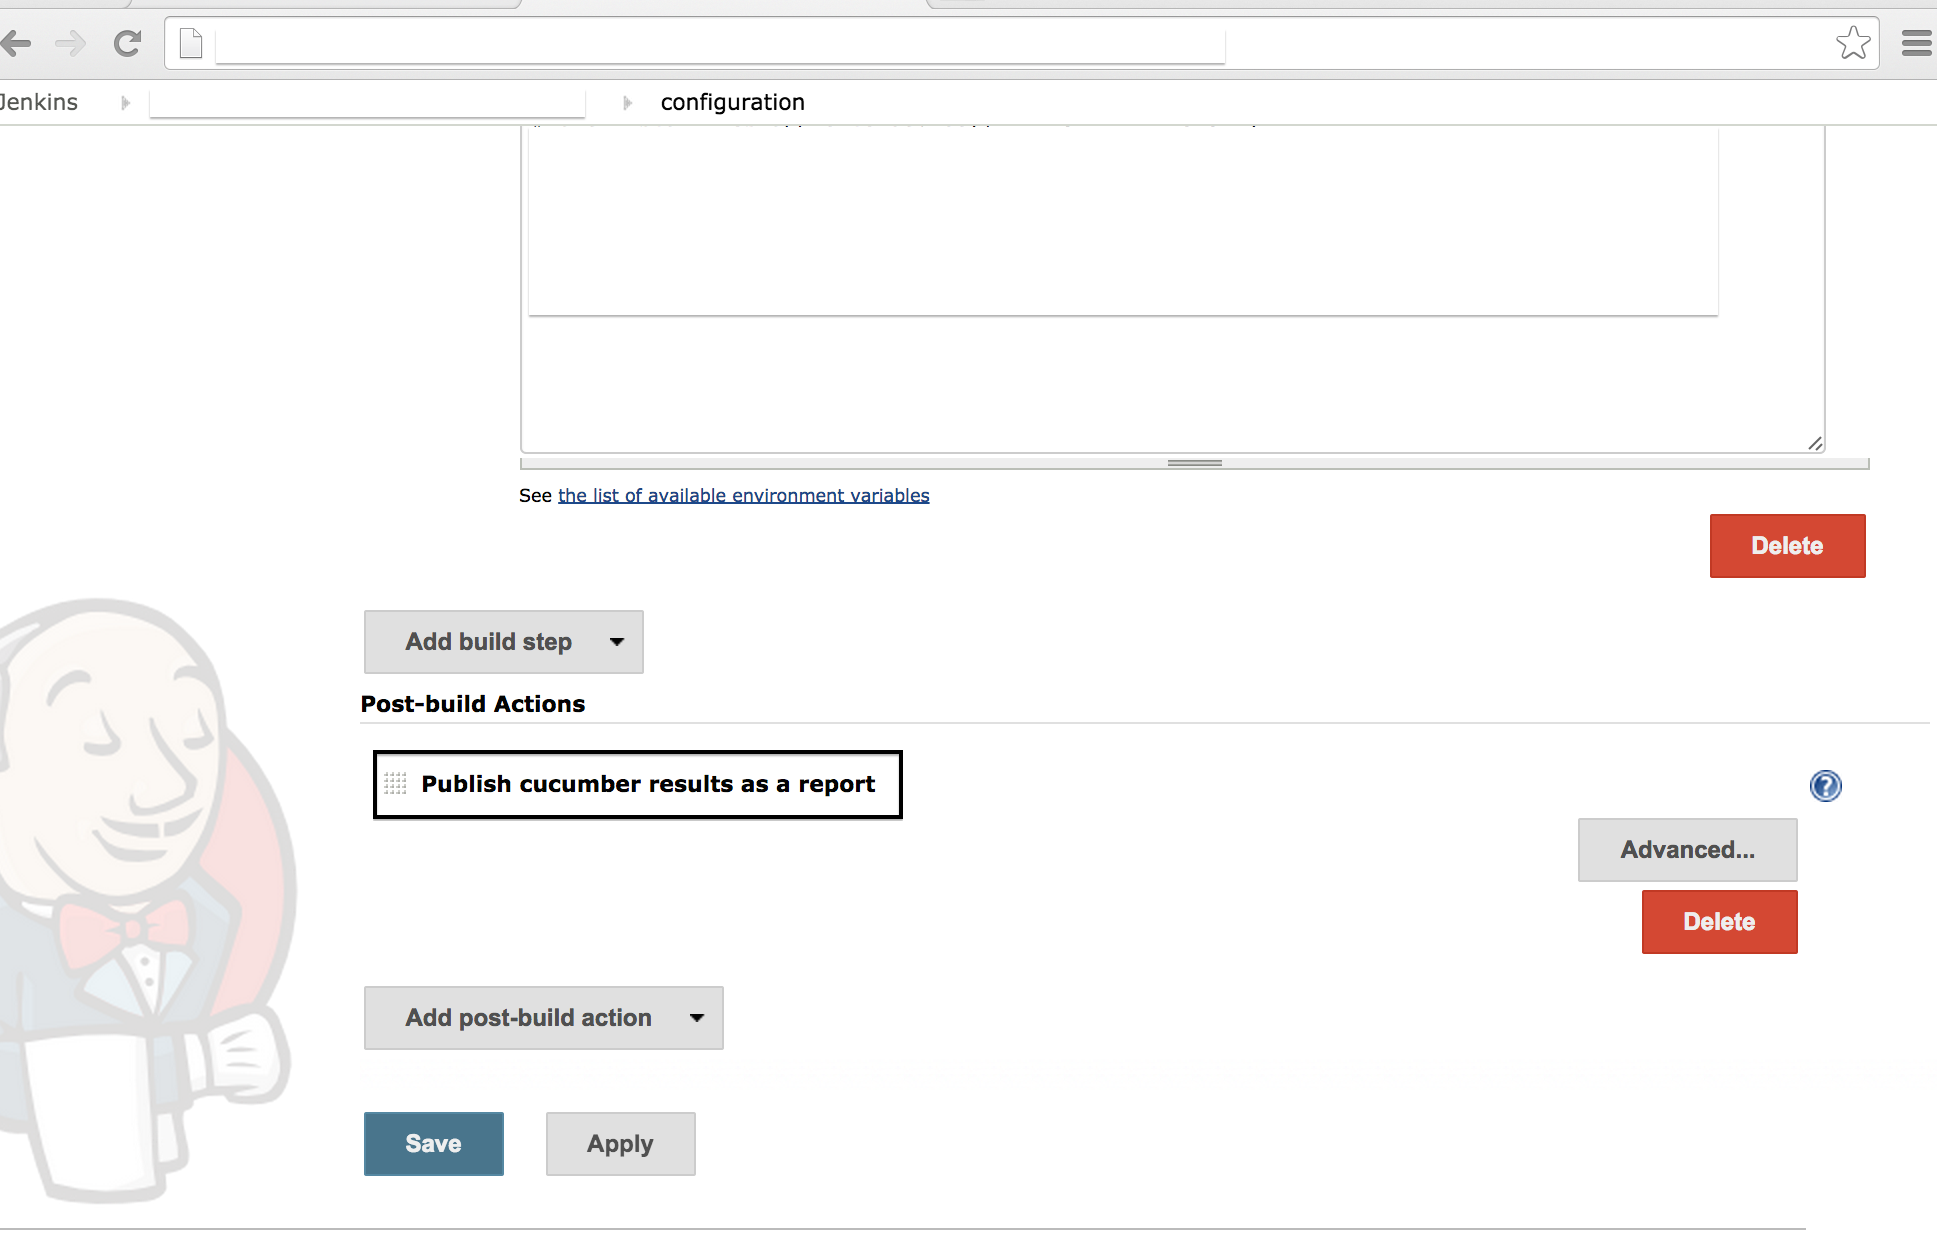
Seventh – In this step you can install a plugin of Cucumber and see the report with graphs and everything. Link of plugin: https://github.com/masterthought/jenkins-cucumber-jvm-reports-plugin-java

page8

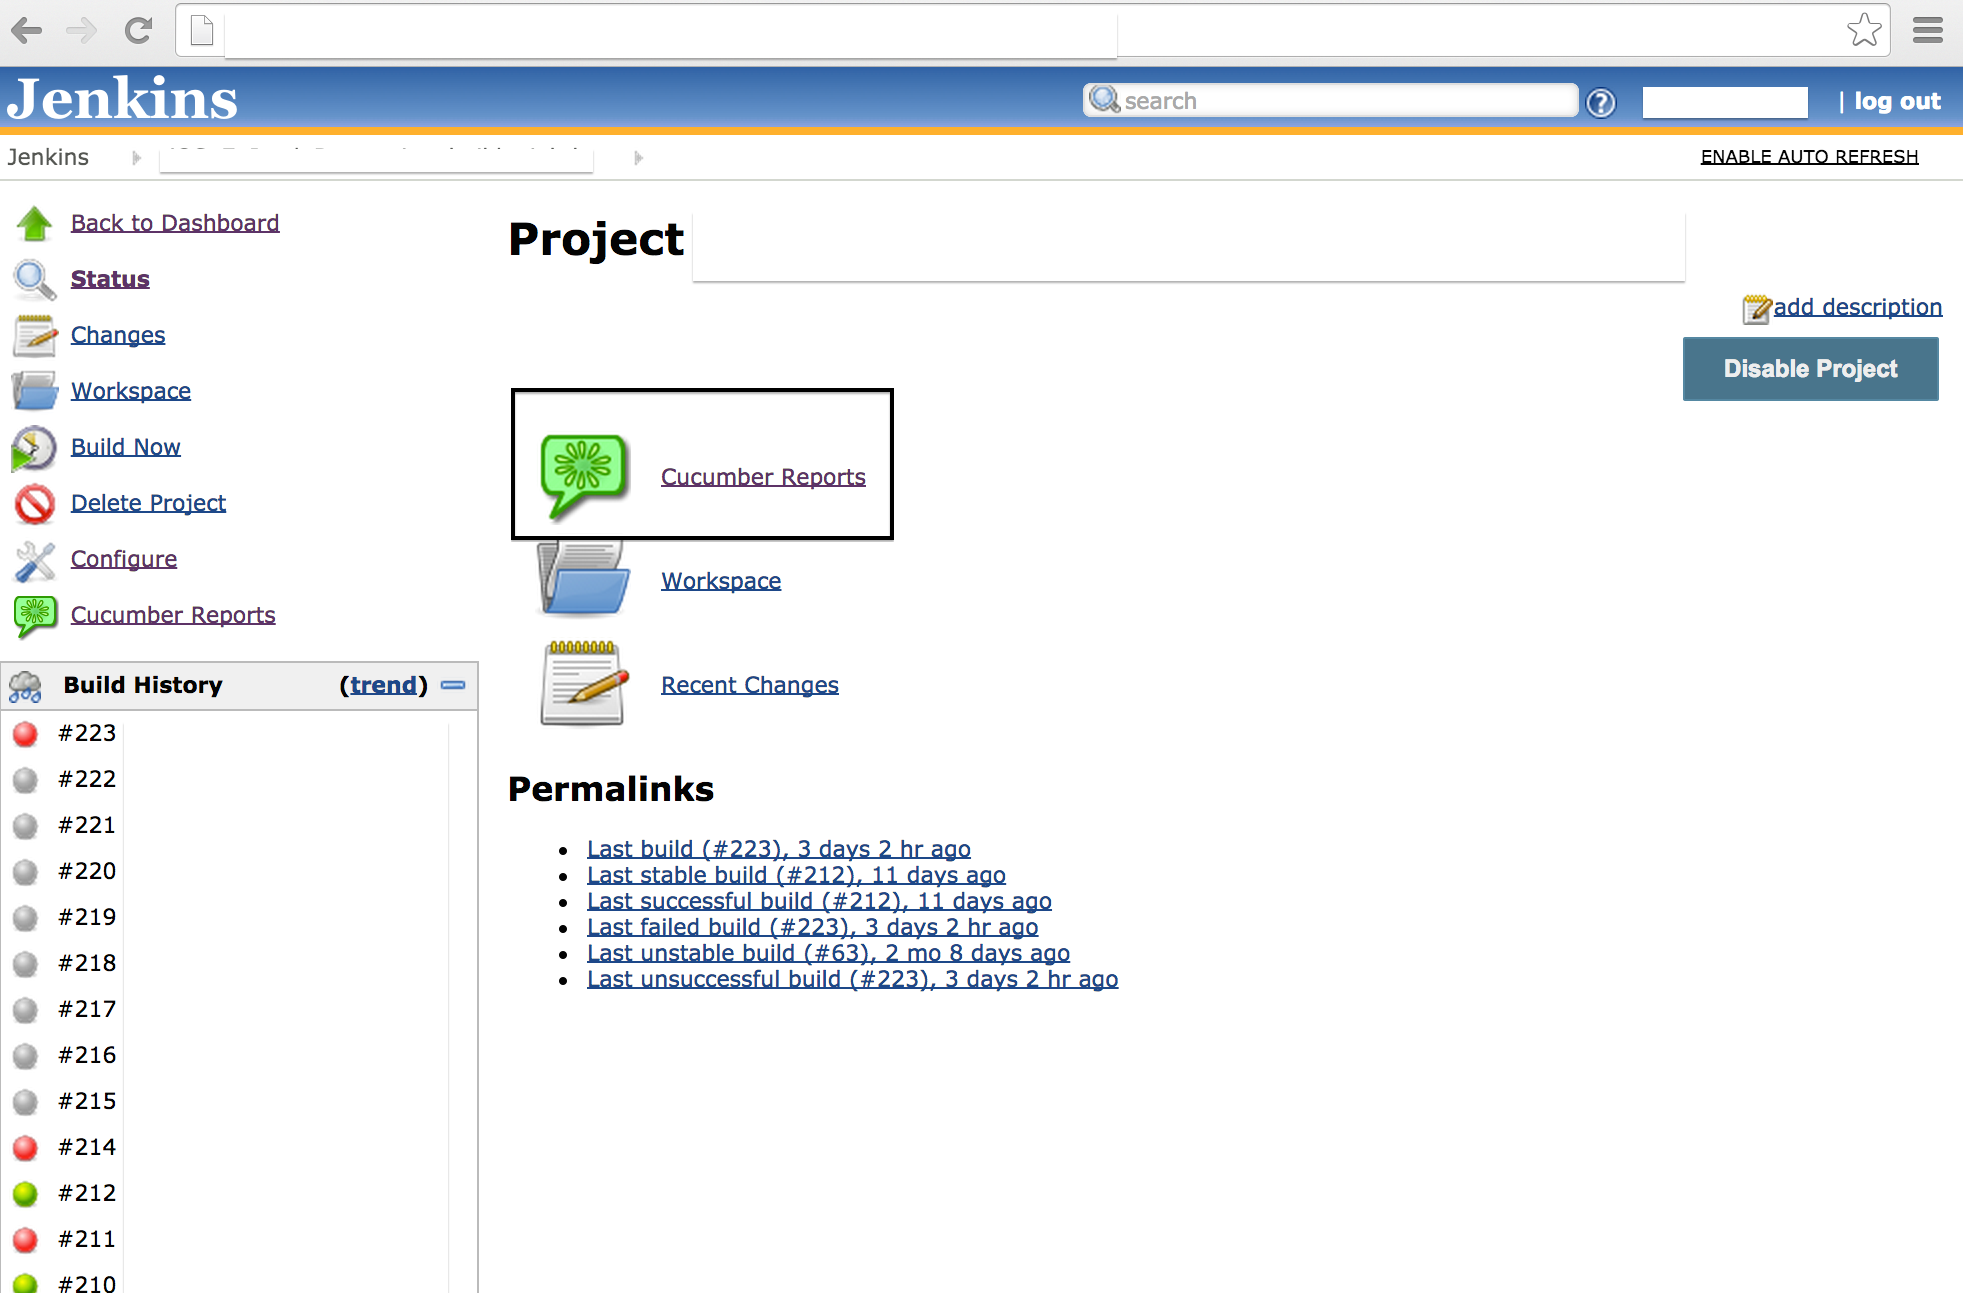
Eighth – After run the test, click on last build and on link Cucumber Reports.

page9

Ninth – You can see the report and how long is delaying each feature, how many scenarios of each feature failed and passed.

page10

If you have any question or suggestion just write below in the comments.

Thank you all !

Using tags in Scenarios of Cucumber/Calabash

Examples:

I run cucumber with various combinations of the following tags:
  –tags @this_one  (used as a short-term tag so that I can run only specific scenario(s))
  –tags ~@known_to_pass   (skip all scenarios that I know always pass, so that I can concentrate on tests that always or sometimes fail
  –tags ~@known_to_fail  (as above, also I can do a File Search/grep for “known_to_pass”/”known_to_fail” and update my boss on the state of the project/test cases
  –tags @BUG_XYZ (run/locate/count all scenarios related to a specific bug/issue)
  –tags @skip  (skip all scenarios that are known to fail and cause subsequent test cases to fail)
  –tags @ios –tags ~@android  (run only scenarios that apply to iPhone/iPad, but not to Android)
  –tags @wip (run scenarios in progress)
  –tags @debug (run scenarios that I want debug)
and you can create yours 🙂

7 Possible issues and fixes – Calabash android

  • 1. To get rid of warning about ansicolor (windows):

  • open cmd and navigate to the unzipped folder
  • Navigate to x64 (if you have a 64 bit machine) otherwise navigate to x86
  • Execute ‘ansicon.exe -i’ to install and add ansicon to your Windows
  • Run your cucumber test and you should
  • get the colored output result on Windows


  • 2. Warning about gem json ~>1.7.7 (Windows):

  • If the above, doesn’t fix it,
    • uninstall Ruby.
    • Install Ruby 1.9.x again
    • Make sure you also install the corresponding Devkit
    • gem install json -v 1.7.7
    • bundle update json


  • 3. Jarsigner: unable to sign jar

  • Rename the .apk file to .zip
  • Unpack the .zip file and remove the META-INF folder
  • Zip the folder again and rename it to .apk (zip -r <xxx.apk> *)
  • Sign the apk:
  • Copy your “Calabash” folder having “feature” file.


  • 4. No MD5 fingerprint found: (RuntimeError)

  • Paste it into your android workspace having gen, res, src folder. eg., ~/.android
  • Now, Test server will create inside your calabash folder.
  • Navigate to new path and again run apk file.


  • 5. If the AndroidManifest.xml is missing:

  • To create AndroidManifest.xml file:  where should this be?
  • calabash-android extract-manifest Downloads\mytest.apk


  • 6. If adb device not showing up in “adb devices”:

  • adb kill-server adb start-server adb devices


  • 7.Cannot load such file rspec/expectations:

  • Make sure you add the foll. line in your Gemfile
  • gem ‘rspec’

Using Excel Sheet as BD – Selenium – (Read)

Hello guys !

Today I will post about how to use Excel Sheet as a database with Selenium.

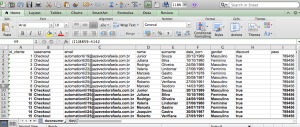
– First create your BD as this example:

Sheet 1 – Consumers
Untitled


Sheet 2 – Products: Now, you can create other sheets with information about the products or something that you want.

– Always save as .xls

– Create a class for open the Data base (Sheet) – remember download the lib jxl > Link with download of all versions

import java.io.File;
import java.io.IOException;
import jxl.Sheet;
import jxl.Workbook;
import jxl.WorkbookSettings;
import jxl.read.biff.BiffException;


public class OpenDataBase {


Sheet sheet;
Workbook bddatabase;

    public Sheet Open() throws BiffException, IOException, Exception {

WorkbookSettings ws = new WorkbookSettings();
ws.setEncoding("Cp1252");

//Change for the folder of the .xls
bddatabase = Workbook.getWorkbook(new File("BD//BDFile.xls"), ws);  

//Change the name of your sheet
sheet = bddatabase.getSheet("tbclient");
return sheet;
}

public void Close(Workbook bddatabase) throws BiffException, IOException, Exception {

    bddatabase.close();

    }
}


– Create a class to list all the informations inside of the sheet (table):

import org.openqa.selenium.WebDriver;
import java.io.IOException;
import jxl.Cell;
import jxl.read.biff.BiffException;
import org.openqa.selenium.By;


public void TestCase() throws BiffException, IOException, Exception {

// open Data base
opendatabase.Open();

// bring the cells from BD
for (int i = 1; i < opendatabase.sheet.getRows(); i++) {
Cell id_client = opendatabase.sheet.getCell(0, i);
Cell casenameBD = opendatabase.sheet.getCell(1, i);
Cell email = opendatabase.sheet.getCell(2, i);
Cell name = opendatabase.sheet.getCell(3, i);
Cell surname = opendatabase.sheet.getCell(4, i);
Cell date_born = opendatabase.sheet.getCell(5, i);
Cell gender = opendatabase.sheet.getCell(6, i);
Cell discount = opendatabase.sheet.getCell(7, i);
Cell pass = opendatabase.sheet.getCell(8, i);


driver.findElement(By.id("field")).sendKeys(id_client.getContents());
driver.findElement(By.id("field")).sendKeys(casenameBD.getContents());
driver.findElement(By.id("field")).sendKeys(email.getContents());
driver.findElement(By.id("field")).sendKeys(name.getContents());
driver.findElement(By.id("field")).sendKeys(surname.getContents());
driver.findElement(By.id("field")).sendKeys(date_born.getContents());
driver.findElement(By.id("field")).sendKeys(gender.getContents());
driver.findElement(By.id("field")).sendKeys(discount.getContents());
driver.findElement(By.id("field")).sendKeys(pass.getContents());

}

}


If you have any questions, just write below !

Thank you 🙂

Testing Ajax application with Selenium

Ajax, an acronym for Asynchronous JavaScript and XML, is a web development technique for creating interactive and more responsive web applications. The Ajax application works more like a desktop application, meaning that user’s request will not cause an entire page to reload every time, the web browser makes an asynchronous call to the web server to obtain the required data and update only specific parts of the current web page. As result the user gets more interactive, speedy, and usable web pages, but testing AJAX with Selenium will be challenging.

Selenium’s ‘assert’ and ‘verify’ commands might occasionally fail thanks to the asynchronous nature of the Ajax. It may happened that the result doesn’t come back from the server immediately and while ‘assert’ and ‘verify’ commands already trying to verify a new value immediately.

Not experienced testers would recommend to add a ‘pause’ command for a few seconds before the verification. The ‘pause’ suggestion may work in certain cases, because Ajax call may be not completed after pausing for a specific time due to slow machines or network. If the tester set the long pause time it will make the test unacceptably slow and drastically increase testing time.

In this type of tests you should use waitForCondition function in Selenium for Ajax testing. The waitForCondition command evaluates a JavaScript snippet repeatedly, until the snippet returns true. As soon as Selenium detects that the condition returns true, it will stop waiting and Ajax testing will resume.

It is important to note that the selenium in selenium.waitForCondition is a Java object in your test code and the selenium in selenium.browserbot is a javascript object running in the web browser.

Examples:

selenium.waitForCondition("selenium.browserbot.getCurrentWindow().loading == false", "20000");

> Condition

> Timeout miliseconds

If you are using AJAX you might find there is an AJAX object on your application. In it will be a activeRequestCount. When the AJAX.activeRequestCount goes to zero, all the AJAX calls are done. So you can wait for an AJAX call to complete with:

selenium.waitForCondition("selenium.browserbot.getCurrentWindow().AJAX.activeRequestCount == 0", "30000");

Thank you 🙂


Fonts: http://www.seleniumguide.com/p/testing-ajax-with-selenium.html

http://darrellgrainger.blogspot.co.uk/2010/03/selenium-rc-java-waitforcondition.html

How take a property inside an element in calabash-ios and calabash-android

Hello mate !


I am writing about “How take a property inside an element in calabash-ios”, look the examples:
 

IOS

– This query is taking the property :TextContent for the element in a web page.


 query("WebView css:'#testid'")[1]["textContent"]

 
– This query is taking the property :TextContent for the element.


 query("Label index:1",:textContent)
 

– Look when you want a sub-property:


[

[0] {

     "id" => "login_button",

     "enabled" => true,

     "contentDescription" => nil,

     "class" => "android.widget.Button",

     "text" => "Login",

     "rect" => {

     "center_y" => 545.0,

     "center_x" => 639.5,

     "height" => 64,

     "y" => 513,

     "width" => 195,

     "x" => 542

               },

     }

]

– This query is taking the property inside the group of properties.


 query("Label").first["rect"]["y"]


Android

– This query is taking the property :TextContent for the element in a web page.

 query("WebView css:'#testid'",:textContent)
 
– This query is taking the property :TextContent for the element.


 query("Label index:1",:textContent)
 

– Look when you want a sub-property:


 [

[0] {

     "id" => "login_button",

     "enabled" => true,

     "contentDescription" => nil,

     "class" => "android.widget.Button",

     "text" => "Login",

     "rect" => {

     "center_y" => 545.0,

     "center_x" => 639.5,

     "height" => 64,

     "y" => 513,

     "width" => 195,

     "x" => 542

               },

     }

]


– This query is taking the property inside the group of properties.


 query("Label index:1",:rect,:y)
 

If you need help or have some comment to do, please write below 🙂
 
Thank you !


Swipe and Drag – Calabash iOS and Android

Hi guys !!
I am writing examples of swipe and drag on mobile devices with calabash today. Some methods that you can use to test, these drags have the same action as the swipe. (If for some reason the swipe don’t work)
ANDROID:
  def swipe_page_to_left
    performAction('swipe', 'left')
  end

  def swipe_page_to_right
    performAction('swipe', 'right')
  end

  def scroll_to_right
    performAction('drag', 90, 0, 50, 50, 50)
  end

  def scroll_to_left
    performAction('drag', 0, 90, 50, 50, 50)
  end

def scroll_to_up
   performAction('drag', 88, 80, 90, 90, 5)
 end

 def scroll_to_down
    performAction('drag', 70, 10, 80, 0, 3)
 end

IOS
Change to down, left or right:

 swipe(:up)

If you have some question or suggest just write below !
Thank you 🙂